Sony DEV-50 Digital Recording Binoculars Handbook - Page 20
To adjust the focus manually, To switch the viewfinder display, between 2D and 3D
 |
View all Sony DEV-50 manuals
Add to My Manuals
Save this manual to your list of manuals |
Page 20 highlights
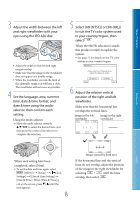
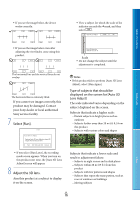
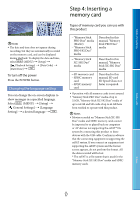
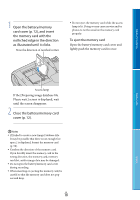
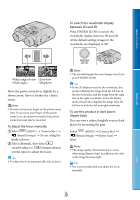
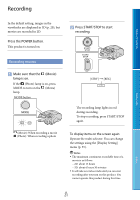
Table of Contents To switch the viewfinder display between 2D and 3D Press FINDER 2D/3D to switch the viewfinder display between 2D and 3D. At the default setting, images in the viewfinder are displayed in 3D. Menu Lists Wider range of view Close view (Wide angle) (Telephoto) Move the power zoom lever slightly for a slower zoom. Move it further for a faster zoom. Notes Be sure to keep your finger on the power zoom lever. If you move your finger off the power zoom lever, the operation sound of the power zoom lever may also be recorded. To adjust the focus manually Select (MENU) [Camera/Mic] [ Manual Settings] [Focus] using the multi-selector. Select [Manual], then select (nearby subject) / (distant subject) several times to adjust the focus. Tips To adjust the focus automatically, select [Auto]. Notes The recorded image does not change even if you press FINDER 2D/3D. Tips In the 3D display mode for the viewfinder, this product displays the image from the left lens in the left viewfinder, and the image from the right lens in the right viewfinder. In the 2D display mode, this product displays the image from the left lens in both the left and right viewfinder. To use this product in dark places (Hyper Gain) You can view a subject brightly even in dark places by increasing the gain. Select (MENU) [Camera/Mic] [ Manual Settings] [Hyper Gain] [On]. Notes The image quality deteriorates due to noise when using [Hyper Gain]. In addition, the color of the image becomes light. Tips It is recommended that you adjust the focus manually. GB 20 Index
-
 1
1 -
2
-
3
-
4
-
5
-
6
-
7
-
8
-
9
-
10
-
11
-
12
-
13
-
14
-
 15
15 -
 16
16 -
 17
17 -
 18
18 -
 19
19 -
 20
20 -
 21
21 -
 22
22 -
 23
23 -
 24
24 -
 25
25 -
26
-
27
-
28
-
29
-
30
-
31
-
32
-
33
-
34
-
35
-
36
-
37
-
38
-
39
-
40
-
41
-
42
-
43
-
44
-
45
-
46
-
47
-
48
-
49
-
50
-
51
-
52
-
53
-
54
-
55
-
56
-
57
-
58
-
59
-
60
-
61
-
62
-
63
-
64
-
65
-
66
-
67
-
68
-
69
-
70
-
71
-
72
-
73
-
74
-
75
-
76
-
77
-
78
-
79
-
80
-
81
-
82
-
83
-
84
-
85
-
86
-
87
-
88
-
89
-
90
 |
 |
