Sony DSC-RX10M2 Help Guide (Printable PDF)
Sony DSC-RX10M2 Manual
 |
View all Sony DSC-RX10M2 manuals
Add to My Manuals
Save this manual to your list of manuals |
Sony DSC-RX10M2 manual content summary:
- Sony DSC-RX10M2 | Help Guide (Printable PDF) - Page 1
Digital Still Camera DSC-RX10M2 How to Use Before Use Names of parts Checking the camera and the supplied items [1] Identifying parts the eyepiece cup Attaching the eyepiece cup [6] Adjusting the viewfinder Adjusting the viewfinder (diopter-adjustment) [7] In-Camera guide About the [In-Camera - Sony DSC-RX10M2 | Help Guide (Printable PDF) - Page 2
language, date and time Setting language, date and time [19] Confirming the operation method Confirming the operation method Using the control wheel [20] Using the manual ring [21] Using the control dial [22] Using MENU items [23] Using the Fn (Function) button [24] Using the "Quick Navi" [25 - Sony DSC-RX10M2 | Help Guide (Printable PDF) - Page 3
32] Program Auto [33] Sweep Panorama [34] Scene Selection [35] Shutter Priority [36] Aperture Priority [37] Manual Exposure [38] BULB [39] Memory recall [40] Movie [41] Shooting super-slow-motion movies (HFR Settings) [42] Using shooting functions Using the zoom Zoom [43] The zoom features available - Sony DSC-RX10M2 | Help Guide (Printable PDF) - Page 4
[62] Adjusting the focus Changing the focus method using the focus mode dial [63] Focus Area [64] Center Lock-on AF [65] Focus-lock [66] Manual Focus [67] Direct manual focus (DMF) [68] MF Assist (still image) [69] Focus Magnifier [70] Focus Magnif. Time [71] - Sony DSC-RX10M2 | Help Guide (Printable PDF) - Page 5
] Exposure compensation dial [80] Metering Mode [81] AE lock [82] AEL w/ shutter (still image) [83] Exp.comp.set [84] Zebra [85] Exposure Set. Guide [86] Reset EV Comp. [87] Selecting a drive mode (Continuous shooting/Self-timer) Drive Mode [88] Cont. Shooting [89] Spd Priority Cont. [90] Self-timer - Sony DSC-RX10M2 | Help Guide (Printable PDF) - Page 6
ISO [99] ISO AUTO Min. SS [100] Multi Frame NR [101] Correcting the brightness or contrast D-Range Opt. (DRO) [102] Auto HDR [103] Adjusting color tones White Balance [104] Capturing a basic white color in [Custom Setup] mode [105] Selecting an effect mode Picture Effect [106] Creative Style [107] - Sony DSC-RX10M2 | Help Guide (Printable PDF) - Page 7
Audio Out Timing [122] Wind Noise Reduct. [123] Auto Slow Shut. (movie) [124] MOVIE Button [125] Picture Profile [126] High Frame Rate [127] Customizing the shooting functions for convenient use Memory [128] Function Menu Set. [ - Sony DSC-RX10M2 | Help Guide (Printable PDF) - Page 8
Grid Line [150] Auto Review [151] Live View Display [152] Bright Monitoring [153] FINDER/MONITOR [154] Release Deleting multiple selected images [165] Playing back movies Playing back movies [166] Motion Shot Video [167] Viewing panoramic images Playing back panoramic images [168] Printing Specify - Sony DSC-RX10M2 | Help Guide (Printable PDF) - Page 9
177] Viewfinder Bright. [178] Finder Color Temp. [179] Volume Settings [180] Audio signals [181] Upload Settings(Eye-Fi) [182] Tile Menu [183] Mode Dial Guide [184] Delete confirm. [185] Display Quality [186] Pwr Save Start Time [187] NTSC/PAL Selector [188] Demo Mode [189] TC/UB Settings [190] HDMI - Sony DSC-RX10M2 | Help Guide (Printable PDF) - Page 10
HDMI Info. Display [194] TC Output (movie) [195] REC Control (movie) [196] 4K Output Sel. (movie) [197] USB Connection [198] USB LUN Setting [199] USB Power Supply [200] Language [201] Date/Time Setup [202] Area Setting [203] Copyright - Sony DSC-RX10M2 | Help Guide (Printable PDF) - Page 11
Adding applications to the product PlayMemories Camera Apps PlayMemories Camera Apps [232] Recommended computer environment [233] Installing the applications Opening a service account [234] Downloading applications [235] Downloading applications directly to the product using the Wi-Fi function [236] - Sony DSC-RX10M2 | Help Guide (Printable PDF) - Page 12
PlayMemories Home [243] Software for Mac computers [244] Image Data Converter [245] Installing Image Data Converter [246] Accessing Image Data Converter Guide [247] Remote Camera Control [248] Installing Remote Camera Control [249] Accessing the Help of Remote Camera Control [250] Connecting this - Sony DSC-RX10M2 | Help Guide (Printable PDF) - Page 13
Selecting a disc to be created [254] Creating Blu-ray Discs from high-definition image quality movies [255] Creating DVD discs (AVCHD recording discs) from high-definition image quality movies [256] Creating DVD discs from standard image quality movies [257] Precautions/This product Precautions - Sony DSC-RX10M2 | Help Guide (Printable PDF) - Page 14
Trademarks Trademarks [271] Troubleshooting If you have problems If you have problems Troubleshooting [272] Troubleshooting Battery pack and power You cannot insert the battery pack into the product. [273] You cannot turn on the product. [274] The power turns off - Sony DSC-RX10M2 | Help Guide (Printable PDF) - Page 15
The flash does not work. [287] Fuzzy white circular spots appear on images shot using the flash. [288] The close-up shoot function (Macro) does not work. [289] The recording date and time are not displayed on the screen. [ - Sony DSC-RX10M2 | Help Guide (Printable PDF) - Page 16
[WPS Push] does not work. [315] [Send to Computer] is canceled halfway. [316] You cannot send movies to a smartphone. [317] [Smart Remote Embedded] or [Send to Smartphone] is canceled halfway. [318] The shooting screen for [Smart Remote Embedded] is not displayed smoothly./The connection between - Sony DSC-RX10M2 | Help Guide (Printable PDF) - Page 17
The product does not work properly. [336] A sound is produced when the product is shaken. [337] "--E-" appears on the screen. [338] Messages Messages Self-diagnosis display [339] Warning messages [340] Situations this product has difficulty handling Situations this product has difficulty handling - Sony DSC-RX10M2 | Help Guide (Printable PDF) - Page 18
appropriate one that matches your country/region. Shoulder strap (1) Lens cap (1) Lens hood (1) Shoe cap (1) (Attached on the camera) Eyepiece cup (1) (Attached on the camera) Instruction Manual (1) Wi-Fi Connection/One-touch (NFC) Guide (1) [2] How to Use Before Use Names of parts Identifying parts - Sony DSC-RX10M2 | Help Guide (Printable PDF) - Page 19
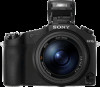
Shutter button 3. For shooting: W/T (zoom) lever For viewing: (Index) lever/Playback zoom lever 4. Self-timer lamp/AF Illuminator 5. Aperture index 6. Lens 7. Manual ring 8. Exposure compensation dial 9. Flash 10. Multi interface shoe* 11. Mode dial 12. Hook for shoulder strap 13. Focus mode dial 14 - Sony DSC-RX10M2 | Help Guide (Printable PDF) - Page 20
microphone is a plug-inpower type, the power of the microphone is supplied by this product. 4. (Headphones) jack 5. Multi/Micro USB Terminal* Supports Micro USB compatible device. 6. HDMI micro jack 7. Charge lamp 8. Eye sensor 9. Monitor You can adjust the monitor to an easily viewable angle - Sony DSC-RX10M2 | Help Guide (Printable PDF) - Page 21
a smartphone equipped with the NFC function. For details on the location of the (N mark) on your Smartphone, refer to the operating instructions of the Smartphone. NFC (Near Field Communication) is an international standard of the short-range wireless communication technology. 4. Battery lock lever - Sony DSC-RX10M2 | Help Guide (Printable PDF) - Page 22
*For details on compatible accessories for the multi interface shoe and the Multi/Micro USB Terminal, visit the Sony web site, or consult your Sony dealer or local authorized Sony service facility. You can also use accessories that are compatible with the accessory shoe. Operations with other - Sony DSC-RX10M2 | Help Guide (Printable PDF) - Page 23
P/A/S/M/Sweep Panorama mode For playback Basic information display Histogram display - Sony DSC-RX10M2 | Help Guide (Printable PDF) - Page 24
1. P P* A S M Shoot Mode Memory recall NO CARD Memory card/Upload Scene Recognition icons Scene Selection 100 Remaining number of recordable images Aspect ratio of still images 20M / 18M / 17M / 13M / 10M / 7.5M / 6.5M / 5.0M / 4.2M / 3.7M / VGA Image size of still images Image quality of - Sony DSC-RX10M2 | Help Guide (Printable PDF) - Page 25
SteadyShot Off/On, Camera shake warning Airplane Mode Overlay icon No audio recording of movies Wind Noise Reduct. Setting Effect OFF ×2.0 Smart teleconverter Database file full/Database file error Overheating warning Smart Zoom/ Clear Image Zoom/Digital Zoom Spot metering area C:32:00 Self- - Sony DSC-RX10M2 | Help Guide (Printable PDF) - Page 26
Protect DPOF DPOF set Auto object framing image Dual Video REC PC Remote Bright Monitoring Copyright information writing on 240fps 250fps 480fps 500fps 960fps 1000fps Frame rate for HFR shooting Recording timing Writing data CAPTURE Capturing still image Unable to shoot Still images Auto Dual Rec 2. - Sony DSC-RX10M2 | Help Guide (Printable PDF) - Page 27
DRO/Auto HDR ND Filter Creative Style/Contrast, Saturation, Sharpness +3 +3 +3 Smile/Face Detect. Picture Effect Smile detection sensitivity indicator ― Picture Profile 3. Lock-on AF Guide display for Lock-on AF Bracket indicator STBY Movie recording standby REC 0:12 Recording time of the movie - Sony DSC-RX10M2 | Help Guide (Printable PDF) - Page 28
Control wheel function Control dial function Focus 1/250 Shutter speed F3.5 Aperture Value ±0.0 Metered Manual ±0.0 Exposure compensation ISO400 ISO sensitivity AE lock Shutter speed indicator Aperture indicator Histogram Picture Effect error Auto HDR image warning 2015-1-1 10:37AM Date of - Sony DSC-RX10M2 | Help Guide (Printable PDF) - Page 29
REC Control 00:00:00:00 Time code (hour:minute:second:frame) 00 00 00 00 User Bit Shooting Standby Shooting Setting Guide display for HFR shooting [4] How to Use Before Use Icons and indicators Display panel You can set the shutter speed and aperture, exposure compensation, flash - Sony DSC-RX10M2 | Help Guide (Printable PDF) - Page 30
White Balance Drive Mode Remaining battery Number of recordable images* ND Filter *Even if the number of recordable images is higher than 9,999 images, "9999" will appear on the display panel. To turn on the display panel backlight Press the illumination button (A) on top of the camera. If you press - Sony DSC-RX10M2 | Help Guide (Printable PDF) - Page 31
[5] How to Use Before Use Using the strap Using the shoulder strap Attach the shoulder strap to prevent damage caused by dropping the product. 1. Attach both ends of the strap. [6] How to Use Before Use Attaching the eyepiece cup Attaching the eyepiece cup - Sony DSC-RX10M2 | Help Guide (Printable PDF) - Page 32
the diopter-adjustment dial, remove the eyepiece cup and then adjust the dial. 1. Turn the diopter-adjustment dial. [8] How to Use Before Use In-Camera guide About the [In-Camera - Sony DSC-RX10M2 | Help Guide (Printable PDF) - Page 33
of the control wheel after selecting an item shown in gray, the reason the item cannot be set is displayed. Note Assign the [In-Camera Guide] function to a button in advance using the [Custom Key Settings]. [9] How to Use Preparing the camera Charging the battery pack Inserting the battery pack into - Sony DSC-RX10M2 | Help Guide (Printable PDF) - Page 34
3. Close the cover. [10] How to Use Preparing the camera Charging the battery pack Charging the battery pack while it is inserted in the camera When using the camera for the first time, be sure to charge the battery pack. The charged battery pack will discharge little by little, even if you do not - Sony DSC-RX10M2 | Help Guide (Printable PDF) - Page 35
For customers in countries/regions other than the U.S.A. and Canada Charge lamp Lit: Charging Off: Charging finished Flashing: Charging error or charging paused temporarily because the camera is not within the proper temperature range If the charge lamp lights up once and then immediately turns off, - Sony DSC-RX10M2 | Help Guide (Printable PDF) - Page 36
in battery performance. When charging is finished, disconnect the AC Adaptor from the wall outlet (wall socket). Be sure to use only genuine Sony brand battery packs, micro USB cables (supplied) and AC Adaptors (supplied). [11] How to Use Preparing the camera Charging the battery pack Charging - Sony DSC-RX10M2 | Help Guide (Printable PDF) - Page 37
that can be recorded is for shooting under the following conditions: The battery pack is used at an ambient temperature of 25°C (77°F). Using Sony Memory Stick PRO Duo (Mark2) media (sold separately) [Display Quality]: [Standard] The number for "Shooting (still images)" is based on the CIPA standard - Sony DSC-RX10M2 | Help Guide (Printable PDF) - Page 38
The image quality is set to 60i 17M (FH) . Actual shooting (movies): Battery life based on repeated shooting, zooming, shooting stand-by, turning on/off, etc. Continuous movie shooting: Battery life based on non-stop shooting until the limit (29 minutes) has been reached, and then continued by - Sony DSC-RX10M2 | Help Guide (Printable PDF) - Page 39
[14] How to Use Preparing the camera Charging the battery pack Removing the battery pack How to remove the battery pack 1. Make sure that the access lamp is not lit, and turn off the camera. 2. Slide lock lever (A) and remove the battery pack. Be careful not to drop the battery pack. [15] How to Use - Sony DSC-RX10M2 | Help Guide (Printable PDF) - Page 40
Ensure that the notched corner is facing in the correct direction. With the notched corner facing in the direction illustrated, insert the memory card until it clicks into place. 3. Close the memory card cover. Hint When you use a memory card with this product for the first time, it is recommended - Sony DSC-RX10M2 | Help Guide (Printable PDF) - Page 41
PRO Duo (Mark2) Memory Stick PRO-HG Duo Memory Stick Micro (M2) (Mark2) *Memory Stick media with a capacity of up to 32 GB have been tested and proven to operate with this camera. - Sony DSC-RX10M2 | Help Guide (Printable PDF) - Page 42
memory card SDXC memory card microSD memory card / microSDHC memory card microSDXC memory card *SD cards with a capacity of up to 128 GB have been tested and proven to operate with this camera. Memory cards that can be used for movie recording When shooting movies in XAVC S format SDXC memory card - Sony DSC-RX10M2 | Help Guide (Printable PDF) - Page 43
attached properly, the lens hood index (red line) matches the red index mark on the hood. (There may be no lens hood index on some lenses.) Remove the lens hood when using the flash. Otherwise, the lens hood blocks the flash light and may appear as a shadow on the image. To - Sony DSC-RX10M2 | Help Guide (Printable PDF) - Page 44
2. Select your language, and then press . 3. Check that [Enter] is selected on the screen, then press on the control wheel. 4. Select your desired geographic location, and then press . 5. Select a setting item using the up/down side of the control wheel or by turning the control wheel, then press in - Sony DSC-RX10M2 | Help Guide (Printable PDF) - Page 45
wheel or by turning the control wheel. [21] How to Use Confirming the operation method Confirming the operation method Using the manual ring By turning the manual ring (A), you can change the desired settings instantly for various shooting modes. Icons and function names are displayed on the screen - Sony DSC-RX10M2 | Help Guide (Printable PDF) - Page 46
Icons and function names are displayed on the screen as follows. Ex. : Tv: shutter speed [23] How to Use Confirming the operation method Confirming the operation method Using MENU items In this section, you learn how to change settings related to all camera operations and execute camera functions - Sony DSC-RX10M2 | Help Guide (Printable PDF) - Page 47
3. Select the desired setting item by pressing the up/down/left/right side on the control wheel or by turning the control wheel, and then press on the center of the control wheel. Select an icon at the top of the screen and press the left/right side of the control wheel to move to another MENU item. - Sony DSC-RX10M2 | Help Guide (Printable PDF) - Page 48
the desired function in step 2, then press on the center of the control wheel. The dedicated setting screen for the function appears. Follow the operating guide (A) to perform the settings. - Sony DSC-RX10M2 | Help Guide (Printable PDF) - Page 49
[25] How to Use Confirming the operation method Confirming the operation method Using the "Quick Navi" You can change the settings directly using the Quick Navi screen when using the viewfinder. The displayed contents and their position are just a guideline, and may differ from the actual display. - Sony DSC-RX10M2 | Help Guide (Printable PDF) - Page 50
function in step 4, then press on the center of the control wheel. The dedicated setting screen for the function appears. Follow the operating guide (A) to perform the settings. Note Gray items on the Quick Navi screen are not available. When using [Creative Style] or [Picture Profile], some - Sony DSC-RX10M2 | Help Guide (Printable PDF) - Page 51
Image is in the focus. The focused position will change to suit the motion of the subject. lights: The focusing is in progress. Hint When the product focus indicator flashes and the beep does not sound. Either recompose the shot or change the focus setting. Focusing may be difficult in the following - Sony DSC-RX10M2 | Help Guide (Printable PDF) - Page 52
The subject is seen through glass. The subject is moving quickly. There is reflective light or shiny surfaces. There is a flashing light. The subject is backlit. [27] How to Use Shooting Shooting still images/movies Shooting movies You can record movies by pressing the MOVIE (Movie) button. 1. Press - Sony DSC-RX10M2 | Help Guide (Printable PDF) - Page 53
and shoot when you want to blur the background, etc. (Shutter Priority): Allows you to shoot fast-moving subjects etc., by manually adjusting the shutter speed. (Manual Exposure): Allows you to shoot still images with the desired exposure by adjusting the exposure (both the shutter speed and the - Sony DSC-RX10M2 | Help Guide (Printable PDF) - Page 54
Allows you to shoot slow motion movies. Select a frame rate higher than the playback frame rate to shoot smooth slow motion movies. (Sweep Panorama → (Camera Settings) → [Auto Mode] → [Intelligent Auto]. When [Mode Dial Guide] is set to [On], you can select the desired settings after you have changed - Sony DSC-RX10M2 | Help Guide (Printable PDF) - Page 55
quality images than in Intelligent Auto mode. 1. Set the mode dial to (Auto Mode). 2. MENU → (Camera Settings) → [Auto Mode] → [Superior Auto]. When [Mode Dial Guide] is set to [On], you can select the desired settings after you have changed the position of the mode dial. 3. Point the camera to - Sony DSC-RX10M2 | Help Guide (Printable PDF) - Page 56
the shooting conditions and shoot the image. Scene Recognition: When the product recognizes certain scenes, the following icons and guides are displayed on the first line: (Portrait) (Infant) (Night Portrait) (Night Scene) (Backlight Portrait) (Backlight) (Landscape) (Macro) (Spotlight) (Low - Sony DSC-RX10M2 | Help Guide (Printable PDF) - Page 57
the camera. Hint In [Superior Auto] mode and when the (overlay icon) is displayed, be sure not to move the camera before the multiple shots are recorded. In [Program Auto] mode, you can change the combination of shutter speed and aperture value while maintaining the correct exposure by turning the - Sony DSC-RX10M2 | Help Guide (Printable PDF) - Page 58
Sweep Panorama Allows you to create a single panoramic image from multiple images shot while panning the camera. 1. Set the mode dial to (Sweep Panorama This part will not be shot. 4. Press the shutter button fully down. 5. Pan the camera to the end of the guide in the direction of the arrow on - Sony DSC-RX10M2 | Help Guide (Printable PDF) - Page 59
Wide] is selected for [Panorama: Size], the entire angle of the panoramic shot may not be achieved within the given time. If this happens, try interrupted in the following situations. When the camera is panned too fast or too slow. The subject is too blurry. Hint You can turn the control dial on - Sony DSC-RX10M2 | Help Guide (Printable PDF) - Page 60
settings according to the scene. 1. Set the mode dial to SCN (Scene Selection). 2. Turn the control dial to select the desired setting. When [Mode Dial Guide] is set to [On], you can select the desired settings after you have changed the position of the mode dial. Menu item details Portrait: Blurs - Sony DSC-RX10M2 | Help Guide (Printable PDF) - Page 61
scenes with less noise and blur without using a tripod. A burst of shots are taken, and image processing is applied to reduce subject blur, camera- : Shoots night scene portraits using the flash. Anti Motion Blur: Allows you to shoot indoor shots without using the flash and reduces subject blur. The - Sony DSC-RX10M2 | Help Guide (Printable PDF) - Page 62
the sky, a beach, or a lawn. Subjects with constant change such as waves or water falls. In the case of [Hand-held Twilight] or [Anti Motion Blur], block noise may occur when using a light source that flickers, such as fluorescent lighting. The minimum distance that you can come close to a subject - Sony DSC-RX10M2 | Help Guide (Printable PDF) - Page 63
is recommended. Use a tripod to prevent blurring when you use a slow shutter speed. The SteadyShot warning indicator does not appear in shutter speed brightness of the image on the monitor may differ from the actual image being shot. Hint When a faster shutter speed is used, moving subjects, such as - Sony DSC-RX10M2 | Help Guide (Printable PDF) - Page 64
Selecting a shooting mode Manual Exposure You can shoot dial to M (Manual Exposure). 2. Select use MM (Metered Manual) to check the exposure The Metered Manual indicator does not appear Manual, the Metered Manual indicator flashes. The SteadyShot warning indicator does not appear in manual - Sony DSC-RX10M2 | Help Guide (Printable PDF) - Page 65
trails of light, such as fireworks. 1. Set the mode dial to M (Manual Exposure). 2. Turn the control dial clockwise until [BULB] is indicated. 3. is pressed, the shutter remains open. Note Since the shutter speed becomes slow and the camera-shake tends to occur more easily, it is recommended that - Sony DSC-RX10M2 | Help Guide (Printable PDF) - Page 66
Images shot in [BULB] mode tend to be blurry. We recommend that you use a tripod Set the mode dial to (Movie). 2. MENU → (Camera Settings) → [Movie] → desired setting. When [Mode Dial Guide] is set to [On], you can select the desired settings after you have changed the position of the mode dial. 3. - Sony DSC-RX10M2 | Help Guide (Printable PDF) - Page 67
adjusting the aperture value manually. Shutter Priority: Allows you to shoot after adjusting the shutter speed manually. Manual Exposure: Allows you higher frame rate than the recording format, you can record a smooth super-slow-motion movie. 1. Set the mode dial to (High Frame Rate). The HFR - Sony DSC-RX10M2 | Help Guide (Printable PDF) - Page 68
setting screen. 4. Press the MOVIE (Movie) button. The camera will automatically start recording as soon as you finish shooting. Menu item details Record Setting: Selects the frame rate of the movie from [60p 50M]/[50p 50M], [30p 50M]/[25p 50M], and [24p 50M*]. * Only when [NTSC/PAL Selector] is set - Sony DSC-RX10M2 | Help Guide (Printable PDF) - Page 69
When [ REC Timing] is set to [Start Trigger] and you press the MOVIE button again during shooting, the camera will end shooting and start recording. To redo shooting You can cancel recording by selecting [Cancel] on the screen. However, the movie recorded up to the point you cancelled will be - Sony DSC-RX10M2 | Help Guide (Printable PDF) - Page 70
the next shooting. You cannot adjust the exposure, focus settings including manual focus, or zoom scale after the screen has switched to HFR shooting Focus Mode] function is set to [Single-shot AF] or [Continuous AF], you can zoom images by rotating the manual ring. [44] How to Use Using shooting - Sony DSC-RX10M2 | Help Guide (Printable PDF) - Page 71
The zoom feature of the product provides a higher magnification zoom by combining various zoom features. The icon displayed on the screen changes, according to the selected zoom feature. 1. Optical zoom range Images are magnified within the optical zoom range of this product. 2. Smart Zoom range ( - Sony DSC-RX10M2 | Help Guide (Printable PDF) - Page 72
You can select the zoom setting of the product. 1. MENU → (Custom Settings) → [Zoom Setting] → desired setting. Menu item details Optical zoom only: Optical zoom is activated. You can use the Smart Zoom function if you set [ Image Size] to [M], [S] or [VGA]. On:ClearImage Zoom: Even if the zoom - Sony DSC-RX10M2 | Help Guide (Printable PDF) - Page 73
you press the key. [49] How to Use Using shooting functions Using the zoom Zoom Func. on Ring Sets the zoom functions when using the manual ring to change zoom scales. The settings - Sony DSC-RX10M2 | Help Guide (Printable PDF) - Page 74
you operate the zoom by turning the manual ring. Quick: Zooms in/out to an angle of view corresponding to how far the manual ring has been rotated. Step: out at certain angle steps when you operate the zoom by turning the manual ring. Note In the following situations, the zoom function activates as - Sony DSC-RX10M2 | Help Guide (Printable PDF) - Page 75
2. Press the shutter button fully down. When you do not use the flash When not using the flash, press it back into the camera body. Note If you fire the flash before the flash unit pops up entirely, it may cause malfunction. You cannot use the flash when recording movies. While charging the flash, - Sony DSC-RX10M2 | Help Guide (Printable PDF) - Page 76
: The flash works in dark environments or when shooting towards bright light. Fill-flash: The flash works every time you trigger the shutter. Slow Sync.: The flash works every time you trigger the shutter. Slow sync shooting allows you to shoot a clear image of both the subject and the background by - Sony DSC-RX10M2 | Help Guide (Printable PDF) - Page 77
separately) to the product, and shoot with a wireless flash (sold separately), placed away from the product. Note The default setting depends on the shooting mode. Available flash mode depends on the shooting mode. The [Wireless] setting cannot be used with the camera's internal flash. [53] How to - Sony DSC-RX10M2 | Help Guide (Printable PDF) - Page 78
Each time you press the DISP button, the recording information display changes. Graphic Display Display All Info. No Disp. Info. Histogram Level - Sony DSC-RX10M2 | Help Guide (Printable PDF) - Page 79
For viewfinder* *[For viewfinder] is displayed only on the screen. Some display modes are not available in the default settings. To change the display modes, press MENU → (Custom Settings) → [DISP Button] and change the setting. Note Histogram is not displayed during panorama shooting. In movie mode - Sony DSC-RX10M2 | Help Guide (Printable PDF) - Page 80
Display All Info.: Shows recording information. No Disp. Info.: Does not show recording information. Histogram: Displays the luminance distribution graphically. Level: Indicates whether the product is level in both the horizontal and front-back directions. When the product is level in both - Sony DSC-RX10M2 | Help Guide (Printable PDF) - Page 81
Disp. Switch] has been assigned. Each time you press the key, the monitor display will switch from the movie recording time counter → time code (TC) → user bit (UB), in that order. Note When the monitor is tilted while in shooting mode, such as during self-portrait shooting, TC/UB information is - Sony DSC-RX10M2 | Help Guide (Printable PDF) - Page 82
Image size when [ L: 18M 4864×3648 pixels M: 10M 3648×2736 pixels S: 5.0M 2592×1944 pixels VGA 640×480 pixels Image size when [ L: 17M 5472×3080 pixels M: 7.5M 3648×2056 pixels S: 4.2M 2720×1528 pixels Image size when [ L: 13M 3648×3648 pixels M: 6.5M 2544×2544 pixels S: 3.7M 1920×1920 pixels - Sony DSC-RX10M2 | Help Guide (Printable PDF) - Page 83
Suitable for standard prints. 4:3: For shooting in a size suitable for viewing on a computer. 16:9: For viewing on a high-definition TV. 1:1: For shooting in composition as a medium format camera. [60] How to Use Using shooting functions Selecting still image size/image quality Quality (still image) - Sony DSC-RX10M2 | Help Guide (Printable PDF) - Page 84
[Standard] is higher than that of [Fine], the file size of [Standard] is smaller than that of [Fine]. This will allow more files to be recorded on 1 memory card, but the image quality will be lower. About RAW images To open a RAW image file recorded with this camera, the software Image Data - Sony DSC-RX10M2 | Help Guide (Printable PDF) - Page 85
dial (A) to select the desired focus method. Focus mode details S (Single-shot AF): The camera focuses and the focus is locked when you press the subject is in motion. DMF (DMF): After focusing automatically, make fine focus adjustment manually (Direct Manual Focus). MF (Manual Focus): Adjusts - Sony DSC-RX10M2 | Help Guide (Printable PDF) - Page 86
Note If the subject is too close, the image may show any dust or fingerprints on the lens. Wipe the lens with a soft cloth, etc. Once you change the focus method, the set focus distance is erased. When [Focus Mode] is set to [Continuous AF], the beep does not sound when focus is achieved. Hint If - Sony DSC-RX10M2 | Help Guide (Printable PDF) - Page 87
control wheel. You can move the tracking start area to a desired point by designating the area to be the flexible spot or expand flexible spot. Note When the mode dial is set to (Movie) or when shooting movies, you cannot select [Lock-on AF] for [Focus Area]. When the mode dial is set to (Movie) and - Sony DSC-RX10M2 | Help Guide (Printable PDF) - Page 88
Selection] is set to [Hand-held Twilight] or [Anti Motion Blur] When shooting in Manual Focus mode When using the digital zoom When the shooting mode is the shot. 4. Press the shutter button down fully to take the picture. [67] How to Use Using shooting functions Adjusting the focus Manual Focus - Sony DSC-RX10M2 | Help Guide (Printable PDF) - Page 89
. If you re-select the [Focus Mode], any focus distance that you set manually will be canceled. [68] How to Use Using shooting functions Adjusting the focus Direct manual focus (DMF) You can make fine adjustments manually after the focus is locked. You can quickly focus on a subject rather than - Sony DSC-RX10M2 | Help Guide (Printable PDF) - Page 90
MF Assist (still image) Enlarges the image on the screen automatically to make manual focusing easier. This works in Manual Focus or Direct Manual Focus shooting. 1. MENU → (Custom Settings) → [ MF Assist] → [On]. 2. Turn the manual ring to adjust the focus. The image is enlarged. You can magnify - Sony DSC-RX10M2 | Help Guide (Printable PDF) - Page 91
the normal shooting display by pressing three times. 3. Confirm the focus. 4. Press the shutter button fully down to shoot the image. Hint When focusing manually, you can adjust the focus while an image is magnified. The [Focus Magnifier] function will be released when the shutter button is pressed - Sony DSC-RX10M2 | Help Guide (Printable PDF) - Page 92
72] How to Use Using shooting functions Adjusting the focus Peaking Level Enhances the outline of in-focus ranges using a specific color in Manual Focus or Direct Manual Focus shooting. This function allows you to confirm the focus easily. The setting applies to both still images and movies. 1. MENU - Sony DSC-RX10M2 | Help Guide (Printable PDF) - Page 93
. [75] How to Use Using shooting functions Adjusting the focus AF/MF control You can easily switch the focusing mode from auto to manual and vice versa while shooting without changing your holding position. The setting applies to both still images and movies. 1. MENU → (Custom Settings) → [Custom - Sony DSC-RX10M2 | Help Guide (Printable PDF) - Page 94
AF/MF Ctrl Toggle: Switches the focusing mode until the button is pressed again. Note You cannot set the [AF/MF Control Hold] function to [Left Button], [Right Button] or [Down Button]. [76] How to Use Using shooting functions Adjusting the focus AF Illuminator (still image) The AF illuminator - Sony DSC-RX10M2 | Help Guide (Printable PDF) - Page 95
is displayed over the eyes. If the focus mode is set to [Single-shot AF], the frame will disappear after a period of time. Note Depending on , you cannot use [Eye AF], such as when [Focus Mode] is set to [Manual Focus], etc. [Eye AF] may not function in the following situations: When the person - Sony DSC-RX10M2 | Help Guide (Printable PDF) - Page 96
compensation dial to "0" from a setting other than "0," the exposure value switches to "0" even if the exposure has been set to other settings. When you use [Manual Exposure], you can compensate for the exposure only when [ISO] is set to [ISO AUTO]. - Sony DSC-RX10M2 | Help Guide (Printable PDF) - Page 97
a subject in extremely bright or dark conditions, or when you use the flash, you may not be able to get a satisfactory effect. When you use [Manual Exposure], you can compensate for the exposure only when [ISO] is set to [ISO AUTO]. [81] How to Use Using shooting functions Adjusting the exposure - Sony DSC-RX10M2 | Help Guide (Printable PDF) - Page 98
) lights up. 3. Keep pressing the AEL button and focus on the subject again, then shoot the picture. Keep holding the AEL button down while taking a shot if you want to continue shooting with the fixed exposure. Release the button to reset the exposure. - Sony DSC-RX10M2 | Help Guide (Printable PDF) - Page 99
details Auto: Fixes the exposure after adjusting the focus automatically when you press the shutter button halfway down when [Focus Mode] is set to [Single-shot AF]. On: Fixes the exposure when you press the shutter button halfway down. Off: Does not fix the exposure when you press the shutter - Sony DSC-RX10M2 | Help Guide (Printable PDF) - Page 100
appear over part of an image if the brightness level of that part meets the IRE level that you set. Use this zebra pattern as a guide to adjust the brightness. 1. MENU → (Custom Settings) → [Zebra] → desired setting. Menu item details Off: Does not display the zebra pattern. 70/75/80/85/90 - Sony DSC-RX10M2 | Help Guide (Printable PDF) - Page 101
Does not display the guide. On: Displays the guide. [87] How to Use Using shooting functions Adjusting the exposure Reset EV Comp. Sets whether to maintain the exposure value set using [Exposure Comp.] when - Sony DSC-RX10M2 | Help Guide (Printable PDF) - Page 102
Shoots one still image. Normal shooting mode. Cont. Shooting: Shoots images continuously while you press and hold down the shutter button. Spd Priority Cont.: Shoots images continuously at high speed while you press and hold down the shutter button. Self-timer: Shoots an image using the self-timer - Sony DSC-RX10M2 | Help Guide (Printable PDF) - Page 103
first image, and the focus is fixed after that. However, the exposure value is adjusted for each image. To use the same exposure for subsequent shots, change the following settings. Set [ AEL w/ shutter] to [Auto] or [Off]. - Sony DSC-RX10M2 | Help Guide (Printable PDF) - Page 104
[91] How to Use Using shooting functions shooting/Self-timer) Self-timer Selecting a drive mode (Continuous Shoots an image using the self-timer after a designated number of seconds have elapsed since the shutter button was pressed. 1. MENU → (Camera Settings) → [Drive Mode] → [Self-timer]. 2. - Sony DSC-RX10M2 | Help Guide (Printable PDF) - Page 105
the self-timer after a designated number of seconds have elapsed since the shutter button was pressed. You can choose the best from multiple shots. 1. MENU → (Camera Settings) → [Drive Mode] → [Self-timer(Cont)]. 2. Select the desired mode using the right/left side of the control wheel. Menu item - Sony DSC-RX10M2 | Help Guide (Printable PDF) - Page 106
shooting/Self-timer) Cont. Bracket Shoots multiple images while automatically shifting the exposure from base to darker and then to lighter. Press and hold down the shutter button until the bracket recording is completed. You can select an image that suits your intention, after recording. 1. MENU→ ( - Sony DSC-RX10M2 | Help Guide (Printable PDF) - Page 107
Image: This setting shoots five images continuously with an exposure value shifted by plus or minus 3.0 EV. Note The last shot is shown on the Auto Review. When [ISO AUTO] is selected in [Manual Exposure] mode, the exposure is changed by adjusting the ISO value. If a setting other than [ISO AUTO] is - Sony DSC-RX10M2 | Help Guide (Printable PDF) - Page 108
2. Select the desired mode using the right/left side of the control wheel. Menu item details Single Bracket: 0.3EV 3 Image: This setting shoots a total of three images in a row with an exposure value shifted by plus or minus 0.3 EV. Single Bracket: 0.3EV 5 Image: This setting shoots a total of five - Sony DSC-RX10M2 | Help Guide (Printable PDF) - Page 109
value shifted by plus or minus 3.0 EV. Note When [ISO AUTO] is selected in [Manual Exposure] mode, the exposure is changed by adjusting the ISO value. If a setting other white balance. Note The last shot is shown on the Auto Review. [96] How to Use Using shooting functions Selecting a drive - Sony DSC-RX10M2 | Help Guide (Printable PDF) - Page 110
value. DRO Bracket: Hi: Records a series of three images with large changes in the D-Range Optimizer value. Note The last shot is shown on the Auto Review. [97] How to Use Using shooting functions Selecting a drive mode (Continuous shooting/Self-timer) Settings for bracket shooting You can - Sony DSC-RX10M2 | Help Guide (Printable PDF) - Page 111
(0 0→+) [98] How to Use Using shooting functions Selecting a drive mode (Continuous shooting/Self-timer) Indicator during bracket shooting Viewfinder Ambient light* bracketing 3 images shifted by 0.3EV steps Exposure compensation ±0.0 steps Monitor (Display All Info. or Histogram) Ambient light* - Sony DSC-RX10M2 | Help Guide (Printable PDF) - Page 112
, guides equal to the number of images to be shot are displayed over/under the bracket indicator. When you start bracket shooting, the guides will sensitivity automatically. ISO 64 - ISO 12800: Sets the ISO sensitivity manually. Selecting a larger number increases the ISO sensitivity. Note [ISO AUTO - Sony DSC-RX10M2 | Help Guide (Printable PDF) - Page 113
prevent camera shake and subject blurring. STD (Standard): The camera automatically sets the shutter speed based on the focal length of the lens. SLOW (Slow)/SLOWER (Slower): The ISO sensitivity will start to change at shutter speeds slower than [Standard], so you can shoot images with less noise - Sony DSC-RX10M2 | Help Guide (Printable PDF) - Page 114
Hint The difference in shutter speed at which ISO sensitivity starts to change between [Faster], [Fast], [Standard], [Slow], and [Slower] is 1 EV. Note If the exposure is insufficient even when the ISO sensitivity is set to [ISO AUTO Maximum] in [ISO AUTO], in - Sony DSC-RX10M2 | Help Guide (Printable PDF) - Page 115
is fixed to [Off] when the following modes are selected in [Scene Selection]. [Sunset] [Night Scene] [Night Portrait] [Hand-held Twilight] [Anti Motion Blur] The setting is fixed to [D-Range Optimizer: Auto] when [Scene Selection] modes other than the above modes are selected. When [ Record Setting - Sony DSC-RX10M2 | Help Guide (Printable PDF) - Page 116
cannot select [Auto HDR]. When [Picture Profile] is set to something other than [Off], you cannot set [Auto HDR]. You cannot start the next shot until the capture process is completed after you shoot. You may not obtain the desired effect depending on the luminance difference of a subject and - Sony DSC-RX10M2 | Help Guide (Printable PDF) - Page 117
inform you when the camera detects image blurring. Change the composition or re-shoot the image carefully to avoid image blur, as needed. [104] How to Use Using shooting functions Adjusting color tones White Balance Adjusts the color tones according to the ambient light conditions. Use this feature - Sony DSC-RX10M2 | Help Guide (Printable PDF) - Page 118
Adjusts the color tones depending on the light source. Achieves the effect of CC (Color Compensation) filters for photography. Custom 1/Custom 2/Custom 3: Uses the white balance setting saved in [Custom Setup]. Custom Setup: Memorizes the basic white color under the light conditions for the shooting - Sony DSC-RX10M2 | Help Guide (Printable PDF) - Page 119
The message [Custom WB Error] indicates that the value is higher than the expected range, when the flash is used on a subject with too bright colors in the frame. If you register this value, the indicator turns orange on the recording information display. You can shoot at this point, but it is - Sony DSC-RX10M2 | Help Guide (Printable PDF) - Page 120
-tone Mono.] [Miniature] [Watercolor] [Illustration] In the case of [HDR Painting] and [Rich-tone Mono.], the shutter is released three times for one shot. Be careful about the following: Use this function when the subject is motionless or does not flash light. Do not change the composition before - Sony DSC-RX10M2 | Help Guide (Printable PDF) - Page 121
necessary, change the composition or otherwise adjust the settings, be careful of blurring, and shoot again. [Picture Effect] cannot be set when the shooting mode is set to [Intelligent Auto], [Superior Auto], [Scene Selection] or [Sweep Panorama]. [Picture Effect] cannot be set when [ Quality] is - Sony DSC-RX10M2 | Help Guide (Printable PDF) - Page 122
The saturation, contrast, and sharpness are heightened for shooting vivid and crisp scenery. Distant landscapes also stand out more. Sunset: For shooting the beautiful red of the setting sun. Night Scene: The contrast is lowered for reproducing night scenes. Autumn leaves: For shooting autumn - Sony DSC-RX10M2 | Help Guide (Printable PDF) - Page 123
this camera. What is XAVC S? Records high-definition movies such as 4K by converting them to MP4 movies using the MPEG-4 AVC/H.264 codec. [ File Format] → desired setting. Menu item details XAVC S 4K: Records high-definition movies in XAVC S 4K. This format supports a higher bit rate. Audio: LPCM - Sony DSC-RX10M2 | Help Guide (Printable PDF) - Page 124
is temporarily set to [Off] when [ File Format] is set to [XAVC S 4K]. Images will not appear on the monitor when you record movies while the camera is XAVC S HD: Records high-definition movies in XAVC S HD. This format supports a higher bit rate. Audio: LPCM In order to record movies with [ - Sony DSC-RX10M2 | Help Guide (Printable PDF) - Page 125
Record Setting] → desired setting. When [ File Format] is set to [XAVC S 4K] Records high-definition movies by converting them to MP4 file format using the MPEG-4 AVC/H.264 format. When [ File Format] is set to [MP4] Movies shot are recorded in MPEG-4 format, at approximately 60 frames/sec (for - Sony DSC-RX10M2 | Help Guide (Printable PDF) - Page 126
When [ File Format] is set to [XAVC S 4K] 30p 100M/25p 100M: Records the movies in 3840 size movies at a high speed. Movies can be recorded at 120 fps/100 fps. You can create smoother slow-motion images using compatible editing equipment. Bit-rate: Approx. 60 Mbps When [ File Format] is set to [AVCHD - Sony DSC-RX10M2 | Help Guide (Printable PDF) - Page 127
Bit-rate: 24 Mbps (Max.) 60i 17M(FH): 50i 17M(FH): Records the movies in 1920 × 1080 (60i/50i). Bit-rate: Approx. 17 Mbps (Avg.) 60p 28M(PS): 50p 28M(PS): Records the movies in 1920 × 1080 (60p/50p). Bit-rate: 28 Mbps (Max.) 24p 24M(FX): 25p 24M(FX): Records the movies in 1920 × 1080 (24p/25p). This - Sony DSC-RX10M2 | Help Guide (Printable PDF) - Page 128
[120p]/[100p] cannot be selected for the following settings. [Intelligent Auto] [Superior Auto] [Scene Selection] [111] How to Use Using shooting functions Recording movies Dual Video REC Allows you to simultaneously record an XAVC S movie and an MP4 movie, or an AVCHD movie and an MP4 movie. 1. - Sony DSC-RX10M2 | Help Guide (Printable PDF) - Page 129
images when shooting movies. Shoots when impressive compositions, including people, are detected. This function may also record versions of the automatically shot images that have been trimmed into optimal compositions. When a trimmed image is recorded, both the image before trimming and the trimmed - Sony DSC-RX10M2 | Help Guide (Printable PDF) - Page 130
button to start movie recording. Still images will be shot automatically. While capturing a still image, the message [ the shutter button. Note Depending on the recording conditions, still images may not be shot with the optimal timing. [114] How to Use Using shooting functions Recording movies Img - Sony DSC-RX10M2 | Help Guide (Printable PDF) - Page 131
[115] How to Use Using shooting functions Recording movies Quality(Dual Rec) Selects the quality of still images to be shot while recording movies. 1. MENU → (Camera Settings) → [Quality(Dual Rec)] → desired setting. Menu item details Extra fine/Fine/Standard [116] How to Use Using shooting - Sony DSC-RX10M2 | Help Guide (Printable PDF) - Page 132
display. This becomes the standard range that can be received by a general household TV. Off / 80% / 90% Guideframe: Sets whether or not to display the guide frame. You can verify whether the subject is level or perpendicular to the ground. Off / On Hint You can display all the markers at the - Sony DSC-RX10M2 | Help Guide (Printable PDF) - Page 133
for [ SteadyShot], the angle of view will change. [Intelligent Active] and [Active] cannot be selected when [ File Format] is set to [XAVC S 4K]. [119] How to Use Using shooting functions Recording movies Audio Recording Sets whether to record sounds when shooting movies. 1. MENU → (Camera Settings - Sony DSC-RX10M2 | Help Guide (Printable PDF) - Page 134
Menu item details On: Displays the audio level. Off: Does not display the audio level. Note The audio level is not displayed in the following situations: When [Audio Recording] is set to [Off]. When DISP (Display Setting) is set to [No Disp. Info.]. Set the shooting mode to Movie. You can see the - Sony DSC-RX10M2 | Help Guide (Printable PDF) - Page 135
Settings) → [Audio Out Timing] → desired setting. Menu item details Live: Outputs audio without delay. Select this setting when audio deviation is a problem during audio monitoring. Lip Sync: Outputs audio and video in sync. Select this setting to prevent undesirable deviations between video and - Sony DSC-RX10M2 | Help Guide (Printable PDF) - Page 136
be darker than when [On] is selected, but you can record movies with smoother motion and less object blur. Note [ Auto Slow Shut.] does not function in the following situations: (Shutter Priority) (Manual Exposure) [125] How to Use Using shooting functions Recording movies MOVIE Button Sets whether - Sony DSC-RX10M2 | Help Guide (Printable PDF) - Page 137
Picture Profile Allows you to change the settings for the color, gradation, etc for movies. For details on "Picture Profile," refer to http://helpguide.sony.net/di/pp/v1/en/index.html. Customizing the picture profile You can customize the picture quality by adjusting picture profile items such as - Sony DSC-RX10M2 | Help Guide (Printable PDF) - Page 138
[Knee] is set to [Off] if [Mode] is set to [Auto]. To use functions in [Knee], set [Mode] to [Manual]. Mode: Selects auto/manual settings. Auto: The knee point and slope are set automatically. Manual: The knee point and slope are set manually. Auto Set: Settings when [Auto] is selected for [Mode]. - Sony DSC-RX10M2 | Help Guide (Printable PDF) - Page 139
. (90% to 100%) Sensitivity: Sets the sensitivity. (High/Mid/Low) Manual Set: Settings when [Manual] is selected for [Mode]. Point: Sets the knee point. (75% to Pro: Similar color tones to the standard image quality of Sony professional cameras (when combined with ITU709 gamma) ITU709 Matrix: Colors - Sony DSC-RX10M2 | Help Guide (Printable PDF) - Page 140
+7) Adjust: The following parameters can be selected manually. Mode: Selects auto/manual setting. (Auto (automatic optimization) / Manual (The details are set manually.)) V/H Balance: Sets the vertical (V) and setting. We recommend checking the picture in advance by test shooting when using S-Log2. - Sony DSC-RX10M2 | Help Guide (Printable PDF) - Page 141
[Black Level] setting. If you set [Slope] to +5 in [Manual Set], [Knee] is set to [Off]. S-Gamut is a color space unique to Sony that provides a wide color space equivalent to film cameras. However, S-Gamut setting of this camera does not support the whole color space of S-Gamut; it is a setting to - Sony DSC-RX10M2 | Help Guide (Printable PDF) - Page 142
Optical zoom scale To recall registered settings Set the mode dial to MR, then press the right/left side of the control wheel or turn the control wheel to select the desired memory number. To change registered settings Change the setting to the desired one and re-register the setting to the same - Sony DSC-RX10M2 | Help Guide (Printable PDF) - Page 143
. The camera will automatically focus while pressing the key when the [Focus Area] is [Wide] or [Center], [Focus Mode] is set to other than [Manual Focus], and [Center Lockon AF] is set to [Off]. Note Some functions cannot be assigned to certain keys. [131] How to Use Using shooting functions - Sony DSC-RX10M2 | Help Guide (Printable PDF) - Page 144
The functions that can be assigned are displayed on the setup item selection screen. [133] How to Use Using shooting functions Customizing the shooting functions for convenient use Function of the Custom button Once you assign a function to the Custom button, you can perform that function by simply - Sony DSC-RX10M2 | Help Guide (Printable PDF) - Page 145
1. MENU → setting. (Custom Settings) → [Custom Key Settings] → [Left Button] → desired The functions that can be assigned are displayed on the setup item selection screen. [136] How to Use Using shooting functions convenient use Function of the Right button Customizing the shooting functions for - Sony DSC-RX10M2 | Help Guide (Printable PDF) - Page 146
1. MENU → (Camera Settings) → [Smile/Face Detect.] → desired setting. Menu item details Off: Does not use the Face Detection function. On (Regist. Faces): Detects the registered face with higher priority using [Face Registration]. On: Detects a face without giving higher priority to the registered - Sony DSC-RX10M2 | Help Guide (Printable PDF) - Page 147
Note You cannot use the Face Detection function with the following functions: Zoom functions other than the optical zoom [Sweep Panorama] [Picture Effect] is set to [Posterization]. When using the [Focus Magnifier] function. [Scene Selection] is set to [Landscape], [Night Scene] or [Sunset]. [ - Sony DSC-RX10M2 | Help Guide (Printable PDF) - Page 148
as a priority when [Smile/Face Detect.] is set to [On (Regist. Faces)]. 1. MENU → (Custom Settings) → [Face Registration] → [New Registration]. 2. Align the guide frame with the face to be registered, and press the shutter button. 3. When a confirmation message appears, select [Enter]. Note Up to - Sony DSC-RX10M2 | Help Guide (Printable PDF) - Page 149
Note Even if you execute [Delete], the data for registered face will remain in the product. To delete the data for registered faces from the product, select [Delete All]. [143] How to Use Using shooting functions Setting the other functions of this product Red Eye Reduction When using the flash, it - Sony DSC-RX10M2 | Help Guide (Printable PDF) - Page 150
1. MENU → (Camera Settings) → [ Auto Obj. Framing] → desired setting. Menu item details Off: Does not trim images. Auto: Automatically trims images into an appropriate composition. Note The trimmed image may not be the best possible composition, depending on the shooting conditions. [ Auto Obj. - Sony DSC-RX10M2 | Help Guide (Printable PDF) - Page 151
Cont. Shooting], [Spd Priority Cont.] or [Cont. Bracket]. The shooting mode is set to [Scene Selection] and [Sports Action], [Hand-held Twilight] or [Anti Motion Blur] is selected. The ISO sensitivity is set to [Multi Frame NR]. You cannot set [ Long Exposure NR] to [Off] when the shooting mode is - Sony DSC-RX10M2 | Help Guide (Printable PDF) - Page 152
Normal: Activates high ISO noise reduction normally. Low: Activates high ISO noise reduction moderately. Off: Does not activate high ISO noise reduction. Select this to prioritize the timing of shooting. Note [ High ISO NR] is not available in the following situations: When the shooting mode is set - Sony DSC-RX10M2 | Help Guide (Printable PDF) - Page 153
vivid green or red, Adobe RGB is effective. The file name of the image starts with "_DSC." Note [AdobeRGB] is for applications or printers that support color management and DCF2.0 option color space. Images may not be printed or viewed in the correct colors if you use applications or printers that - Sony DSC-RX10M2 | Help Guide (Printable PDF) - Page 154
the diagonal line to express an uplifting and powerful feeling. Off: Does not display the grid line. [151] How to Use Using shooting functions Auto Review Setting the other functions of this product You can check the recorded image on the screen right after the shooting. You can also set the - Sony DSC-RX10M2 | Help Guide (Printable PDF) - Page 155
. Live View is always displayed with the appropriate brightness even in [Manual Exposure] mode. When [Setting Effect OFF] is selected, the icon [Live View Display] is set to [Setting Effect OFF], the brightness of the shot image will not be the same as that of the displayed Live View. Hint When - Sony DSC-RX10M2 | Help Guide (Printable PDF) - Page 156
in the following situations. When the camera is turned off. When the mode dial is turned. When the focus mode is set to other than manual focus. When [ MF Assist] is set to [On]. When [Focus Magnifier] is selected. During [Bright Monitoring], the shutter speed may be slower than normal while - Sony DSC-RX10M2 | Help Guide (Printable PDF) - Page 157
been inserted. Disable: Does not release the shutter when no memory card has been inserted. Note When no memory card has been inserted, the images shot will not be saved. The default setting is [Enable]. It is recommended that you select [Disable] prior to actual shooting. [156] How to Use Using - Sony DSC-RX10M2 | Help Guide (Printable PDF) - Page 158
setting is as below. Mechanical Shut. Flash: Shutter speed: BULB to 1/3200 second *2 Shutter sound: mechanical shutter sound and electronic shutter sound *3 Electronic Shut. Flash: *1 Shutter speed: 30 seconds to 1/32000 second *2 Shutter sound: electronic shutter sound *3 *1 When shooting with the - Sony DSC-RX10M2 | Help Guide (Printable PDF) - Page 159
downloaded from PlayMemories Camera Apps. When an external flash is attached and the shutter speed is high, a belt-like contrast may be recorded on the image. Set [ Shutter Type] to [Mechanical Shut.] before taking pictures. When using an external flash, the highest shutter speed you can set is 1/ - Sony DSC-RX10M2 | Help Guide (Printable PDF) - Page 160
Setting the other functions of this product If you use an ND filter, the amount of light entering the camera is reduced. You can slow down the shutter speed and decrease the aperture value for a better exposure. 1. MENU → (Camera Settings) → [ND Filter] → desired setting. Menu item details Auto - Sony DSC-RX10M2 | Help Guide (Printable PDF) - Page 161
and play back images. An image that is not registered in the image database file may not be played back correctly. To play back images shot using other devices, register those images to the image database file using MENU → [Setup] → [Recover Image DB]. [161] How to Use Viewing Viewing still images - Sony DSC-RX10M2 | Help Guide (Printable PDF) - Page 162
→ No Disp. Info. → Display Info." each time you press the DISP button. The DISP (Display Setting) settings are applied for the Auto Review display. Note The histogram is not displayed in the following situations: During movie playback During scrolling playback of panoramic images During slideshows - Sony DSC-RX10M2 | Help Guide (Printable PDF) - Page 163
Deleting a displayed image You can delete an image displayed. 1. Display the image you want to delete. 2. Press the (Delete) button. 3. Select [Delete] using the control wheel, then press wheel. on the center of the control [165] How to Use Viewing Deleting images Deleting multiple selected - Sony DSC-RX10M2 | Help Guide (Printable PDF) - Page 164
movie file : Displays the next frame : Displays the previous frame : Motion Shot Video (Shows the tracking of a subject in motion.) : Sound volume adjustment : Closes the operation panel Hint "Forward slow playback," "Reverse slow playback," "Displays the next frame" and "Displays the previous frame - Sony DSC-RX10M2 | Help Guide (Printable PDF) - Page 165
trail, you can adjust the interval of the image tracking using . Note You cannot save the images made with [Motion Shot Video] as a movie file. If the motion of the subject is too slow or the subject does not move enough, the product may fail to create the image. Hint You can also change - Sony DSC-RX10M2 | Help Guide (Printable PDF) - Page 166
[169] How to Use Viewing Printing Specify Printing You can specify in advance on the memory card which still images you want to print out later. The (print order) icon will appear on the specified images. DPOF refers to "Digital Print Order Format." 1. MENU → (Playback) → [Specify Printing] → - Sony DSC-RX10M2 | Help Guide (Printable PDF) - Page 167
: Displays only XAVC S HD-format movies. XAVC S 4K View: Displays only XAVC S 4K-format movies. [171] How to Use Viewing Using viewing camera, the displayed image rotates automatically detecting the orientation of the camera. Manual: A portrait image is displayed as a vertical image. If you have - Sony DSC-RX10M2 | Help Guide (Printable PDF) - Page 168
, the image remains rotated even after the product is turned off. Note You cannot rotate the movies. You may not be able to rotate images shot using other products. When viewing rotated images on a computer, the images may be displayed in their original orientation depending on the software. - Sony DSC-RX10M2 | Help Guide (Printable PDF) - Page 169
[174] How to Use Viewing Using viewing functions Protect Protects recorded images against accidental erasure. The protected images. mark is displayed on 1. MENU → (Playback) → [Protect] → desired setting. Menu item details Multiple Img.: Applies or cancels the protection of the selected multiple - Sony DSC-RX10M2 | Help Guide (Printable PDF) - Page 170
Turn on this product. Images shot with the product appear on the TV screen. For details, refer to the operating instructions supplied with the compatible TV. Note Do HDMI cable with the HDMI logo or a genuine Sony cable. Use an HDMI cable that is compatible 4K to HD image quality or vice- - Sony DSC-RX10M2 | Help Guide (Printable PDF) - Page 171
. Note If the product is not in playback mode, press the (Playback) button. Only TVs that support "BRAVIA" Sync can provide SYNC MENU operations. For details, refer to the operating instructions supplied with the TV. If the product performs unwanted operations in response to the TV Remote Control - Sony DSC-RX10M2 | Help Guide (Printable PDF) - Page 172
is too bright for shooting indoors. Set [Monitor Brightness] to [Manual] for indoor shooting. The monitor brightness cannot be adjusted in the following situations. The maximum brightness will be [±0]. [ File Format] is [XAVC S 4K]. [ File Format] is [XAVC S HD] and the [ Record Setting] is [ - Sony DSC-RX10M2 | Help Guide (Printable PDF) - Page 173
-2 to +2. Note The electronic viewfinder brightness cannot be adjusted in the following situations. The maximum brightness will be [±0]. [ File Format] is [XAVC S 4K]. [ File Format] is [XAVC S HD] and the [ Record Setting] is [120p]/[100p]. You cannot use the viewfinder while using Wi-Fi functions - Sony DSC-RX10M2 | Help Guide (Printable PDF) - Page 174
slot. 1. MENU → (Setup) → [Upload Settings] → desired setting. 2. Set your Wi-Fi network or destination on the Eye-Fi card. For details, refer to the manual supplied with the Eye-Fi card. 3. Insert the Eye-Fi card you have set up into the product, and shoot still images. Images are transferred - Sony DSC-RX10M2 | Help Guide (Printable PDF) - Page 175
be influenced by other communication devices. If the communication status is poor, move closer to the access point to be connected. This product does not support Eye-Fi "Endless Memory Mode." Before using an Eye-Fi card, be sure that "Endless Memory Mode" is turned off. [183] How to Use Changing - Sony DSC-RX10M2 | Help Guide (Printable PDF) - Page 176
dial and change the settings available for that shooting mode. 1. MENU → (Setup) → [Mode Dial Guide] → desired setting. Menu item details On: Displays the Mode Dial Guide. Off: Does not display the Mode Dial Guide. [185] How to Use Changing settings Setup menu Delete confirm. You can set whether - Sony DSC-RX10M2 | Help Guide (Printable PDF) - Page 177
You can change the display quality. 1. MENU → (Setup) → [Display Quality] → desired setting. Menu item details High: Displays in high quality. Standard: Displays in standard quality. Note When [High] is set, battery consumption will be higher than when [Standard] is set. [187] How to Use Changing - Sony DSC-RX10M2 | Help Guide (Printable PDF) - Page 178
1. MENU → (Setup) → [NTSC/PAL Selector] → [Enter] Note If you insert a memory card that has previously been formatted with a different video system, a message telling you that you must reformat the card will appear. If you want to record using another system, re-format the memory card or use - Sony DSC-RX10M2 | Help Guide (Printable PDF) - Page 179
Make: Sets the recording format for the time code on the recording medium. UB Time Rec: Sets whether or not to record the time as a user bit. How to set the time code (TC Preset) 1. MENU → (Setup) → [TC/UB Settings] → [TC Preset], then press of the control wheel. 2. Turn the control - Sony DSC-RX10M2 | Help Guide (Printable PDF) - Page 180
:00:00) using the RMT-VP1K remote commander (sold separately). How to set the user bit (UB Preset) 1. MENU → (Setup) → [TC/UB Settings] → [ correction is called non-drop frame. The setting is fixed to [NDF] when recording in 4K/24p, 1080/24p or 1080/25p. How to select the count up format for the - Sony DSC-RX10M2 | Help Guide (Printable PDF) - Page 181
The time code may not be recorded sequentially in the following situations even when the time code advances in [Rec Run] mode. When the recording format is changed. When the recording medium is removed. How to select how the time code is recorded (TC Make) 1. MENU → (Setup) → [TC/UB Settings] → [ - Sony DSC-RX10M2 | Help Guide (Printable PDF) - Page 182
[192] How to Use Changing settings Setup menu 24p/60p Output (movie) (Only for 1080 60i compatible models) Set 1080/24p or 1080/60p as the HDMI output format when [ [24p 24M(FX)], [24p 17M(FH)], or [24p 50M]. Record Setting] is set to 1. MENU → (Setup) → [HDMI Settings] → [HDMI Resolution] → [ - Sony DSC-RX10M2 | Help Guide (Printable PDF) - Page 183
You cannot operate this product with a TV's remote control. Note [CTRL FOR HDMI] is available only with a "BRAVIA" Sync-compatible TV. [194] How to Use Changing settings Setup menu HDMI Info. Display Selects whether to display the shooting information when this product and the TV are connected - Sony DSC-RX10M2 | Help Guide (Printable PDF) - Page 184
or status of the recorder/player. Check if the external recorder/player works properly before use. [197] How to Use Changing settings Setup menu 4K Output Sel. (movie) You can set how to record movies and perform HDMI output when your camera is connected to external recording/playback devices - Sony DSC-RX10M2 | Help Guide (Printable PDF) - Page 185
Only(25p)] or [HDMI Only(24p)] is set, the [HDMI Info. Display] will temporarily be set to [Off]. The counter does not move forward when 4K movies are being output. The following functions are not available when the camera is connected via an HDMI cable and the [ File Format] is [XAVC - Sony DSC-RX10M2 | Help Guide (Printable PDF) - Page 186
connected to this product. 1. MENU → (Setup) → [USB Connection] → desired setting. Menu item details Auto: Establishes a Mass Storage or MTP connection automatically, depending on the computer or other USB devices to be connected. Windows 7 or Windows 8 computers are connected in MTP, and their - Sony DSC-RX10M2 | Help Guide (Printable PDF) - Page 187
Set [USB LUN Setting] to [Single] only if you cannot make a connection. [200] How to Use Changing settings Setup menu USB Power Supply Sets whether to supply power via the micro USB cable when the product is connected to a computer or an USB device. 1. MENU → (Setup) → [USB Power Supply] → - Sony DSC-RX10M2 | Help Guide (Printable PDF) - Page 188
Sets the date and time again. 1. MENU → (Setup) → [Date/Time Setup] → desired setting. Menu item details Daylight Savings: Selects Daylight Savings [On]/[Off]. Date/Time: Sets the date and time. Date Format: Selects the date and time display format. [203] How to Use Changing settings Setup menu Area - Sony DSC-RX10M2 | Help Guide (Printable PDF) - Page 189
Copyright: Sets the copyright holder name. Disp. Copyright Info: Displays the current copyright information. Hint How to use the keyboard When manual character entry is required, a keyboard is displayed on the screen. 1. Input box The characters you entered are displayed. 2. Switch character types - Sony DSC-RX10M2 | Help Guide (Printable PDF) - Page 190
7. Switches the next character to a capital or lowercase letter. 8. Enters a space. To cancel input, select [Cancel]. Note You can only enter alphanumeric characters and symbols for [Set Photographer] and [Set Copyright]. You can enter up to 46 letters. A icon appears during the playback of images - Sony DSC-RX10M2 | Help Guide (Printable PDF) - Page 191
Menu item details Series: The product will assign numbers to files sequentially up to "9999" without resetting. Reset: The product resets numbers when a file is recorded in a new folder and assigns numbers to files starting with "0001." (When the recording folder contains a file, a number one higher - Sony DSC-RX10M2 | Help Guide (Printable PDF) - Page 192
Setup menu Recover Image DB If image files were processed on a computer, problems may occur in the image database file. In such cases, the images on the memory card will not be played back on this product. If these problems happen, repair the file using [Recover Image DB]. 1. MENU → (Setup) - Sony DSC-RX10M2 | Help Guide (Printable PDF) - Page 193
[211] How to Use Changing settings Setup menu Display Media Info. Displays the recordable time of movies and the number of recordable still images for the inserted memory card. 1. MENU → (Setup) → [Display Media Info.]. [212] How to Use Changing settings Setup menu Version Displays the version of - Sony DSC-RX10M2 | Help Guide (Printable PDF) - Page 194
smartphone's application store. If PlayMemories Mobile is already installed on your smartphone, be sure to update it to the latest version. For details on PlayMemories Mobile, refer to the support page (http://www.sony.net/pmm/). [216] How to Use Using Wi-Fi functions Connecting this product and - Sony DSC-RX10M2 | Help Guide (Printable PDF) - Page 195
3. Input the password that is displayed on this product. The smartphone is connected to the product. [217] How to Use Using Wi-Fi functions Connecting this product and a Smartphone Connecting the product to an iPhone or iPad 1. Select the model name of this product (DIRECT-xxxx: xxxx) on the Wi-Fi - Sony DSC-RX10M2 | Help Guide (Printable PDF) - Page 196
2. Input the password displayed on this product. The iPhone or iPad is connected to the product. 3. Confirm that your iPhone or iPad was connected to the "SSID" shown on this product. 4. Return to the "Home" screen and launch PlayMemories Mobile. [218] How to Use Using Wi-Fi functions Connecting - Sony DSC-RX10M2 | Help Guide (Printable PDF) - Page 197
feature that works with the smartphone, the product and the smartphone will be connected via Wi-Fi. To use this function, register the desired application in advance. 1. MENU → (Wireless) → [One-touch(NFC)] → desired application. 2. Switch this product to shooting mode, then touch an NFC-enabled - Sony DSC-RX10M2 | Help Guide (Printable PDF) - Page 198
shutter button (A) on the smartphone to shoot an image. Use button (B) to change settings such as [EV], [Self-Timer] and [Review Check]. Note When you record movies using a smartphone as a remote controller, the monitor of the product becomes darker. Also, you cannot use the viewfinder for - Sony DSC-RX10M2 | Help Guide (Printable PDF) - Page 199
The smartphone and the product are connected, and PlayMemories Mobile launches on the smartphone. Touch the smartphone to the product for 1-2 seconds until PlayMemories Mobile launches. About "NFC" NFC is a technology that enables short-range wireless communication between various devices, such as - Sony DSC-RX10M2 | Help Guide (Printable PDF) - Page 200
1. MENU → (Wireless) → [Send to Smartphone] → desired setting. If you press the (Send to Smartphone) button in playback mode, the setting screen for [Send to Smartphone] will appear. 2. If the product is ready for the transfer, the information screen appears on the product. Connect the smartphone - Sony DSC-RX10M2 | Help Guide (Printable PDF) - Page 201
connect to the product, reset the connection information by following these steps. MENU → [Wireless] → [SSID/PW Reset]. After resetting the connection information, you must register the smartphone again. When [Airplane Mode] is set to [On], you cannot connect this product and the smartphone. Set [ - Sony DSC-RX10M2 | Help Guide (Printable PDF) - Page 202
NFC to connect the product and the smartphone. About "NFC" NFC is a technology that enables short-range wireless communication between various devices, such as mobile phones or IC tags, etc. NFC makes data communication simpler with just a touch on the designated touch-point. NFC (Near Field - Sony DSC-RX10M2 | Help Guide (Printable PDF) - Page 203
connect the product and the computer via a USB connection and follow the instructions in PlayMemories Home. When you save images to the MAC computer using Wi wheel. on the center of the To display the next/previous image manually, press the right/left side of the control wheel. To change the - Sony DSC-RX10M2 | Help Guide (Printable PDF) - Page 204
Select from [On] and [Off]. Playback Image Size: Select from [HD] and [4K]. *The settings are effective only for BRAVIA TV which is compatible with the functions. Note You can use this function on a TV that supports DLNA renderer. You can view images on a Wi-Fi Direct-enabled - Sony DSC-RX10M2 | Help Guide (Printable PDF) - Page 205
set to WEP or your access point does not support the Wi-Fi Protected Setup (WPS) button point, see the access point operating instructions or contact the administrator of the access Access Point Set. You can register your access point manually. Before starting the procedure, check the SSID name of - Sony DSC-RX10M2 | Help Guide (Printable PDF) - Page 206
the password, and select [OK]. Access points without the mark do not require a password. 4. Select [OK]. How to use the keyboard When manual character entry is required, a keyboard is displayed on the screen. 1. Input box The characters you entered are displayed. 2. Switch character types Each - Sony DSC-RX10M2 | Help Guide (Printable PDF) - Page 207
PIN: Displays the PIN code you enter into the connected device. Priority Connection: Select [On] or [Off]. IP Address Setting: Select [Auto] or [Manual]. IP Address: If you are entering the IP address manually, enter the set address. Subnet Mask/Default Gateway: When you set [IP Address Setting] to - Sony DSC-RX10M2 | Help Guide (Printable PDF) - Page 208
1. MENU → (Wireless) → [Edit Device Name]. 2. Select the input box, then input the device name → [OK]. For input method, refer to "How to use the keyboard." [229] How to Use Using Wi-Fi functions Changing the settings of Wi-Fi functions Disp MAC Address Displays the MAC address of this product. 1. - Sony DSC-RX10M2 | Help Guide (Printable PDF) - Page 209
the applications Opening a service account You can open a service account, which is required to download applications. 1. Access the application download website. http://www.sony.net/pmca/ 2. Follow the instructions on the screen and acquire a service account. Follow the instructions on the screen - Sony DSC-RX10M2 | Help Guide (Printable PDF) - Page 210
http://www.sony.net/pmca/ 2. Select the desired application and download the application to the product following the instructions on the . Acquire a service account in advance. 1. MENU → (Application) → [Application List] → (PlayMemories Camera Apps), then follow the instructions on the screen - Sony DSC-RX10M2 | Help Guide (Printable PDF) - Page 211
[237] How to Use Adding applications to the product Starting the applications Launching the downloaded application Launch an application that has been downloaded from the application download website PlayMemories Camera Apps. 1. MENU → (Application) → [Application List] → desired application to - Sony DSC-RX10M2 | Help Guide (Printable PDF) - Page 212
the account information of PlayMemories Camera Apps The account information for the "Sony Entertainment Network" that is registered on the product is displayed. 1. computer environment of the software from the following URL: http://www.sony.net/pcenv/ [242] How to Use Using a computer Using the - Sony DSC-RX10M2 | Help Guide (Printable PDF) - Page 213
from XAVC S-format movies. You can upload images to a network service. (An internet connection is required.) For other details, please refer instructions. http://www.sony.net/pm/ An internet connection is required. For detailed instructions, visit the PlayMemories Home support page. http://www.sony - Sony DSC-RX10M2 | Help Guide (Printable PDF) - Page 214
the restart confirmation message appears, restart the computer following the instructions on the screen. DirectX may be installed depending on your Home, refer to the Help of PlayMemories Home or the PlayMemories Home support page (http://www.sony.co.jp/pmh-se/) (English only). [244] How to Use - Sony DSC-RX10M2 | Help Guide (Printable PDF) - Page 215
] → [Image Data Converter], and select [Help] from the menu bar → [Image Data Converter Guide]. Hint For details on operation, you can also refer to the Image Data Converter support page (English only). http://www.sony.co.jp/ids-se/ [248] How to Use Using a computer Using the software Remote Camera - Sony DSC-RX10M2 | Help Guide (Printable PDF) - Page 216
Using the software Installing Remote Camera Control Download and install the software by accessing the following URL: Windows: http://www.sony.co.jp/imsoft/Win/ Mac: http://www.sony.co.jp/imsoft/Mac/ [250] How to Use Using a computer Using the software Accessing the Help of Remote Camera Control - Sony DSC-RX10M2 | Help Guide (Printable PDF) - Page 217
2. Turn on the product and the computer. 3. Check from (Setup) that [USB Connection] is set to [Mass Storage]. 4. Connect the product and your computer using the micro USB cable (supplied) (A) . If you connect the product to your computer using the micro USB cable when [USB Power Supply] is set - Sony DSC-RX10M2 | Help Guide (Printable PDF) - Page 218
the connected computer. Movie files may be damaged or become unplayable. Do not delete or copy AVCHD movies on the memory card from the computer. Sony is not held liable for consequences resulting from such operations via the computer. [253] How to Use Using a computer Connecting this product and - Sony DSC-RX10M2 | Help Guide (Printable PDF) - Page 219
as DVD-R discs, creating a high-definition image quality (HD) disc. Writable movie formats: XAVC S, AVCHD, MP4 (AVC) Players: AVCHD format playback devices (Sony Blu-ray Disc players, PlayStation 3, etc.) You cannot play these kinds of discs on ordinary DVD players. Standard definition image quality - Sony DSC-RX10M2 | Help Guide (Printable PDF) - Page 220
disc using PlayMemories Home, refer to the Help guide for PlayMemories Home. B. How to create using For details, refer to the device's operating instructions. Note When creating Blu-ray discs using PlayMemories on AVCHDcompatible playback devices (such as Sony Blu-ray Disc players or the PlayStation - Sony DSC-RX10M2 | Help Guide (Printable PDF) - Page 221
using a USB cable. Install the dedicated add-on software following the on-screen instructions. (An internet connection is needed.) For details on how to create a disc using PlayMemories Home, refer to the Help guide for PlayMemories Home. B. How to create using a device other than a computer You can - Sony DSC-RX10M2 | Help Guide (Printable PDF) - Page 222
refer to the device's operating instructions. [258] How to Use Precautions/This product Precautions Precautions Backing up memory cards Data may be corrupted in the following cases. Be sure to back - Sony DSC-RX10M2 | Help Guide (Printable PDF) - Page 223
a smoother, more realistic image. The camera is compatible with 4K 30p/4K 25p/4K 24p-format movies. You can record movies in higher quality. camera can only be played back on devices supporting AVCHD format. DVD players and DVD recorders do not support AVCHD format, so they cannot playback AVCHD - Sony DSC-RX10M2 | Help Guide (Printable PDF) - Page 224
XAVC S movies can be played back only on XAVC S-supported devices. On the monitor, viewfinder, and lens The monitor and viewfinder are manufactured using extremely high-precision technology so over 99.99 % of the pixels - Sony DSC-RX10M2 | Help Guide (Printable PDF) - Page 225
others When discarding or transferring this product to others, make sure to perform the following operation to protect private information. Perform [Setting Reset] to reset all the settings. [259] How to Use Precautions/This product Precautions On the internal rechargeable battery This camera has an - Sony DSC-RX10M2 | Help Guide (Printable PDF) - Page 226
function frequently, turn the power on/off frequently, or set the monitor very bright. We recommend preparing spare battery packs and taking trial shots before taking the actual shots. Do not expose the battery pack to water. The battery pack is not water-resistant. Do not leave the battery pack in - Sony DSC-RX10M2 | Help Guide (Printable PDF) - Page 227
Adaptor is dedicated to this product. Do not connect with other electronic devices. Doing so may cause a malfunction. Make sure to use a genuine Sony AC Adaptor. If the product's charge lamp flashes while charging, remove the battery pack being charged, and then insert the same battery pack firmly - Sony DSC-RX10M2 | Help Guide (Printable PDF) - Page 228
outside of the recommended operating temperature. When the temperature returns to the appropriate range, charging resumes and the charge lamp lights up again. We recommend charging the battery pack in an ambient temperature of between 10°C to 30°C (50°F to 86°F). [262] How to Use Precautions/This - Sony DSC-RX10M2 | Help Guide (Printable PDF) - Page 229
media into the product without an M2 Adaptor as large as Duo size, you might not be able to remove it from the product. To use a microSD memory card with this product, be sure to insert the microSD memory card into a dedicated adaptor. When inserting a memory card into a memory card adaptor, be sure - Sony DSC-RX10M2 | Help Guide (Printable PDF) - Page 230
If you wipe the monitor firmly using tissue paper, etc., the coating may be scratched. If the monitor becomes dirty with fingerprints or dust, gently remove the dust from the surface, and then clean the monitor using soft cloth, etc. [264] How to Use Precautions/This product recordable time of - Sony DSC-RX10M2 | Help Guide (Printable PDF) - Page 231
greater than 9,999, the "9999" indicator appears. When an image shot with other products is played back on this product, the image may not the memory card. The values when [ File Format] is set to [XAVC S 4K], [XAVC S HD], and [AVCHD] are based on shooting with [Dual Video REC] set to [Off - Sony DSC-RX10M2 | Help Guide (Printable PDF) - Page 232
32 GB: 64 GB: 2 h 5 m [ File Format]:[XAVC S HD] 60p 50M 50p 50M 8 GB: 16 GB: 32 GB: 64 GB: 2 h 35 m 30p 50M 25p 50M 8 GB: 16 GB: 32 GB: 64 GB: 2 h 35 m 24p 50M* 8 GB: 16 GB: 32 GB: 64 GB: 2 h 35 m 120p 100M 100p 100M 8 GB: 16 GB: 32 GB: 64 GB: 1 h 15 m 120p 60M 100p 60M 8 GB: 16 GB: 32 GB: 64 GB: 2 - Sony DSC-RX10M2 | Help Guide (Printable PDF) - Page 233
16 GB: 2 h 32 GB: 4 h 5 m 64 GB: 8 h 15 m 60p 28M(PS) 50p 28M(PS) 8 GB: 35 m 16 GB: 1 h 15 m 32 GB: 2 h 30 m 64 GB: 5 h 5 m 24p 24M(FX) 25p 24M(FX) 8 GB: 40 m 16 GB: 1 h 25 m 32 GB: 3 h 64 GB: 6 h 24p 17M(FH) 25p 17M(FH) 8 GB: 55 m 16 GB: 2 h 32 GB: 4 h 5 m 64 GB: 8 h 15 m [ File Format]: [MP4] - Sony DSC-RX10M2 | Help Guide (Printable PDF) - Page 234
If the file format is set to MP4 (28M), continuous shooting is possible for approximately 20 minutes for each shooting (limited by file size of 4 GB). Note The recordable time of movies varies because the product is equipped with VBR (Variable Bit Rate), which automatically adjusts image quality - Sony DSC-RX10M2 | Help Guide (Printable PDF) - Page 235
as doing so may cause a malfunction. [267] How to Use Precautions/This product Using this product abroad On TV color systems To view movies shot using this product on a television, the product and television must use the same color television system. Check the TV color system for the country or - Sony DSC-RX10M2 | Help Guide (Printable PDF) - Page 236
A CONSUMER OR OTHER USES IN WHICH IT DOES NOT RECEIVE REMUNERATION TO (i) ENCODE VIDEO IN COMPLIANCE WITH THE AVC STANDARD ("AVC VIDEO") AND/OR (ii) DECODE AVC VIDEO THAT WAS ENCODED BY A CONSUMER ENGAGED IN A PERSONAL ACTIVITY AND/OR WAS OBTAINED FROM A VIDEO PROVIDER LICENSED TO PROVIDE AVC VIDEO - Sony DSC-RX10M2 | Help Guide (Printable PDF) - Page 237
" folder. [271] How to Use Precautions/This product Trademarks Trademarks The following marks are registered trademarks or trademarks of Sony Corporation. , Cyber-shot, , Memory Stick, , Memory Stick PRO, , Memory Stick Duo, , Memory Stick PRO Duo, , Memory Stick PRO-HG Duo, , Memory Stick - Sony DSC-RX10M2 | Help Guide (Printable PDF) - Page 238
their respective developers or manufacturers. However, the ™ or ® marks may not be specified in all cases in this manual. [272] Troubleshooting If you have problems If you have problems Troubleshooting If you experience trouble with the product, try the following solutions. 1. Check the items under - Sony DSC-RX10M2 | Help Guide (Printable PDF) - Page 239
the battery pack is correct, and insert it until the battery lock lever is locked. Make sure that the battery is NP-FW50. [274] Troubleshooting Troubleshooting Battery pack and power You cannot turn on the product. After inserting the battery pack into the product, it may take a few moments for the - Sony DSC-RX10M2 | Help Guide (Printable PDF) - Page 240
with a new one. [277] Troubleshooting Troubleshooting Battery pack and power The charge °C (50 °F and 86 °F). [278] Troubleshooting Troubleshooting Battery pack and power The battery pack is not and reconnect the USB cable. [279] Troubleshooting Troubleshooting Battery pack and power The monitor does - Sony DSC-RX10M2 | Help Guide (Printable PDF) - Page 241
changes. The functioning of the ND filter inside the lens produces audio and image disturbances. This is not a malfunction. [282] Troubleshooting Troubleshooting Shooting still images/movies Recording takes a long time. The noise reduction function is processing an image. This is not a malfunction - Sony DSC-RX10M2 | Help Guide (Printable PDF) - Page 242
Twilight] or [Anti Motion Blur] under [Scene Selection]. [DRO/Auto HDR] is set to [Auto HDR]. [285] Troubleshooting Troubleshooting Shooting still images/movies The set to [Manual Focus]. Set [Focus Mode] to a setting other than [Manual Focus]. [286] Troubleshooting Troubleshooting Shooting still - Sony DSC-RX10M2 | Help Guide (Printable PDF) - Page 243
selected in [Scene Selection]. [Anti Motion Blur] [Night Scene] [Hand-held Twilight] During Sweep Panorama shooting. During movie recording. [288] Troubleshooting Troubleshooting Shooting still images/movies Fuzzy white circular spots appear on images shot using the flash. Particles (dust, pollen - Sony DSC-RX10M2 | Help Guide (Printable PDF) - Page 244
is too bright or too dark to shoot using the current aperture value and/or shutter speed settings. Readjust the settings. [293] Troubleshooting Troubleshooting Shooting still images/movies The image colors are not correct. Adjust [White Balance]. [Picture Effect] is set. Set [Picture Effect] to [Off - Sony DSC-RX10M2 | Help Guide (Printable PDF) - Page 245
. Depending on the brightness of the subject, you may see a dark shadow when you change the aperture. This is not a malfunction. [296] Troubleshooting Troubleshooting Shooting still images/movies The eyes of the subject come out red. Set [Red Eye Reduction] to [On]. Shoot the subject at a distance - Sony DSC-RX10M2 | Help Guide (Printable PDF) - Page 246
been set to [Auto], the monitor will turn off due to the reaction of the eye sensor. Set [FINDER/MONITOR] to [Monitor(Manual)]. [302] Troubleshooting Troubleshooting Shooting still images/movies [Finder/Monitor Sel.] does not work even though it has been assigned to a certain key using [Custom Key - Sony DSC-RX10M2 | Help Guide (Printable PDF) - Page 247
camera-shake. The use of a tripod or the flash is recommended. [Hand-held Twilight] and [Anti Motion Blur] in [Scene Selection] are also effective in reducing blur. [305] Troubleshooting Troubleshooting Shooting still images/movies The monitor darkens after a short period of time passed. If you do - Sony DSC-RX10M2 | Help Guide (Printable PDF) - Page 248
. [Dial / Wheel Lock] is on. Hold down the Fn button until the lock is released, or set the [Dial / Wheel Lock] to [Unlock]. [308] Troubleshooting Troubleshooting Shooting still images/movies Sound is not recorded properly. If you turn down the [Audio Rec Level] to the lowest sound level, audio will - Sony DSC-RX10M2 | Help Guide (Printable PDF) - Page 249
Press DISP (Display Setting) on the control wheel to display the information. [311] Troubleshooting Troubleshooting Viewing images The image cannot be deleted. Cancel the protection. [312] Troubleshooting Troubleshooting Viewing images The image was deleted by mistake. Once you have deleted an image - Sony DSC-RX10M2 | Help Guide (Printable PDF) - Page 250
. Wireless access points may not be displayed on the product depending on the access point settings. Refer to the instruction manual of the wireless access point. [315] Troubleshooting Troubleshooting Wi-Fi [WPS Push] does not work. [WPS Push] may not work depending on the access point settings - Sony DSC-RX10M2 | Help Guide (Printable PDF) - Page 251
. Place this product closer to the smartphone. [320] Troubleshooting Troubleshooting Wi-Fi You cannot use One-Touch connection (NFC). NFC function is activated on your smartphone. For details, refer to the instruction manual of the smartphone. Do not place any metal objects other than a smartphone - Sony DSC-RX10M2 | Help Guide (Printable PDF) - Page 252
by a computer, you may not be able to import the images to a computer. Shoot using a memory card formatted by this product. [323] Troubleshooting Troubleshooting Computers The image and sound are interrupted by noise when viewing a movie on a computer. You are playing back the movie directly from - Sony DSC-RX10M2 | Help Guide (Printable PDF) - Page 253
Troubleshooting Printing Images are printed with both edges cut off. Depending on your printer, the left, right, top, and bottom edges of the image may be cut off. Especially when you print an image shot with [ Aspect Ratio] set to [16:9], the lateral end of the image may be cut off. When - Sony DSC-RX10M2 | Help Guide (Printable PDF) - Page 254
without recording the date. When you print images at a shop, images can be printed with the date if you ask them to do so. [330] Troubleshooting Troubleshooting Others The lens gets fogged. Moisture condensation has occurred. Turn off the product and leave it for about an hour before using it. [331 - Sony DSC-RX10M2 | Help Guide (Printable PDF) - Page 255
warm when you use it for a long time. This is not a malfunction. Turn off the product and do not use it for a while. [333] Troubleshooting Troubleshooting Others The Clock Set screen appears when you turn on the product. Set the date and time again. The internal rechargeable backup battery has - Sony DSC-RX10M2 | Help Guide (Printable PDF) - Page 256
trying these solutions, consult your Sony dealer or local authorized Sony service facility. [337] Troubleshooting Troubleshooting Others A sound is produced again. If the problem persists even after performing this procedure, format the memory card. [339] Troubleshooting Messages Messages Self- - Sony DSC-RX10M2 | Help Guide (Printable PDF) - Page 257
may need repair. Contact your Sony dealer or local authorized Sony service facility. C:32:□□ There is trouble with the product's hardware. Sony dealer or local authorized Sony service facility. Be prepared to give all numbers in the error code beginning from the E. [340] Troubleshooting Messages - Sony DSC-RX10M2 | Help Guide (Printable PDF) - Page 258
Memory Card Error An incompatible memory card is inserted. Formatting has failed. Format the memory card again. Unable to read memory card. Reinsert memory card. An incompatible memory card is inserted. The memory card is damaged. The terminal section of the memory card is dirty. Memory card locked. - Sony DSC-RX10M2 | Help Guide (Printable PDF) - Page 259
Sony service facility. Unable to magnify. Unable to rotate image. Images recorded with other products may not be enlarged or rotated. Cannot create more folders. A folder in the memory card has the first three digits "999." You cannot create any more folders on this camera. [341] Troubleshooting shot - Sony DSC-RX10M2 | Help Guide (Printable PDF) - Page 260
Overly bright conditions Lock-on AF Varying levels of brightness Lock-on AF High Frame Rate Flickering lights Sweep Panorama High Frame Rate Subjects too close to the product Sweep Panorama Subjects with large movements or subjects that move too quickly Superior Auto Sweep Panorama Auto HDR Lock-on
-
 1
1 -
 2
2 -
 3
3 -
 4
4 -
 5
5 -
 6
6 -
 7
7 -
8
-
9
-
10
-
11
-
12
-
13
-
14
-
15
-
16
-
17
-
18
-
19
-
20
-
21
-
22
-
23
-
24
-
25
-
26
-
27
-
28
-
29
-
30
-
31
-
32
-
33
-
34
-
35
-
36
-
37
-
38
-
39
-
40
-
41
-
42
-
43
-
44
-
45
-
46
-
47
-
48
-
49
-
50
-
51
-
52
-
53
-
54
-
55
-
56
-
57
-
58
-
59
-
60
-
61
-
62
-
63
-
64
-
65
-
66
-
67
-
68
-
69
-
70
-
71
-
72
-
73
-
74
-
75
-
76
-
77
-
78
-
79
-
80
-
81
-
82
-
83
-
84
-
85
-
86
-
87
-
88
-
89
-
90
-
91
-
92
-
93
-
94
-
95
-
96
-
97
-
98
-
99
-
100
-
101
-
102
-
103
-
104
-
105
-
106
-
107
-
108
-
109
-
110
-
111
-
112
-
113
-
114
-
115
-
116
-
117
-
118
-
119
-
120
-
121
-
122
-
123
-
124
-
125
-
126
-
127
-
128
-
129
-
130
-
131
-
132
-
133
-
134
-
135
-
136
-
137
-
138
-
139
-
140
-
141
-
142
-
143
-
144
-
145
-
146
-
147
-
148
-
149
-
150
-
151
-
152
-
153
-
154
-
155
-
156
-
157
-
158
-
159
-
160
-
161
-
162
-
163
-
164
-
165
-
166
-
167
-
168
-
169
-
170
-
171
-
172
-
173
-
174
-
175
-
176
-
177
-
178
-
179
-
180
-
181
-
182
-
183
-
184
-
185
-
186
-
187
-
188
-
189
-
190
-
191
-
192
-
193
-
194
-
195
-
196
-
197
-
198
-
199
-
200
-
201
-
202
-
203
-
204
-
205
-
206
-
207
-
208
-
209
-
210
-
211
-
212
-
213
-
214
-
215
-
216
-
217
-
218
-
219
-
220
-
221
-
222
-
223
-
224
-
225
-
226
-
227
-
228
-
229
-
230
-
231
-
232
-
233
-
234
-
235
-
236
-
237
-
238
-
239
-
240
-
241
-
242
-
243
-
244
-
245
-
246
-
247
-
248
-
249
-
250
-
251
-
252
-
253
-
254
-
255
-
256
-
257
-
258
-
259
-
260
 |
 |
Digital Still Camera
DSC-RX10M2
How to Use
Before Use
Names of parts
Checking the camera and the supplied items [1]
Identifying parts [2]
Icons and indicators
List of icons on the screen [3]
Display panel [4]
Using the strap
Using the shoulder strap [5]
Attaching the eyepiece cup
Attaching the eyepiece cup [6]
Adjusting the viewfinder
Adjusting the viewfinder (diopter-adjustment) [7]
In-Camera guide
About the [In-Camera Guide] [8]