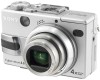
Sony DSC V1 Operating Instructions
Sony DSC V1 - Cyber-shot 5MP Digital Camera Manual
 |
UPC - 027242621459
View all Sony DSC V1 manuals
Add to My Manuals
Save this manual to your list of manuals |
Sony DSC V1 manual content summary:
- Sony DSC V1 | Operating Instructions - Page 1
manual thoroughly, and retain it for future reference. Owner's Record The model and serial numbers are located on the bottom. Record the serial number in the space provided below. Refer to these numbers whenever you call upon your Sony dealer regarding this product. Model No. DSC-V1 Serial No. DSC - Sony DSC V1 | Operating Instructions - Page 2
alert the user to the presence of important operating and maintenance (servicing) instructions in the literature SONY Model No.: DSC-V1 Responsible Party: Sony Electronics Inc. Address: 680 Kinderkamack Road, Oradell, NJ 07649 U.S.A. Telephone No.: 201-930-6972 This device complies with Part - Sony DSC V1 | Operating Instructions - Page 3
nearest Sony service camera. Notice If static electricity or electromagnetism causes data transfer to discontinue midway (fail), restart the application or disconnect and connect the USB cable again. "Memory Stick" and battery pack N50 For the Customers in the U.S.A. THIS DEVICE COMPLIES WITH PART - Sony DSC V1 | Operating Instructions - Page 4
zoom lens This camera is equipped with a power zoom lens. Be careful not to bump the lens, and be careful not to apply force to it. Clean the flash surface before use The heat of flash emission may cause dirt on the flash surface to become discolored or to stick to the flash surface, resulting - Sony DSC V1 | Operating Instructions - Page 5
of pictures in this manual are reproduced images, and are not actual images shot using this camera. Trademarks • "Memory Stick," and "MagicGate Memory Stick" are trademarks of Sony Corporation. • "Memory Stick Duo" and are trademarks of Sony Corporation. • "Memory Stick PRO" and are - Sony DSC V1 | Operating Instructions - Page 6
camera 4 Identifying the parts 8 Getting started Charging the battery pack 10 Using an external power source 13 Using your camera abroad 13 Turning on/off your camera 14 How to use the control button 14 Setting the date and time 15 Shooting still images Inserting and removing a "Memory Stick - Sony DSC V1 | Operating Instructions - Page 7
- For Macintosh users 95 Troubleshooting Troubleshooting 97 Warnings and messages 106 Self-diagnosis display 108 Additional information Number of images that can be saved or shooting time 109 Menu items 111 SET UP items 115 Precautions 118 On "Memory Stick 119 On "InfoLITHIUM" battery pack - Sony DSC V1 | Operating Instructions - Page 8
14) E Finder window F Microphone G Lens H RESET button (bottom surface) (97) I Speaker (bottom surface) J NIGHTSHOT/NIGHTFRAMING lever (56) K Advanced accessory shoe (65) L Flash (26) M Hook for shoulder* strap N ACC (Accessory) jack (65) O Self-timer lamp (25)/ Infrared ray emitter (56) P Hologram - Sony DSC V1 | Operating Instructions - Page 9
/CHG lamp (orange) (11, 26) B AE LOCK button (52) qf qg qh qj Attaching the strap qk ql L Battery eject lever (10) M Access lamp (17) N (Display/LCD on/off) button (28) O Control button (Menu on) (32) H DC IN jack (10, 13) I LCD screen J MENU button (39, 111) K Battery/"Memory Stick" cover 9 - Sony DSC V1 | Operating Instructions - Page 10
charging the battery pack (page 14). • Your camera operates with the "InfoLITHIUM" NP-FC11 battery pack (C type) (supplied). You can use only C type battery pack (page 120). 2 Battery eject lever , Install the battery pack, then close the battery/"Memory Stick" cover. Insert the battery pack with - Sony DSC V1 | Operating Instructions - Page 11
when charging is completed. /CHG lamp /CHG • After charging the battery pack, disconnect the AC Adaptor from the DC IN jack of your camera. To remove the battery pack Battery eject lever Open the battery/"Memory Stick" cover. Slide the battery eject lever in the direction of the arrow, and remove - Sony DSC V1 | Operating Instructions - Page 12
battery pack at a temperature of 25°C (77°F). The numbers of images that can be recorded or viewed take into account changing the supplied "Memory Stick when you use the camera with the battery back. When [Power Save] is set to [On] While charging the flash, the /CHG lamp flashes and the LCD screen - Sony DSC V1 | Operating Instructions - Page 13
and connect the AC Adaptor (supplied) to the DC IN jack of your camera. Open the cover in the arrow direction as illustrated above. Connect the plug an easily accessible wall outlet (wall socket) close by. If any trouble occurs while using the adaptor, immediately shut off the power by disconnecting - Sony DSC V1 | Operating Instructions - Page 14
appears (page 15). Turning off the power Press POWER again. The POWER lamp goes out, and the camera turns off. • Do not leave the camera with the lens portion extended for a long period of time with the battery pack or the AC Adaptor removed, as this may cause a malfunction. • If you turn on the - Sony DSC V1 | Operating Instructions - Page 15
on the control button, then press z. Select from [Y/M/D] (year/month/day), [M/D/Y] (month/day/year) or [D/M/Y] (day/month/year). • If the rechargeable button battery, which provides the power for saving the time data, is ever fully discharged (page 119), the Clock Set screen will appear again. When - Sony DSC V1 | Operating Instructions - Page 16
Clock Set Y/M/D M/D/Y D/M/Y 2003 / OK 1/ 1 12 : 00 OK AM Cancel 4 , Select the year, month, day, hour or minute item you want to set with b/B on the control button. The item to be set is indicated with v/V. Clock Set Y/M/D M/D/Y D/M/Y 2003 / OK 7/ 1 12 : 00 OK AM Cancel 5 , Set the - Sony DSC V1 | Operating Instructions - Page 17
to record or display images with the "Memory Stick." 3 Access lamp , Close the battery/"Memory Stick" cover. To remove a "Memory Stick" Open the battery/"Memory Stick" cover, then push the "Memory Stick" to pop it out. • Whenever the access lamp is lit, the camera is recording or reading an image - Sony DSC V1 | Operating Instructions - Page 18
Setting the still image size Mode dial 5.0M 5.0M 4.5M(3:2) 3.1M 1.2M VGA Image Size 1 , Set the mode dial to turn on the power. , and • You can also carry out this operation when the mode dial is set to P, S, A, M or SCN. 2 , Press (Image Size). The Image Size setup appears. • For details - Sony DSC V1 | Operating Instructions - Page 19
your image. This means you can save fewer images in your "Memory Stick." Choose an image size and quality level appropriately for the kind of mode, see page 41. • When images recorded using earlier Sony models are played back on this camera, the display may differ from the actual image size. • - Sony DSC V1 | Operating Instructions - Page 20
• Do not touch the lens portion while it is operating, such as when you press POWER to turn on the power or when the zoom function is working (page 23). • This camera can create new folders and select folders to be stored in the "Memory Stick" (page 41). 2 , Hold the camera steadily with both hands - Sony DSC V1 | Operating Instructions - Page 21
flashing to steadily lit, the camera is ready for shooting. ( Memory Stick." When the recording lamp (page 9) goes out, you can shoot the next image. • The frame indicated on the LCD screen shows the focus adjustment range (AF range finder, page 46). • When operating the camera using a battery - Sony DSC V1 | Operating Instructions - Page 22
and size, and "AF mode" which sets the focus operation according to the AF response and the battery consumption. See page 45 for details. Checking the last image you shot - Quick Review 60min Review VGA 101 8/8 100-0029 2003 7 4 10:30PM RETURN , Press b (7) on the control button. To return to - Sony DSC V1 | Operating Instructions - Page 23
Camera 2) (page 116). • The lens portion moves during zoom operation. Do not touch the lens portion while it is operating. • The zoom magnification cannot be changed while shooting movies (page 79). Smart zoom Digital maximum flashes and the centrally-located subject has priority to focus on. 23 - Sony DSC V1 | Operating Instructions - Page 24
way to the W side: Approx. 10 cm (4 inches) from the lens surface When the zoom is set all the way to the T side: Approx. 40 cm (15 3/4 inches ) from the lens surface 1 , Set the mode dial to , and press B ( ) on the control button. The - Sony DSC V1 | Operating Instructions - Page 25
in the frame, and press the shutter button fully down. The self-timer lamp (page 9) flashes and a beep sounds after you press the shutter button until the shutter operates (approximately 10 seconds later while standing in front of the camera, the focus and the exposure may not be correctly set. 25 - Sony DSC V1 | Operating Instructions - Page 26
speed becomes slower in dark places, so using a tripod is recommended. • While charging the flash, the /CHG lamp flashes. After the charging is complete, the lamp goes out. • You can mount an external flash on this camera (page 65). • This setting is maintained even when the power is turned off. To - Sony DSC V1 | Operating Instructions - Page 27
hologram AF emitter emits very bright light. Although there are no problems with safety, directly looking into the hologram AF emitter at telephoto end conversion lens (not supplied) to the camera, the hologram AF light is blocked. We recommend using hologram AF together with the Sony HVL-F32X flash - Sony DSC V1 | Operating Instructions - Page 28
101 96 S AF The finder is convenient when you want to save battery power, or when it is difficult to confirm the image using the LCD ). - The AF Mode is set to [Single] (page 47). - If you press (Flash mode)/ (Self-timer)/ (Macro), the image will be displayed on the LCD screen for approximately - Sony DSC V1 | Operating Instructions - Page 29
dial to SET UP. The SET UP screen appears. • When images are shot with the date and time superimposed, the date and time cannot be removed this operation with the mode dial set to P, S, A, M or SCN. 2 , Select (Camera 1) with v on 1 the control button, then press B. Select [Date/Time] with v/V, then - Sony DSC V1 | Operating Instructions - Page 30
Value: F2.8 Shutter Speed: 1/30 Exposure Value: 0.0 ISO: 100 101-0002 2003 7 4 10:30PM SINGLE DISPLAY BACK/NEXT You can view images shot with your camera almost immediately on the screen. You can select the following three methods for viewing images. Single (single-image) screen You can view - Sony DSC V1 | Operating Instructions - Page 31
Viewing still images Viewing an index screen (nine-image or triple-image) 60min VGA 101 3/9 101-0003 2003 7 4 10:30PM BACK/NEXT VOLUME SINGLE DISPLAY MOVE Aperture Value: F2.8 Shutter Speed: 1/30 Exposure Value: 0.0 ISO: 100 101-0002 2003 7 4 10:30PM SINGLE DISPLAY BACK/NEXT 2 , - Sony DSC V1 | Operating Instructions - Page 32
location of this switch may differ depending on your TV. For details, see the operating instructions supplied with the TV. 101-0002 2003 7 4 10:30PM BACK/NEXT VOLUME 3 , Set the mode dial to , and turn on the camera. Press b/B on the control button to select the desired image. • When using your - Sony DSC V1 | Operating Instructions - Page 33
TV with a video input jack and the A/V connecting cable (supplied). The color system of the TV must match that of your digital still camera. Check the following lists: NTSC system Bahama Islands, Bolivia, Canada, Central America, Chile, Colombia, Ecuador, Jamaica, Japan, Korea, Mexico, Peru, Surinam - Sony DSC V1 | Operating Instructions - Page 34
BACK/NEXT Delete Exit 1 , Set the mode dial to , and turn on the camera. Press b/B on the control button to select the image you want to delete. 2 with v on the control button, then press z. When the message "Memory Stick access" disappears, the image has been deleted. To continue and delete - Sony DSC V1 | Operating Instructions - Page 35
Deleting still images Deleting images in index (nine-image) mode Delete Exit Select All In Folder Delete Exit Select All In Folder SELECT MOVE TO NEXT 1 , While an index (nine-image) screen (page 31) is displayed, press (Delete). 2 , Select [Select] with b/B on the control button, then - Sony DSC V1 | Operating Instructions - Page 36
0002 2003 7 4 10:30PM OK BACK/NEXT 4 , Press (Delete) and select [OK] with B on the control button, then press z. When the message "Memory Stick access" disappears, the images have been deleted. To cancel deleting Select [Exit] with b on the control button, then press z. 1 , While an index - Sony DSC V1 | Operating Instructions - Page 37
to SET UP, and turn on the power. • The term "formatting" means preparing a "Memory Stick" to record images; this process is also called "initialization." The "Memory Stick" provided with this camera, and those available commercially, are already formatted, and can be used immediately. • When you - Sony DSC V1 | Operating Instructions - Page 38
60min Format All data will be erased Ready? O K Cancel OK 3 , Select [OK] with v on the control button, then press z. The "Formatting" message appears. When this message disappears, the format is complete. 38 - Sony DSC V1 | Operating Instructions - Page 39
menu display Press MENU. Changing the items in the SET UP screen a Set the mode dial to SET UP. The SET UP screen appears. Camera 1 1 Moving Image : 2 AF Mode : MPEG Movie Single Smart Zoom : On Date/Time : Off 1 Red Eye Reduction : Off 2 Hologram AF : Auto SELECT b Press v/V/b/B on - Sony DSC V1 | Operating Instructions - Page 40
the jog dial The jog dial is used to change the setting values when shooting with the manual adjustment modes (shutter speed priority mode, aperture priority mode, manual exposure mode), EV adjustment, focusing manually or choosing AF range finder frame. Mode dial To select the item a Turn the jog - Sony DSC V1 | Operating Instructions - Page 41
60). • This setting is maintained even when the power is turned off. Creating or selecting a folder Mode dial: SET UP Your camera can create multiple folders within a "Memory Stick". You can select the folder used to store images. When not creating a new folder, "101MSDCF" folder is selected as the - Sony DSC V1 | Operating Instructions - Page 42
number one higher than the largest number in the "Memory Stick", and the folder becomes the recording folder. To cancel folder creation Select [Cancel] in step 2 or 3. • Once you create a new folder, you cannot delete the new folder with the camera. • Images are recorded in the newly created folder - Sony DSC V1 | Operating Instructions - Page 43
button is pressed halfway down. • When the brightness changes, the F value and shutter speed also change while maintaining the shift amount. • When the flash mode setting is changed, Program Shift may be canceled. • You may not be able to shift the F value and shutter speed combination in dark - Sony DSC V1 | Operating Instructions - Page 44
the shutter button is pressed halfway down. You can shoot in this condition, but we recommend that you adjust the flashing values again. • The flash is set to (Forced flash) or (No flash). • You can adjust an exposure value when the mode dial is set to S or A (page 49). Mode dial Jog dial Shutter - Sony DSC V1 | Operating Instructions - Page 45
F8 (minimum) (maximum) a Set the mode manually adjust the shutter speed and aperture values to achieve the desired shooting condition according to your purpose. 60min M 5.0MFINE 101 4 S AF 0EV F5.6 50 The difference between the set value and the appropriate exposure determined by the camera - Sony DSC V1 | Operating Instructions - Page 46
the AF lock function lets you shoot in the desired image composition. Take care to hold the camera steady so that the subject does not deviate from the range finder frame. a Set the mode finder frame indicator flashes and the AF range finder frame is not displayed. The focus is adjusted automatically - Sony DSC V1 | Operating Instructions - Page 47
the focus is locked. • Battery consumption may be faster than in Single AF mode. Continuous AF ( C AF) The camera adjusts the focus before the lock is completed in the following cases, and the C AF indicator flashes. The camera operates in Monitoring AF mode. - When shooting in the dark place - Sony DSC V1 | Operating Instructions - Page 48
the subject at the edge of the frame, the camera may focus on the center instead of on the subject the shutter button halfway down. When the AE/AF lock indicator stops flashing and remains on, return to the fully composed shot, and press the shutter button fully down. AE/AF lock indicator 60min - Sony DSC V1 | Operating Instructions - Page 49
may not get a clear focus. In such cases, the focus setting information flashes. Press the zoom W button until the indicator stops flashing. • The focus preset does not work properly when attaching a conversion lens (not supplied). Adjusting the exposure - EV adjustment Mode dial: P/S/A/SCN/ This - Sony DSC V1 | Operating Instructions - Page 50
exposure Return the exposure adjustment value to 0EV. • If a subject is being shot in extremely bright or dark conditions, or the flash is used, the exposure adjustment may not be effective. Shooting techniques Normally, the camera automatically adjusts the exposure. If the image is too dark or too - Sony DSC V1 | Operating Instructions - Page 51
a single-image or during Quick Review. In particular a large difference may appear in the following cases: - When the flash strobes - When using the NightFraming performed with priority given to the center of the image. The camera determines the exposure based on the brightness of a subject near the - Sony DSC V1 | Operating Instructions - Page 52
Spot metering ( ) Light is measured only for the specific region where the subject is located. This lets you adjust the exposure to the subject even when the subject is backlit or there is strong contrast between the subject and the background. Position the spot metering cross hair on one point of - Sony DSC V1 | Operating Instructions - Page 53
. Portion of the image used to determine the exposure Shooting three images with the exposure shifted - Exposure Bracket Mode dial: /P/S/A/M/SCN The camera records three images in succession, each with the exposure value shifted. The exposure compensation value can be set between ±1.0EV from the - Sony DSC V1 | Operating Instructions - Page 54
the mode dial to SET UP. The SET UP screen appears. b Select (Camera 2) with v/V 2 and [Bracket Step] with B/v, then press B. c and these settings are also used for the other images. • When the exposure is manually adjusted (page 49), the adjusted value is used for the center value. • The recording - Sony DSC V1 | Operating Instructions - Page 55
flashes quickly. When the white balance has been adjusted and stored in the memory, the indicator stops flashing. • The indicator means: Slow flashing: Do not shake or strike the camera during quick flashing the indicator. • If the indicator keeps flashing even when you press v, record - Sony DSC V1 | Operating Instructions - Page 56
flash mode is set to (Forced flash) or SL (Slow synchro), the white balance is adjusted to the condition with the flash problems, but digital still cameras cannot recognize the correct colors without adjustments. Normally, the camera Infrared ray emitter • Filters (not supplied) may block the infrared - Sony DSC V1 | Operating Instructions - Page 57
) in Exposure Bracket, Multi Burst or Burst 3 mode, the BRK/ / indicator flashes. • Do not use the NightShot function in bright places (e.g. outdoors in the daytime). This may cause your camera to malfunction. • Images shot using the NightShot function are recorded with a green tint as if viewing an - Sony DSC V1 | Operating Instructions - Page 58
dial to P, S, A, M or SCN. b Press MENU. The menu appears. c Select [ ] (Flash Level) with b/B, then select the desired setting with v/V. High: Makes the flash level higher than normal. Normal: Normal setting. Low: Makes the flash level lower than normal. • You can carry out this operation even - Sony DSC V1 | Operating Instructions - Page 59
2, each time you repeat steps 1 through 3, the last frame you shot is deleted. • Note that all images are not recorded on the "Memory Stick" until you carry out step 6. • For the number of images GIF files not created on this camera may not be displayed correctly. Advanced still image shooting 59 - Sony DSC V1 | Operating Instructions - Page 60
1.2M). • See page 72 to play back images recorded in Multi Burst mode using this camera. • For the number of images that can be recorded in Multi Burst mode, see page 109. • You cannot use the flash in this mode. • Date and time cannot be superimposed onto images. Shooting three images continuously - Sony DSC V1 | Operating Instructions - Page 61
. When the "Recording" indication disappears, you can shoot the next image. To return to normal mode Select [Normal] in step 3. • You cannot use the flash in this mode. • During shooting in this mode, the images are not displayed on the screen. Compose the image before pressing the shutter button - Sony DSC V1 | Operating Instructions - Page 62
, you can shoot the next image. To return to normal mode Select [Normal] in step 3. • For instructions on how to attach images to an e-mail message, consult the User's Manual for your e-mail software. • For the number of images you can record in E-mail mode, see page 109. Shooting still images - Sony DSC V1 | Operating Instructions - Page 63
shutter speed becomes slower, so we recommend that you use a tripod to prevent shaking. • You cannot shoot in macro mode. • You cannot use the flash. Twilight portrait mode Suitable for shooting portraits in dark places. Allows you to shoot sharp images of people in dark places without losing the - Sony DSC V1 | Operating Instructions - Page 64
Control button Mode dial • You cannot shoot in macro mode. • The flash is set to (Forced flash) or (No flash). Portrait mode Backgrounds blur away, and the subject is sharpened. 64 • The flash is set to (Forced flash) or (No flash). Beach mode When shooting seaside or lakeside scenes, the blue of - Sony DSC V1 | Operating Instructions - Page 65
Mode dial: P/S/A/M/SCN/ You can digitally process images to obtain special effects. Solarize flash (not supplied) will allow you to shoot more vivid flash pictures than when using an internal flash. For details, please consult the operating instructions supplied with your flash. Advanced accessory - Sony DSC V1 | Operating Instructions - Page 66
set the one-push white balance mode (page 55). Using the Sony flash (not supplied) You can mount the Sony HVL-F32X or HVL-F1000 flash on the advanced accessory shoe of your camera. The HVLF32X is also equipped with automatic flash level adjustment and AF fill light shooting functions. a Mount the - Sony DSC V1 | Operating Instructions - Page 67
wide or telephoto effects. For details, please consult the operating instructions supplied with your conversion lens. • Always turn off the camera before mounting or removing the conversion lens. Failure to do so may result in damage or other malfunction. • When using the built-in flash, the light - Sony DSC V1 | Operating Instructions - Page 68
menu appears. c Select [Folder] with b, then press z. When multiple folders are created in the "Memory Stick" When the first or last image in the folder is displayed, the following indicators appear on the screen . • You can play back images from a last-shot one without selecting the folder. 68 - Sony DSC V1 | Operating Instructions - Page 69
You can enlarge a part of an image up to image to be enlarged. c Press the zoom lever to the T (telephoto) side to zoom in on the image. d Select the desired portion Burst images. • You can enlarge the images displayed with the Quick Review function (page 22) by performing steps c to e. Press V v: - Sony DSC V1 | Operating Instructions - Page 70
(TIFF) images. • You cannot trim images displayed with Quick Review. Playing back successive images - Slide Show Mode dial: You can all images in the selected folder. All: Plays back all images stored in the "Memory Stick". Repeat On: Plays back images in a continuous loop. Off: After all the - Sony DSC V1 | Operating Instructions - Page 71
Advanced still image viewing To stop slide show playback Press z, select [Exit] with B, then press z again. To skip to the next/previous image during the slide show Press B (next) or b (previous). • The interval setting time is approximate, and may vary according to the playback image size. - Sony DSC V1 | Operating Instructions - Page 72
uncompressed (TIFF) images. • You may not be able to rotate images shot with other cameras. • When viewing images on a computer, the image rotation information may not be reflected depending on the application software. Playing back images shot in Multi Burst mode Mode dial: You can play back Multi - Sony DSC V1 | Operating Instructions - Page 73
101 14/14 To return to the normal playback Press z in step 4. The playback starts from the frame displayed on the LCD screen. To delete shot images When using this mode, you cannot delete only certain frames. When you delete images, all 16 of the frames are deleted at the same - Sony DSC V1 | Operating Instructions - Page 74
Still image editing Protecting images - Protect Mode dial: In single-image mode a Set the mode dial to . b Display the image you want to protect with b/B. This function protects images against accidental erasure. Control button Mode dial c Press MENU. The menu appears. d Select [Protect] with - Sony DSC V1 | Operating Instructions - Page 75
Still image editing g Press MENU. h Select [OK] with B, then press z. The - indicator turns white. The selected images are protected. To exit the Protect function Select [Cancel] in step 4 or select [Exit] in step 8, then press z. To cancel individual protection Select the image to be unprotected - Sony DSC V1 | Operating Instructions - Page 76
images shot with your camera that Digital Print Order Format) standard. Control button Mode dial MENU • You cannot mark movies (MPEG Movie) or Clip Motion images. • In E-mail mode, a print (DPOF) mark is marked on the normal size image that is recorded at the same time. • When you mark images shot - Sony DSC V1 | Operating Instructions - Page 77
Still image editing • If you mark an image shot in TIFF mode with a print (DPOF) mark, only the uncompressed (TIFF) image is printed, and the JPEG image recorded at the same time is not - Sony DSC V1 | Operating Instructions - Page 78
g Press MENU. h Select [OK] with B, then press z. The mark turns white. The mark setting is completed. To unmark marks Select the images to be unmarked in step 5, then press z. To unmark all the marks in the folder Select [All In Folder] in step 4, then press z. Select [Off], then press z. To exit - Sony DSC V1 | Operating Instructions - Page 79
and the camera starts recording flash. • The date and time are not superimposed onto movies. • The zoom magnification cannot be changed while shooting movies. Enjoying movies a Set the mode dial to . b Press (Image Size). The Image Size setup appears. • Recording stops when the "Memory Stick - Sony DSC V1 | Operating Instructions - Page 80
page 127. • The procedure for viewing movies on a TV is the same as that for viewing still images (page 32). • The movies recorded using earlier Sony models may be also displayed a size smaller. 101_0010 2003 7 4 10:30PM STOP REV/CUE VOLUME Playback bar To stop playback Press z again. To adjust - Sony DSC V1 | Operating Instructions - Page 81
with b/B. c Press (Delete). The movie has not yet been deleted at this point. d Select [Delete] with v, then press z. When the message "Memory Stick access" disappears, the movie has been deleted. e To continue and delete other movies, display the movie you want to delete with b/B, and - Sony DSC V1 | Operating Instructions - Page 82
101_0010 2003 7 4 10:30PM • OK BACK/NEXT The movie has not yet been deleted at this point. d Select [Delete] with v, then press z. When the message "Memory Stick access" disappears, the middlepositioned movie has been deleted. To cancel deletion Select [Exit] in step 4, then press z. 82 - Sony DSC V1 | Operating Instructions - Page 83
Editing movies Mode dial: You can cut movies, or delete unnecessary portions of movies. This is the recommended mode to use when the "Memory Stick" capacity is insufficient, or when you attach movies to your e-mail messages. The file numbers assigned when movies are cut The cut movies are assigned - Sony DSC V1 | Operating Instructions - Page 84
g Select [OK] with v, then press z. The movie is cut. To cancel cutting Select [Exit] in step 5 or 7. The movie appears on the screen again. • You cannot cut the following images. - Clip Motion - Multi Burst - Still image - MPEG movie files not long enough to cut - Protected MPEG movie files • You - Sony DSC V1 | Operating Instructions - Page 85
your computer - For Windows users Recommended computer environment OS: Memory Stick" slot is provided, you can copy images using an additional device. See the Sony Website for details. http://www.sony.net/ Contents of the CD-ROM x USB Driver This driver is needed in order to connect the camera - Sony DSC V1 | Operating Instructions - Page 86
the CD-ROM drive. Do not connect your camera to your computer at this time. The model selection screen appears. If it does not appear, double-click (My Computer) t (ImageMixer) in that order. b Click [Cyber-shot] on the model selection screen. c Click [USB Driver] on the installing menu screen. The - Sony DSC V1 | Operating Instructions - Page 87
Installing "Image Transfer" You can use the "Image Transfer" software to copy images to your computer automatically when you connect the camera to your computer with the supplied USB cable. a Click [Cyber-shot] on the model selection screen. c Click [Next]. When "Licence Agreement" screen appears, - Sony DSC V1 | Operating Instructions - Page 88
installed on your computer, a screen that asks if you want to install the driver will appear. Follow the instructions that appear on the screen. Installing "ImageMixer" You can use the "ImageMixer Ver. 1.5 for Sony" software to copy, view and edit images, and create video CDs. For details, see - Sony DSC V1 | Operating Instructions - Page 89
be failed or cause data corruption by battery shutoff. We recommend that you use the AC Adaptor. • For further details on the AC Adaptor, see page 13. • For further details on the "Memory Stick," see page 17. b Turn on your computer and the camera. • When you use a desktop computer, we recommend - Sony DSC V1 | Operating Instructions - Page 90
P Disconnecting the USB cable from your computer, removing the "Memory Stick" from your camera or turning off the power during USB connection For Windows 2000, Me, or XP users 1 Double-click on the tasktray. 2 Click (Sony DSC), then click [Stop]. 3 Confirm the device on the confirmation screen, then - Sony DSC V1 | Operating Instructions - Page 91
The contents of the "Memory Stick" inserted in your camera appear. • This section Sony DSC]. (When using Windows 2000, rightclick [ Sony DSC].) 2 Click [Remove] (or [Uninstall] in Windows 2000). The "Confirm Device Removal" screen appears. 3 Click [OK]. The device is deleted. Try the USB driver - Sony DSC V1 | Operating Instructions - Page 92
and Camera Wizard], then click [OK]. The "Scanner and Camera Wizard" screen appears. b Click [Next]. The images stored on the "Memory Stick" are use the "ImageMixer Ver. 1.5 for Sony" software to view and edit images on your computer. For details, see the software's help files. b Double-click the - Sony DSC V1 | Operating Instructions - Page 93
Image file storage destinations and file names Image files recorded with your camera are grouped as folders in the "Memory Stick". Example: For Windows Me users Folder containing image data recorded using a camera without the folder creation function Folder containing image data recorded with this - Sony DSC V1 | Operating Instructions - Page 94
) • Still image files recorded simultaneously in - E-Mail mode (page 62) - TIFF mode (page 61) - Voice mode (page 62) • Small-size image files shot in E-Mail mode (page 62) • Audio files shot in Voice mode (page 62) • Uncompressed (TIFF) image file recorded in TIFF mode (page 61) • Clip Motion files - Sony DSC V1 | Operating Instructions - Page 95
mode, communication between your camera and your computer may not recover at the same time. When a USB connector is not provided on your computer When neither a USB connector nor a "Memory Stick" slot is provided, you can copy images using an additional device. See the Sony Website for details. http - Sony DSC V1 | Operating Instructions - Page 96
recognized icon on the desktop. The contents of the "Memory Stick" inserted in your camera appear. 2 Double-click "DCIM." 3 Double-click the driver and application. • You can use the "ImageMixer Ver. 1.5 for Sony" software to copy, view and edit images, and create video CDs. See the operation manual - Sony DSC V1 | Operating Instructions - Page 97
work properly, consult your Sony dealer or local authorized Sony service facility. Troubleshooting Battery pack and power Symptom Cause Solution You cannot charge the battery pack. • The camera is turned on. p Turn the camera off (page 14). The battery pack cannot • The battery pack is not - Sony DSC V1 | Operating Instructions - Page 98
battery pack (page 10). p Replace the battery pack with a new one. • If you do not operate the camera for about three minutes when using a battery pack, the camera turns off automatically to prevent wearing down the battery mode. Make sure to position the lens farther away from the subject than the - Sony DSC V1 | Operating Instructions - Page 99
MPEG Movie). • You cannot use the zoom while a wide end - conversion lens is mounted. • You cannot use smart zoom while shooting movies (MPEG Movie). phenomenon is occurring. p This is not a malfunction. • The camera is functioning to increase the visibility of the LCD screen by temporarily - Sony DSC V1 | Operating Instructions - Page 100
camera Memory Stick" has been inserted. • The capacity of the "Memory Stick" is insufficient. • The write-protect switch on the "Memory Stick" is set to the LOCK position. • You cannot record images while charging the flash 44). • The sound is made by the lens in operation. p This is not a - Sony DSC V1 | Operating Instructions - Page 101
SCN or (Clip Motion). • The flash is set to (No flash). • The (Twilight mode) is or and 58). p Set the flash to auto (No indicator), SL (Slow synchro) (page 26). (Clip Motion) (pages 20 (Forced flash) or p Set the flash to (Forced flash) (page 26). p Set it flash when you press and hold - Sony DSC V1 | Operating Instructions - Page 102
/Editing Images Symptom Cause Solution Your camera cannot delete an image. You have deleted an image by mistake. The resizing function does not work. 102 • The image is protected. p Cancel the protection (page 74). • The write-protect switch on the "Memory Stick" p Set it to the recording - Sony DSC V1 | Operating Instructions - Page 103
files and still images cannot be cut. Computers Troubleshooting Symptom You do not know if the OS of your computer is compatible. You cannot install the USB driver. Your computer does not recognize your camera. Cause - - • The camera is turned off. • The battery level is low. • You are not using - Sony DSC V1 | Operating Instructions - Page 104
- - p Connect the camera and your computer correctly using Sony" application software, click on HELP. p Consult the computer or software manufacturer. The image and sound are interrupted by noise when you view a movie on a computer. • You are playing back the file directly from the "Memory Stick - Sony DSC V1 | Operating Instructions - Page 105
that you set the "Memory Stick" write-protect by formatting. You cannot restore them. switch to the LOCK position to prevent accidental erasure (page 119). Others Symptom Your camera does not work. Cause • You are not using an "InfoLITHIUM" battery pack. • The battery level is low. (The - Sony DSC V1 | Operating Instructions - Page 106
, or create a new folder. Cannot create more folders • The folder whose first three digits of the name is "999" exists in the "Memory Stick." You cannot create any folders. Cannot record • The camera cannot record images in the selected folder. Select a different folder (page 41). File error - Sony DSC V1 | Operating Instructions - Page 107
battery time left. • The amount of lights is not sufficient, so you are not holding the camera steady enough. Use the flash, mount the camera on a tripod, or otherwise secure the camera , P or (Clip Motion) while NIGHTFRAMING is set. • A problem with the lens caused an error. Troubleshooting 107 - Sony DSC V1 | Operating Instructions - Page 108
97) located on the bottom of the camera, then turn on the power again. If you are unable to solve the problem even after trying the corrective actions a few times, contact your Sony dealer or local authorized Sony service facility and inform them of the 5-digit code. Self-diagnosis display 108 - Sony DSC V1 | Operating Instructions - Page 109
on the capacity of the "Memory Stick," the image size, and the image quality. Refer to the following charts when you choose a "Memory Stick." • The number of 88 486 32MB 178 982 Normal: When 10 frames are shot Mobile: When two frames are shot 64MB 358 1971 (Units: images) 128MB 718 3951 MSX - Sony DSC V1 | Operating Instructions - Page 110
Voice (Units: images) 5.0M 4.5M(3:2) 3.1M 1.2M VGA 16MB 32MB 64MB 128MB MSX-256 MSX-512 MSX-1G 6 (11) 12 (22) 25 (45) 50 (91) 90 (166) 183(337) 375 (689) 6 (11) 12 (22) 25 (45) 50 (91) 90 (166) 183(337) 375 (689) 9 (17) 19 (34) 39 (69) 79 (138) 142 (246) 290 (500) 592 (1022) 22 (38) 45 (78) 91 ( - Sony DSC V1 | Operating Instructions - Page 111
Menu items Menu items that can be modified differ depending on the position of the mode dial. The screen shows only the items you can operate in each specific mode. Factory settings are indicated with x. When the mode dial is set to Item Mode (REC Mode) Setting TIFF Voice E-Mail Exp Brktg Burst - Sony DSC V1 | Operating Instructions - Page 112
slightly shifted (page 53). - Records three images in succession (page 60). - Records an image using the normal recording mode. Selects the amount of flash light (page 58). Sets the image special effects (page 65). Adjusts the sharpness of the image. The indicator appears (except when the setting is - Sony DSC V1 | Operating Instructions - Page 113
[Clip Motion] in the SET UP settings) Item (Metering Mode) WB (White Bal) ± (Flash Level) PFX (P.Effect) Setting Spot / Center / xMulti / WB / / / / / xAuto (page 51). Sets the white balance (page 55). Selects the amount of flash light (page 58). Sets the image special effects (page 65). When the - Sony DSC V1 | Operating Instructions - Page 114
When the mode dial is set to Item Folder Protect DPOF Setting OK / Cancel - - Slide Resize Rotate Divide Interval Image Repeat Start Cancel 5.0M / 3.1M / 1.2M / VGA / Cancel (counter clockwise) / (clockwise) / OK / Cancel OK / Cancel Description Selects the folder containing the image you want - Sony DSC V1 | Operating Instructions - Page 115
SET UP screen appears. Factory settings are indicated with x. 1 (Camera 1) Item Moving Image AF Mode Smart Zoom Date/Time Red Eye not appear during recording. On / xOff Reduces the red-eye phenomenon when using a flash (page 26). xAuto / Off Selects whether to emit hologram AF light. Used when - Sony DSC V1 | Operating Instructions - Page 116
Set to [On] when using a commercially available external flash (page 65). Sets the zoom lever W (wide) side/T (telephoto) side directions (page 23). Description Formats the "Memory Stick." Note that formatting erases all data on a "Memory Stick," including even protected images (page 37). - Assigns - Sony DSC V1 | Operating Instructions - Page 117
/ xDark Shutter xOn Off - Description Selects whether to use the Power Save mode (page 12). Displayed only when you are using the camera with the battery pack. Selects the LCD brightness. This has no effect on the recorded images. Selects the brightness of the LCD backlight. Selecting [Bright - Sony DSC V1 | Operating Instructions - Page 118
. Cleaning the lens Wipe the lens with a soft cloth to remove fingerprints, dust, etc. 118 Cleaning the DC plug Clean the DC plug of the AC Adaptor with a dry cotton bud. Do not use the dirty plug. Use of the dirty plug may not properly charge the battery pack. Cleaning the camera surface Clean - Sony DSC V1 | Operating Instructions - Page 119
located inside the cover next to the tripod screw hole on the bottom of the camera. Never remove the rechargeable button battery except when disposing of the camera. On "Memory Stick" "Memory Stick" is a new compact, portable and versatile IC recording medium with a data capacity that exceeds the - Sony DSC V1 | Operating Instructions - Page 120
. • Do not insert a Memory Stick Duo Adaptor without a "Memory Stick Duo" attached. Doing so may result in malfunction of the unit. Note on using "Memory Stick PRO" (not supplied) "Memory Stick PRO" with a capacity up to 1GB can be used with this camera. On "InfoLITHIUM" battery pack What is the - Sony DSC V1 | Operating Instructions - Page 121
close to your body to warm it up, and insert it in your camera immediately before you start shooting. • Frequently operating the zoom or flash wears out the battery charge faster. • We recommend having spare battery packs handy for two or three times the expected shooting time, and making trial - Sony DSC V1 | Operating Instructions - Page 122
-20°C to +60°C (-4°F to +140°F) Dimensions 99.5×65.2×56.8 mm (4×2 5/8×2 1/4 inches) (W/H/D, excluding maximum protrusions) Mass Approx. 300 g (10.6 oz) (including battery pack NP-FC11, "Memory Stick", and hand strap) Built-in microphone Electret condenser microphone Built-in speaker Dynamic speaker - Sony DSC V1 | Operating Instructions - Page 123
V Capacity 2.8 Wh (780 mAh) x Accessories • AC Adaptor (1) • Power cord (mains lead) (1) • USB cable (1) • NP-FC11 battery pack (1) • A/V connecting cable (1) • Hand strap (1) • "Memory Stick" (32 MB) (1) • CD-ROM (USB driver SPVD-010) (1) • Operating instructions (1) Design and specifications are - Sony DSC V1 | Operating Instructions - Page 124
(50) J Low battery warning indicator (107) K AF range finder frame (46) L Spot metering cross hair (52) M Image size indicator (18) N Image quality indicator (41) O Recording folder indicator (41) P Remaining number of recordable images indicator (19) Q Remaining "Memory Stick" capacity indicator - Sony DSC V1 | Operating Instructions - Page 125
effect indicator (65) G Low battery warning indicator (107) H AF range finder frame (46) I Spot metering cross hair (52) J Image size indicator (79) K Recording time [maximum recordable time] indicator L Recording folder indicator (41) M Remaining "Memory Stick" capacity indicator N AF range - Sony DSC V1 | Operating Instructions - Page 126
Playback folder indicator (68) H Recording folder indicator (41) I Remaining "Memory Stick" capacity indicator J Image number/Number of images recorded in selected folder date of the playback image (29)/Menu/Guide menu (39) 126 Page numbers in parentheses indicate the location of additional - Sony DSC V1 | Operating Instructions - Page 127
F Image number/Number of images recorded in selected folder G Recording folder indicator (41) H Remaining "Memory Stick" capacity indicator I Counter (80) J Playback image (80) K Menu/Guide menu (39) Additional information Page numbers in parentheses indicate the location of additional important - Sony DSC V1 | Operating Instructions - Page 128
Access lamp 17 Advanced accessory shoe 66 AE LOCK 52 AE/AF lock 21, 22, 48 AF lock 48 AF Mode 47 AF range finder frame 45 Aperture priority mode 45 Auto adjustment mode 20 Auto Focus 22, 45 Auto power-off function 14 A/V connecting cable 32 B Battery pack battery life 12, 121 - Sony DSC V1 | Operating Instructions - Page 129
125, 126, 127 M Macro 24 Manual exposure mode 45 Memory Stick 17, 119 remaining indicator 124 Menu 65 Playback zoom 69 Power AC Adaptor 10, 13 battery pack 10 on/off 14 Power Save 12, 117 mode 21 Program Shift 43 Protect 74 Q Quick Review 22 R Red Eye Reduction 26 Remaining indicator 11 - Sony DSC V1 | Operating Instructions - Page 130
T TIFF 61, 94 Trimming 70 TV color system 33 U USB 89, 95 USB driver 86, 95 Using your camera abroad 13 V Viewing images on the LCD screen .......... 30, 80 Viewing images on your computer 92 Voice 62 W Warnings and messages 106 White Balance 55 Z Zoom 23 Zoom lever 23, 116 130 - Sony DSC V1 | Operating Instructions - Page 131
- Sony DSC V1 | Operating Instructions - Page 132
308231111 Printed on 100% recycled paper using VOC (Volatile Organic Compound)-free vegetable oil based ink. Sony Corporation Printed in Japan Additional information on this product and answers to frequently asked questions can be found at our Customer Support Website.
-
 1
1 -
 2
2 -
 3
3 -
 4
4 -
 5
5 -
 6
6 -
 7
7 -
8
-
9
-
10
-
11
-
12
-
13
-
14
-
15
-
16
-
17
-
18
-
19
-
20
-
21
-
22
-
23
-
24
-
25
-
26
-
27
-
28
-
29
-
30
-
31
-
32
-
33
-
34
-
35
-
36
-
37
-
38
-
39
-
40
-
41
-
42
-
43
-
44
-
45
-
46
-
47
-
48
-
49
-
50
-
51
-
52
-
53
-
54
-
55
-
56
-
57
-
58
-
59
-
60
-
61
-
62
-
63
-
64
-
65
-
66
-
67
-
68
-
69
-
70
-
71
-
72
-
73
-
74
-
75
-
76
-
77
-
78
-
79
-
80
-
81
-
82
-
83
-
84
-
85
-
86
-
87
-
88
-
89
-
90
-
91
-
92
-
93
-
94
-
95
-
96
-
97
-
98
-
99
-
100
-
101
-
102
-
103
-
104
-
105
-
106
-
107
-
108
-
109
-
110
-
111
-
112
-
113
-
114
-
115
-
116
-
117
-
118
-
119
-
120
-
121
-
122
-
123
-
124
-
125
-
126
-
127
-
128
-
129
-
130
-
131
-
132
 |
 |
3-082-311-
11
(1)
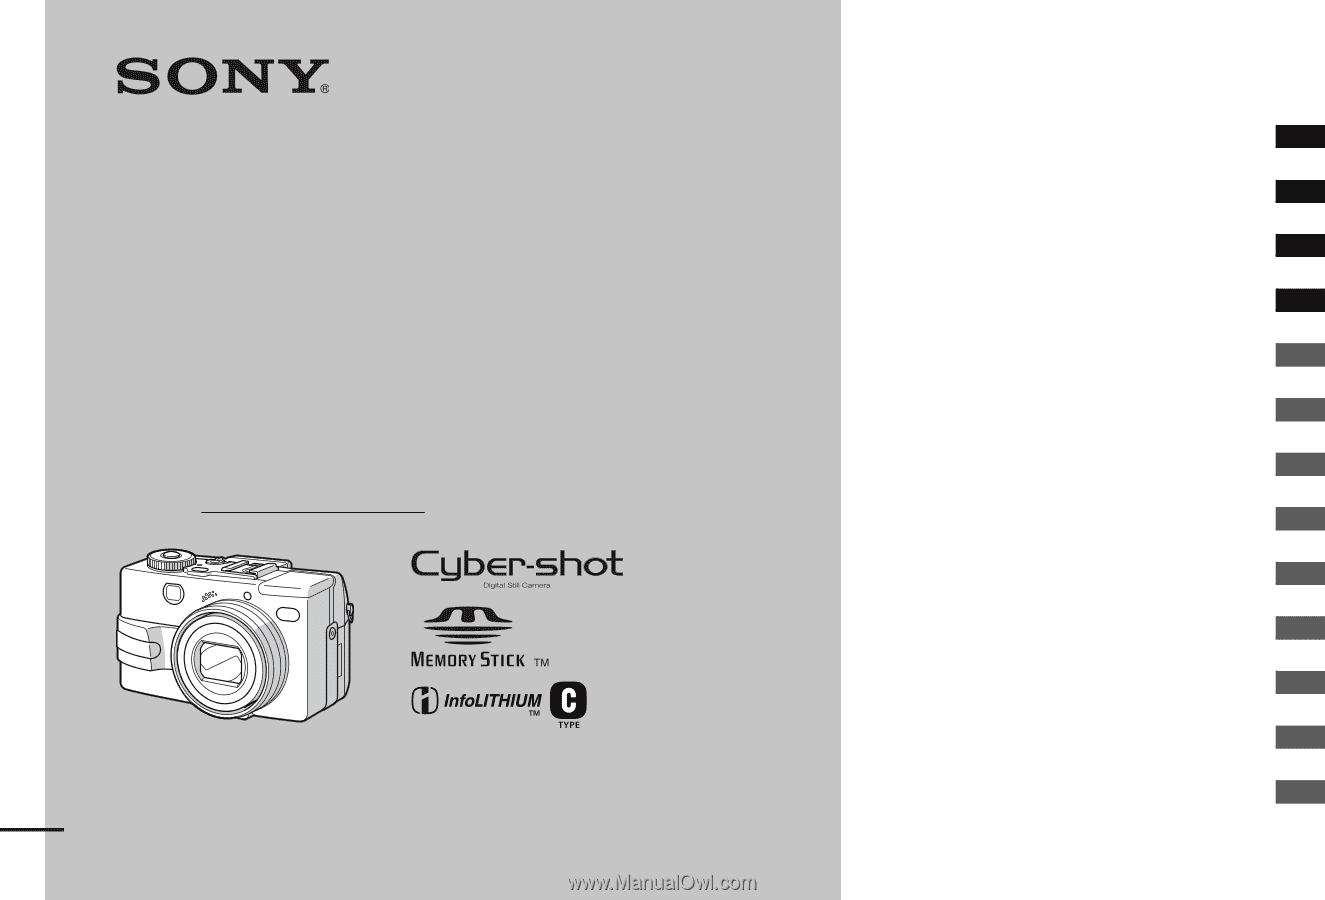
Digital Still Camera
Operating Instructions
Before operating the unit, please read this manual thoroughly, and
retain it for future reference.
Owner’s Record
The model and serial numbers are located on the bottom. Record the
serial number in the space provided below. Refer to these numbers
whenever you call upon your Sony dealer regarding this product.
Model No. DSC-V1
Serial No.
DSC-V1
© 2003 Sony Corporation
Getting started
________________________
Shooting still images
__________________
Viewing still images
___________________
Deleting still images
__________________
Before advanced operations
_____________
Advanced still image shooting
___________
Advanced still image viewing
____________
Still image editing
______________________
Enjoying movies
_______________________
Enjoying images on your computer
_________
Troubleshooting
_______________________
Additional information
___________________
Index
_________________________________