Sony DSC V1 Operating Instructions - Page 8
Identifying the parts, SET UP: To set the SET UP items - accessories
 |
UPC - 027242621459
View all Sony DSC V1 manuals
Add to My Manuals
Save this manual to your list of manuals |
Page 8 highlights
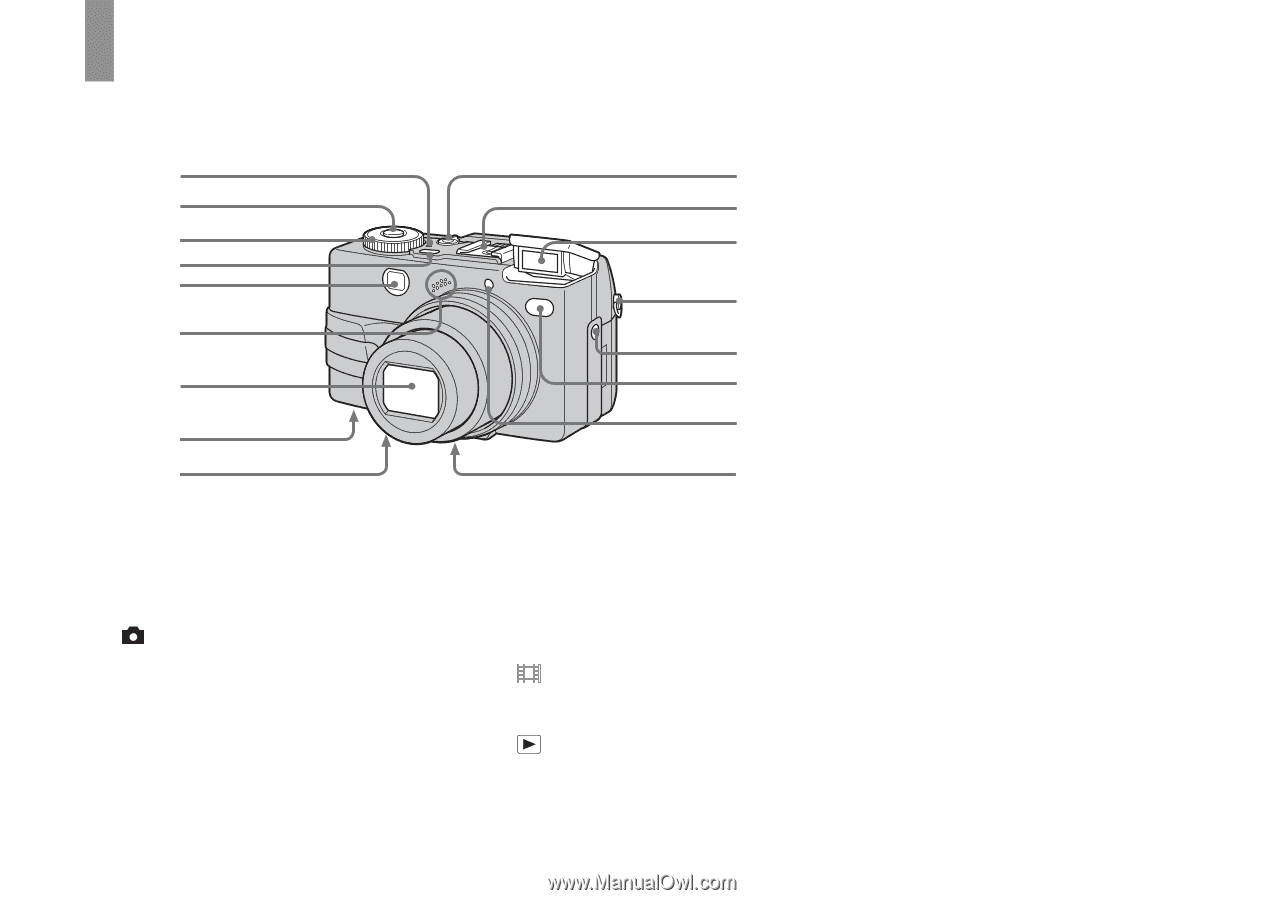
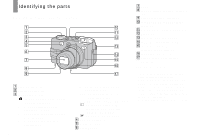
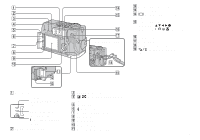
Identifying the parts See the pages in parentheses for details of operation. 1 0 2 qa 3 qs 4 5 qd 6 qf 7 qg qh 8 9 qj A POWER lamp (14) B Shutter button (21) C Mode dial (15, 111) : To shoot still images in auto adjustment mode P: To shoot still images in programmed mode S: To shoot in the shutter speed priority mode A: To shoot in the aperture priority mode 8 M: To shoot in the manual exposure mode SCN: To shoot in the Scene Selection mode SET UP: To set the SET UP items : To shoot movies, Clip Motion images or Multi Burst mode images : To view or edit images D POWER button (14) E Finder window F Microphone G Lens H RESET button (bottom surface) (97) I Speaker (bottom surface) J NIGHTSHOT/NIGHTFRAMING lever (56) K Advanced accessory shoe (65) L Flash (26) M Hook for shoulder* strap N ACC (Accessory) jack (65) O Self-timer lamp (25)/ Infrared ray emitter (56) P Hologram AF (27, 115) Q Tripod screw hole (bottom surface) * Shoulder strap is optional. • The flash automatically pops up and strobes. Close the flash by hand after use. • Use a tripod with a screw length of less than 5.5 mm (7/32 inch). You will be unable to firmly secure the camera to tripods having longer screws, and may damage the camera. • Use ACC jack to connect an external flash or the remote control tripod. • Do not touch the microphone while recording.
-
 1
1 -
2
-
 3
3 -
 4
4 -
 5
5 -
 6
6 -
 7
7 -
 8
8 -
 9
9 -
 10
10 -
 11
11 -
 12
12 -
 13
13 -
14
-
15
-
16
-
17
-
18
-
19
-
20
-
21
-
22
-
23
-
24
-
25
-
26
-
27
-
28
-
29
-
30
-
31
-
32
-
33
-
34
-
35
-
36
-
37
-
38
-
39
-
40
-
41
-
42
-
43
-
44
-
45
-
46
-
47
-
48
-
49
-
50
-
51
-
52
-
53
-
54
-
55
-
56
-
57
-
58
-
59
-
60
-
61
-
62
-
63
-
64
-
65
-
66
-
67
-
68
-
69
-
70
-
71
-
72
-
73
-
74
-
75
-
76
-
77
-
78
-
79
-
80
-
81
-
82
-
83
-
84
-
85
-
86
-
87
-
88
-
89
-
90
-
91
-
92
-
93
-
94
-
95
-
96
-
97
-
98
-
99
-
100
-
101
-
102
-
103
-
104
-
105
-
106
-
107
-
108
-
109
-
110
-
111
-
112
-
113
-
114
-
115
-
116
-
117
-
118
-
119
-
120
-
121
-
122
-
123
-
124
-
125
-
126
-
127
-
128
-
129
-
130
-
131
-
132
 |
 |