Sony KLHW32 Operating Instructions - Page 43
Remote Control, Button Description
 |
UPC - 027242238787
View all Sony KLHW32 manuals
Add to My Manuals
Save this manual to your list of manuals |
Page 43 highlights
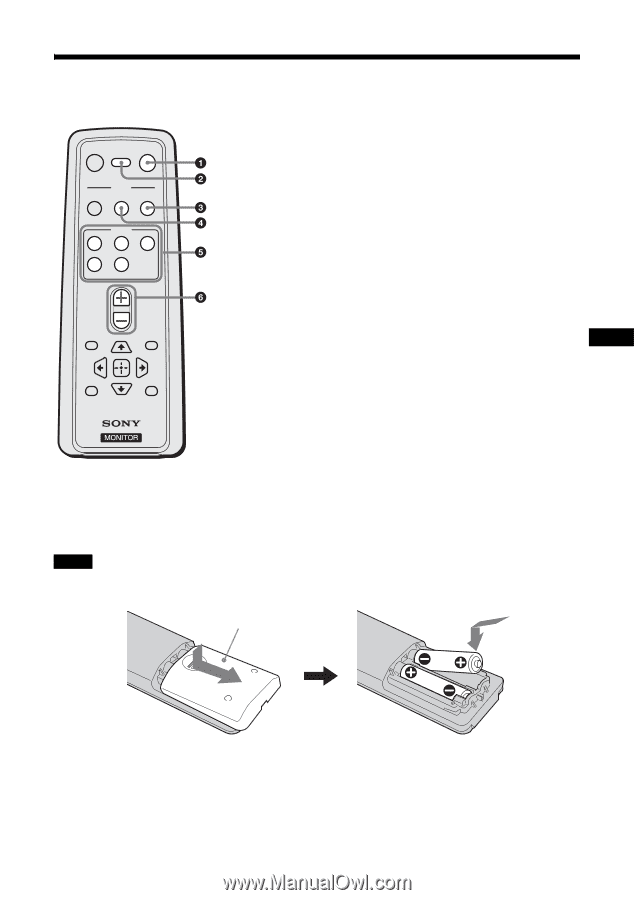
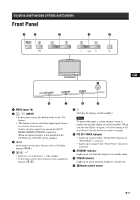
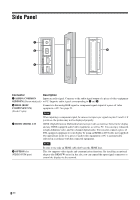
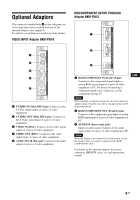
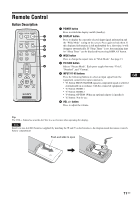
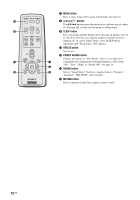
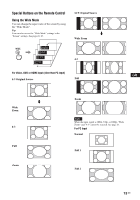
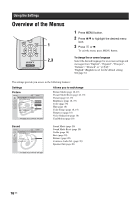
Remote Control Button Description MUTING DISPLAY POWER MODE SOUND PICTURE WIDE INPUT V1 V2 V3 V4 V5 VOL POWER SAVING MENU FREEZE SLEEP 1 POWER button Press to switch the display on/off (standby). 2 DISPLAY button Press to display the currently selected input signal information and the "Wide Mode" setting on the screen. Press again to hide them. If this displayed information is left undisturbed for a short time, it will disappear automatically. If "Sleep Timer" is set, the remaining time for "Sleep Timer" can be displayed by pressing DISPLAY button. 3 WIDE button Press to change the aspect ratio in "Wide Mode". See page 13. 4 PICTURE button Selects "Picture Mode". Each press toggles between "Vivid", "Standard", and "Custom". 5 INPUT V1-V5 buttons Press the following buttons to select an input signal from the equipment connected to input connectors. • V1 button: HD15 (The RGB signal or component signal is selected automatically in accordance with the connected equipment.) • V2 button: HDMI 1 • V3 button: HDMI 2 • V4 button: OPTION (When an optional adaptor is installed.) • V5 button: Not for use. 6 VOL +/- button Press to adjust the volume. GB Tip The VOL + button has a tactile dot. Use it as a reference when operating the display. Note Insert two size AA (R6) batteries (supplied) by matching the 3 and # on the batteries to the diagram inside the remote control's battery compartment. Push and slide to open 11 GB
-
 1
1 -
2
-
3
-
4
-
5
-
6
-
7
-
8
-
9
-
10
-
11
-
12
-
13
-
14
-
15
-
16
-
17
-
18
-
19
-
20
-
21
-
22
-
23
-
24
-
25
-
26
-
27
-
28
-
29
-
30
-
31
-
32
-
33
-
34
-
35
-
36
-
37
-
 38
38 -
 39
39 -
 40
40 -
 41
41 -
 42
42 -
 43
43 -
 44
44 -
 45
45 -
 46
46 -
 47
47 -
 48
48 -
49
-
50
-
51
-
52
-
53
-
54
-
55
-
56
-
57
-
58
-
59
-
60
-
61
-
62
-
63
-
64
-
65
-
66
-
67
-
68
-
69
-
70
-
71
-
72
-
73
-
74
-
75
-
76
-
77
-
78
-
79
-
80
-
81
-
82
-
83
-
84
-
85
-
86
-
87
-
88
-
89
-
90
-
91
-
92
-
93
-
94
-
95
-
96
-
97
-
98
-
99
-
100
-
101
-
102
-
103
-
104
-
105
-
106
-
107
-
108
-
109
-
110
-
111
-
112
-
113
-
114
-
115
-
116
-
117
-
118
-
119
-
120
-
121
-
122
-
123
-
124
-
125
-
126
-
127
-
128
-
129
-
130
-
131
-
132
-
133
-
134
-
135
-
136
-
137
-
138
-
139
-
140
-
141
-
142
-
143
-
144
-
145
-
146
-
147
-
148
-
149
-
150
-
151
-
152
-
153
-
154
-
155
-
156
-
157
-
158
-
159
-
160
-
161
-
162
-
163
-
164
-
165
-
166
-
167
-
168
-
169
-
170
-
171
-
172
-
173
-
174
-
175
-
176
-
177
-
178
-
179
-
180
-
181
-
182
-
183
-
184
-
185
-
186
-
187
-
188
-
189
-
190
-
191
-
192
-
193
-
194
-
195
-
196
-
197
-
198
-
199
-
200
-
201
-
202
-
203
-
204
-
205
-
206
-
207
-
208
-
209
-
210
-
211
-
212
-
213
-
214
-
215
 |
 |