Sony PCV-RS221 VAIO User Guide - Page 45
Switch to Edit Area button, Playback Area Playlist view
 |
View all Sony PCV-RS221 manuals
Add to My Manuals
Save this manual to your list of manuals |
Page 45 highlights
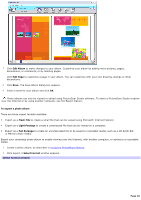
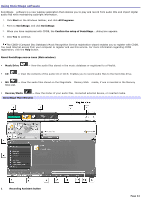
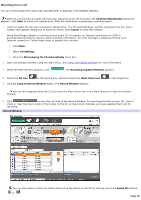
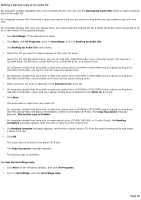
Displays the Recording Assistant window, where you can record or transfer audio files. 8 Volume Control buttons Controls the volume for playing audio files. 2 Source icons Changes the window according to the selected feature. 9 Equalizer button Displays the Equalizer dialog box where you can adjust the sound quality and register new settings. 3 Playback Area (Playlist view) Contains different functions depending on the source icon you select. The Player control buttons, which enable you to play, pause, stop, fast forward, and reverse, are located in this area. 10 Sound Effect button Displays the menu where you can adjust the Vocal Canceller settings. 4 Import button Displays the Import window, where you can import audio files from the hard disk drive to the Music Drive. 11 Visualizer button Displays or hides the Visualizer window where you can view images synchronized to the audio file's sound. 5 Content Area (Playlist view) Displays the playlists that are contained within the Categorized List you selected. Double-click a playlist to view its tracks. 12 Internet button Displays or hides the Internet window where you can download or stream audio files via EMD services. 6 Categorized List (Tree view) Displays the playlists stored in the Music Drive by artist name, genre, format, and so on, and enables you to locate your audio files. 13 Internet address drop-down list (Playlist view) Displays Internet addresses associated with the currently selected song. You can create a URL for either the album or individual tracks. Click GO to immediately connect to the Internet address displayed in the drop-down list. 7 Menu button Displays the SonicStage main menu. 14 Switch to Edit Area button Switches the Content Area to the Edit Area. Page 45
-
 1
1 -
2
-
3
-
4
-
5
-
6
-
7
-
8
-
9
-
10
-
11
-
12
-
13
-
14
-
15
-
16
-
17
-
18
-
19
-
20
-
21
-
22
-
23
-
24
-
25
-
26
-
27
-
28
-
29
-
30
-
31
-
32
-
33
-
34
-
35
-
36
-
37
-
38
-
39
-
 40
40 -
 41
41 -
 42
42 -
 43
43 -
 44
44 -
 45
45 -
 46
46 -
 47
47 -
 48
48 -
 49
49 -
 50
50 -
51
-
52
-
53
-
54
-
55
-
56
-
57
-
58
-
59
-
60
-
61
-
62
-
63
-
64
-
65
-
66
-
67
-
68
-
69
-
70
-
71
-
72
-
73
-
74
-
75
-
76
-
77
-
78
-
79
-
80
-
81
-
82
-
83
-
84
-
85
-
86
-
87
-
88
-
89
-
90
-
91
-
92
-
93
-
94
-
95
-
96
-
97
-
98
-
99
-
100
-
101
-
102
-
103
-
104
-
105
-
106
-
107
-
108
-
109
-
110
-
111
-
112
-
113
-
114
 |
 |
