Sony PCV-RS221 VAIO User Guide - Page 48
Transferring songs (Check-In/Check-Out), To check-out songs, Check-In/Out Window, Change Transfer Mode
 |
View all Sony PCV-RS221 manuals
Add to My Manuals
Save this manual to your list of manuals |
Page 48 highlights
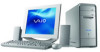
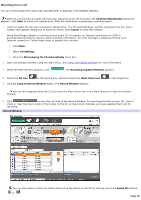
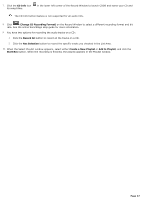
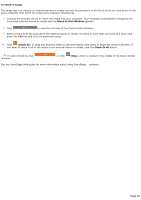
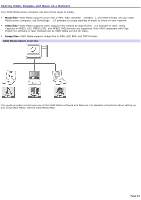
Transferring songs (Check-In/Check-Out) You can use SonicStage software to transfer audio files between the playlists stored in the Music Drive and the external devices or media. Transferring files from the Music Drive to the external device or media is called "check-out," and transferring files from the external device or media to the Music Drive is called "check-in." See the instructions supplied with the external device or media for more information on how to use it. The following instructions explain how to check in and check out audio files from the Music Drive to a USB device, a MiniDisc, or a MagicGate Memory Stick® media. For instructions on automatically checking in and out audio files, see the online SonicStage Help guide. To check-out songs 1. Connect the external device or insert the media into your computer. 2. Open SonicStage software using the Start menu. See Using SonicStage software for more information. 3. When the Main Window appears, click . Your computer automatically recognizes the connected external device or media and the Check-In/Out Window appears. 4. Click Check- In/Out Window to view the List Area of the Check-In/Out Window. 5. Select the playlist that contains the track that you want to check out. The tracks in the playlist are shown in the Playlist view panel. Click the track to select it. You can also hold down the Ctrl key while you click the tracks to select more than one at a time. 6. Click (Change Transfer Mode). A Setup in transfer mode dialog box appears containing transfer information relevant to the installed device or media. See the online SonicStage Help guide for more information on how to select a transfer mode for a particular device. 7. Click (Check-Out), or drag and drop the file onto the external device or media song list to begin the check-out process. To cancel check-out, click Check-In/Out Window. , or click (Stop), which is located in the middle of the Page 48
-
 1
1 -
2
-
3
-
4
-
5
-
6
-
7
-
8
-
9
-
10
-
11
-
12
-
13
-
14
-
15
-
16
-
17
-
18
-
19
-
20
-
21
-
22
-
23
-
24
-
25
-
26
-
27
-
28
-
29
-
30
-
31
-
32
-
33
-
34
-
35
-
36
-
37
-
38
-
39
-
40
-
41
-
42
-
 43
43 -
 44
44 -
 45
45 -
 46
46 -
 47
47 -
 48
48 -
 49
49 -
 50
50 -
 51
51 -
 52
52 -
 53
53 -
54
-
55
-
56
-
57
-
58
-
59
-
60
-
61
-
62
-
63
-
64
-
65
-
66
-
67
-
68
-
69
-
70
-
71
-
72
-
73
-
74
-
75
-
76
-
77
-
78
-
79
-
80
-
81
-
82
-
83
-
84
-
85
-
86
-
87
-
88
-
89
-
90
-
91
-
92
-
93
-
94
-
95
-
96
-
97
-
98
-
99
-
100
-
101
-
102
-
103
-
104
-
105
-
106
-
107
-
108
-
109
-
110
-
111
-
112
-
113
-
114
 |
 |