Sony SNC-RZ25N User Guide - Page 82
Sony SNC-RZ25N - Network Camera Manual
 |
UPC - 027242662575
View all Sony SNC-RZ25N manuals
Add to My Manuals
Save this manual to your list of manuals |
Page 82 highlights
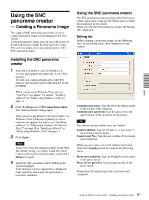
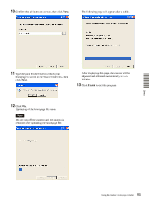
Main tab Note The size of the image in the file should be 320 × 90 pixels (horizontal/vertical). Other image sizes are not supported. Send Transmits a panorama image converted into a JPEG file to the camera. Creating and transmitting a panorama image 1 Click Make on the Main tab to start shooting. A panorama image will be created in about two minutes. Note Viewer The created panorama image is displayed in the upper viewer. Angle setting Specify the camera movement area on the panorama image. Drag the mouse to draw a rectangle within which the camera movement is limited. You can enlarge, reduce or move the created rectangle. To erase the rectangle, rightclick the mouse. Notes Do not perform settings of the camera or move the camera during shooting. 2 Specify the camera movement area by dragging the mouse to draw a rectangle on the panorama image. The specified camera movement area will be effective when the panorama image is saved in the camera. Click Send to transmit the panorama image to the camera. The panorama image is saved in the camera. Others 3 • The camera movement area should include the PanTilt home position (the horizontal position facing the camera). Set the area so that it includes the point where the green lines cross on the setting window. • The edges of the panorama image may not be displayed correctly when the camera is zoomed in. Make Starts shooting to create a panorama image (a complete 360-degree panorama image). It takes about two minutes to create a complete panorama image. Note You can use the saved panorama image when you control panning and tilting from the main viewer. Saving a custom image to the camera You can save a custom image to the camera in spite of the panorama image shot by the camera. Prepare the image to conform to the following requirements: • File format: JPEG or Bitmap • Image size: 320 × 90 pixels (horizontal/vertical) The camera does not support use of images that do not conform to the above conditions. The exposure and white balance settings are fixed while a panorama image is being created. To create a clear panorama image, set Exposure mode to Full auto and White balance to Auto in the Camera setting menu and point the camera to the main subject before starting shooting. File open Allows use of a Bitmap or JPEG image file in spite of a panorama image. 1 2 3 Click File open on the Main tab. The File dialog opens. Select the image you have prepared. Specify the camera movement area by dragging the mouse to draw a rectangle on the panorama image. 82 Using the SNC panorama creator - Creating a Panorama Image
-
 1
1 -
2
-
3
-
4
-
5
-
6
-
7
-
8
-
9
-
10
-
11
-
12
-
13
-
14
-
15
-
16
-
17
-
18
-
19
-
20
-
21
-
22
-
23
-
24
-
25
-
26
-
27
-
28
-
29
-
30
-
31
-
32
-
33
-
34
-
35
-
36
-
37
-
38
-
39
-
40
-
41
-
42
-
43
-
44
-
45
-
46
-
47
-
48
-
49
-
50
-
51
-
52
-
53
-
54
-
55
-
56
-
57
-
58
-
59
-
60
-
61
-
62
-
63
-
64
-
65
-
66
-
67
-
68
-
69
-
70
-
71
-
72
-
73
-
74
-
75
-
76
-
 77
77 -
 78
78 -
 79
79 -
 80
80 -
 81
81 -
 82
82 -
 83
83 -
 84
84 -
 85
85 -
 86
86 -
 87
87 -
88
-
89
-
90
-
91
-
92
 |
 |
