Sony STR-D1015 Operating Instructions - Page 12
Clear, program, contents, decks, function, CLEAR, Start, recording, Forward, direction, Reverse,
 |
View all Sony STR-D1015 manuals
Add to My Manuals
Save this manual to your list of manuals |
Page 12 highlights
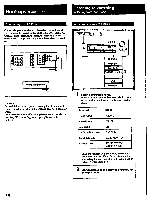
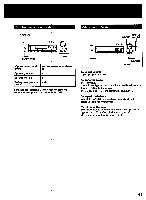
Listening to/Watching a Program Source (continued) Using the Remote Control The remote lets you operate the connected components as well as the receiver. Press one of the SYSTEM CONTROL/ FUNCTION buttons first to select the program source, then use the following buttons to operate each component. The SYSTEM CONTROL/FUNCTION buttons are factory set as described in the following list. FUNCTION button Operates TUNER Tuner TAPE Tape deck DAT/MD DAT deck/MD recorder CD CD player LD LD player VIDEO 1 VCR (VTR 1 mode) VIDEO 2 VCR (VTR 2 mode) VIDEO 3 VCR (VTR 3 mode) TV PHONO TV (The receiver enters PHONO mode) You can use the RMS function of Sony cassette decks with this remote. For more information on the availability of Sony stereo cassette decks with RMS capability, contact your nearest Sony dealer. Turning on power of each component TV CONTROL ON SYSTEM OFF 0 0 J • .3 0 30 0 J 0 0 ••moo ocmc3 VISUAL POWER TVNIDEO 2 1 Press one of the SYSTEM CONTROUFUNCTION buttons. The receiver, the audio component connected to the AC OUTLET of the receiver, VCR, LDP and TV are turned on. 2 Press the button for the function you want to use. The function of the buttons changes depending on which component you are operating. (See "Operative Buttons" in the right column and page 13.) Turning off the power of components • Pressing the SYSTEM OFF button turns off the power of all components at one time. • Pressing the VISUAL POWER button turns off only the TV, VCRs and LD player. • If you want to turn off the power while listening to a program source, see "Background operation" on page 13. 12 Operative buttons FM/AM tuner To Select memory pages for preset tuning Designate preset numbers Scan and select preset stations Select station index names Press SHIFT Numeric buttons CH PRESET +/INDEX Tape deck/DAT/MD recorder To Press Designate numbers Designate number more than 10 Numeric buttons >10 (For tape deck and MD recorder) Fastforward IS. Rewind 44 Skip selections MN (forward), (For DAT and MD recorder) 144 (reverse) Pause play II Start play Ow Start reverse play (For tape deck) ....4 Select the tape running direction (For RMS DIRECTION tape decks with the RMS function) Stop play ■ Clear the RMS program contents RMS CLEAR (For tape decks with the RMS function) Start recording (Forward direction) • + ► Start recording • + +II (Reverse direction for tape deck) Program selections (For tape decks RMS/START with the RMS function) CD player To Designate numbers Designate number more than 10 Skip discs Search selections Skip selections Pause play Start play Stop play Press Numeric buttons >10 D.SKIP IN (forward), 441 (reverse) li•N (forward), NA (reverse) U IP. ■
-
 1
1 -
2
-
3
-
4
-
5
-
6
-
 7
7 -
 8
8 -
 9
9 -
 10
10 -
 11
11 -
 12
12 -
 13
13 -
 14
14 -
 15
15 -
 16
16 -
 17
17 -
18
-
19
-
20
-
21
-
22
-
23
-
24
-
25
-
26
-
27
-
28
-
29
-
30
-
31
-
32
-
33
-
34
-
35
-
36
-
37
-
38
-
39
-
40
 |
 |
