Sony STR-D1090 Operating Instructions - Page 26
Recording, Audio, Source
 |
View all Sony STR-D1090 manuals
Add to My Manuals
Save this manual to your list of manuals |
Page 26 highlights
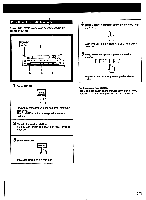
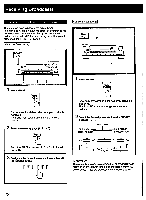
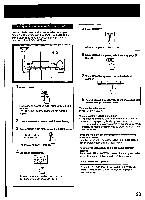
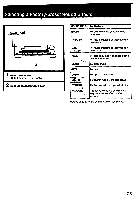
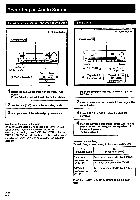
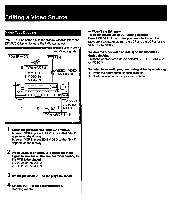
Recording an Audio Source Recording onto an Audio Tape Deck or DAT Deck Tape Dubbing .4) Audio signals i=t. Audio signals I POWER ON 1 = O O == 1 1 1 1 1 1 1 O .=-nr-cr - fil I I to DAT or TAPE 1, 2 OUT 4 2 DAT or tape deck o0 0 0 u u u la= 8 i 4 Record player I CD player 3 VCR tic w. i Select the desired program with the FUNCTION button. For an FM/AM broadcast, tune in the desired station 2 Set the tape (DAT) deck in the recording mode. 3 Start playback of the selected program source. Monitoring the recorded sound If you have connected a 3-head tape deck to the TAPE 2 jacks, you can monitor the recording results. While recording or dubbing, press TAPE 2 MONITOR so that the TAPE 2 MONITOR indicator lights up. To listen to the source sound again, press the button again so that the indicator goes off. POWER -•• ON 3 6 . n O • I 1 to TAPE 2 OUT A 0 Tape deck 2 -To (for recording) . .. i=ilanno i t. to TAPE 1 " (or DAT) IN Tape deck 1or 1, 4 DAT deck (for playback) 4MIMIlhow 1Insert the recorded tape into tape deck 1(or the DAT deck). 2 Insert a blank tape into tape deck 2 and adjust the recording level. 3 Press TAPE1or DAT to select the deck for playback. 4 Start the playback of the tape (or the DAT) in tape deck 1(or the DAT deck), and set tape deck 2 in the recording mode. Dubbing will start. Note on tape dubbing Tape dubbing is possible only in the following directions: From (playback deck) To (Recording deck) Tape deck connected to TAPE 1IN Tape deck connected to TAPE 2 OUT DAT deck connected to DAT OUT DAT deck connected to DAT IN Tape deck connected to TAPE 1 or 2 OUT Press the FUNCTION button according to the playback deck. 26
-
 1
1 -
2
-
3
-
4
-
5
-
6
-
7
-
8
-
9
-
10
-
11
-
12
-
13
-
14
-
15
-
16
-
17
-
18
-
19
-
20
-
 21
21 -
 22
22 -
 23
23 -
 24
24 -
 25
25 -
 26
26 -
 27
27 -
 28
28 -
 29
29 -
 30
30 -
 31
31 -
32
-
33
-
34
-
35
-
36
-
37
-
38
-
39
-
40
-
41
-
42
-
43
-
44
-
45
-
46
-
47
-
48
-
49
-
50
-
51
 |
 |
