Sony STR-DA4600ES Operating Instructions (Large File - 17.22 MB) - Page 42
: Preparing the receiver and the remote, To reboot the receiver
 |
View all Sony STR-DA4600ES manuals
Add to My Manuals
Save this manual to your list of manuals |
Page 42 highlights
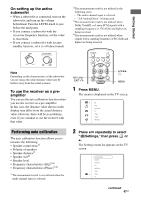
8: Preparing the receiver and the remote Connecting the AC power cord (mains lead) Connect the supplied AC power cord (mains lead) to the AC IN terminal on the receiver, then connect the AC power cord (mains lead) to a wall outlet. Notes • Before connecting the AC power cord (mains lead), make sure that metallic wires of the speaker cords are not touching each other between the SPEAKERS terminals. • Connect the AC power cord (mains lead) firmly. AC IN terminal To the wall outlet AC power cord (mains lead) (supplied) A several space is left between the plug and the rear panel even when the power cord (mains lead) is inserted firmly. The cord is supposed be connected this way. This is not malfunction. Performing initial setup operations Before using the receiver for the first time, initialize the receiver by performing the following procedure. This procedure can also be used to return settings you have made to their factory defaults. ?/1 TONE MODE 2CH/A.DIRECT 1 Press ?/1 to turn off the receiver. 2 While holding down the TONE MODE and 2CH/A.DIRECT, press ?/1 to turn on the receiver. 3 Release the TONE MODE and 2CH/A.DIRECT after a few seconds. After "CLEARING" appears on the display for a while, "CLEARED !" appears. All the settings you have changed or adjusted are reset to the initial settings. Note It takes about 30 seconds for the memory to be cleared completely. Do not turn the receiver off until "CLEARED !" appears on the display. To reboot the receiver If the buttons on the receiver or the remote do not work due to a malfunction of the receiver, reboot the receiver. 1 Press ?/1 to turn off the receiver. 42GB
-
 1
1 -
2
-
3
-
4
-
5
-
6
-
7
-
8
-
9
-
10
-
11
-
12
-
13
-
14
-
15
-
16
-
17
-
18
-
19
-
20
-
21
-
22
-
23
-
24
-
25
-
26
-
27
-
28
-
29
-
30
-
31
-
32
-
33
-
34
-
35
-
36
-
 37
37 -
 38
38 -
 39
39 -
 40
40 -
 41
41 -
 42
42 -
 43
43 -
 44
44 -
 45
45 -
 46
46 -
 47
47 -
48
-
49
-
50
-
51
-
52
-
53
-
54
-
55
-
56
-
57
-
58
-
59
-
60
-
61
-
62
-
63
-
64
-
65
-
66
-
67
-
68
-
69
-
70
-
71
-
72
-
73
-
74
-
75
-
76
-
77
-
78
-
79
-
80
-
81
-
82
-
83
-
84
-
85
-
86
-
87
-
88
-
89
-
90
-
91
-
92
-
93
-
94
-
95
-
96
-
97
-
98
-
99
-
100
-
101
-
102
-
103
-
104
-
105
-
106
-
107
-
108
-
109
-
110
-
111
-
112
-
113
-
114
-
115
-
116
-
117
-
118
-
119
-
120
-
121
-
122
-
123
-
124
-
125
-
126
-
127
-
128
-
129
-
130
-
131
-
132
-
133
-
134
-
135
-
136
-
137
-
138
-
139
-
140
-
141
-
142
-
143
-
144
-
145
-
146
-
147
-
148
-
149
-
150
-
151
-
152
-
153
-
154
-
155
-
156
-
157
-
158
-
159
-
160
-
161
-
162
-
163
-
164
-
165
-
166
-
167
-
168
-
169
-
170
 |
 |
