Sony STR-DA4600ES Operating Instructions (Large File - 17.22 MB) - Page 49
To cancel the measurement
 |
View all Sony STR-DA4600ES manuals
Add to My Manuals
Save this manual to your list of manuals |
Page 49 highlights
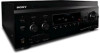
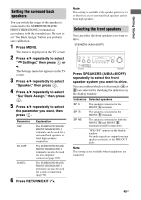
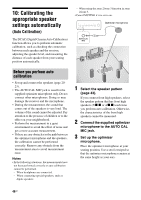
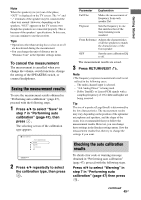
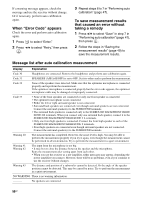
Getting Started Note When the speaker(s) is (are) out of the phase, "OUT" is displayed on the TV screen. The "+" and "-" terminals of the speaker may be connected the other way around. However, depending on the speakers, "OUT" appears on the TV screen even though the speakers are connected properly. This is because of the speakers' specifications. In this case, you can continue to use the receiver. Tips • Operations other than turning the receiver on or off are deactivated during the measurement. • You can change the unit of distance use in "Distance Unit" in the Speaker settings menu. To cancel the measurement The measurement is cancelled when you change the volume, switch functions, change the setting of the SPEAKERS switch, or connect headphones. Saving the measurement results To save the measurement results obtained in "Performing auto calibration" (page 47), proceed with the following steps. 1 Press V/v to select "Save" in step 7 in "Performing auto calibration" (page 47), then press . The selecting screen of the calibration type appears. Parameter Explanation Full Flat Makes the measurement of frequency from each speaker flat. Engineer Sets the frequency to one that matches that of the Sony listening room standard. Front Reference Adjusts the characteristics of all the speakers to match the characteristics of the front speaker. OFF Sets the auto calibration EQ to off. The measurement results are saved. 3 Press RETURN/EXIT O. Note • The frequency response measurement result is not utilized in the following cases. - The multi-channel input is selected. - "2ch Analog Direct" is being used. - Dolby TrueHD, or Linear PCM signals with a sampling frequency of 176.4 kHz and higher are being received. Tip The size of a speaker (Large/Small) is determined by the low characteristics. The measurement results may vary, depending on the position of the optimizer microphone and speakers, and the shape of the room. It is recommended that you follow the measurement results. However, you can change those settings in the Speaker settings menu. Save the measurement results first, then try to change the settings if you want. 2 Press V/v repeatedly to select the calibration type, then press . Checking the auto calibration results To check error code or warning message obtained in "Performing auto calibration" (page 47), proceed with the following steps. Press V/v to select "Warning" in step 7 in "Performing auto calibration" (page 47) then press . continued 49GB
-
 1
1 -
2
-
3
-
4
-
5
-
6
-
7
-
8
-
9
-
10
-
11
-
12
-
13
-
14
-
15
-
16
-
17
-
18
-
19
-
20
-
21
-
22
-
23
-
24
-
25
-
26
-
27
-
28
-
29
-
30
-
31
-
32
-
33
-
34
-
35
-
36
-
37
-
38
-
39
-
40
-
41
-
42
-
43
-
 44
44 -
 45
45 -
 46
46 -
 47
47 -
 48
48 -
 49
49 -
 50
50 -
 51
51 -
 52
52 -
 53
53 -
 54
54 -
55
-
56
-
57
-
58
-
59
-
60
-
61
-
62
-
63
-
64
-
65
-
66
-
67
-
68
-
69
-
70
-
71
-
72
-
73
-
74
-
75
-
76
-
77
-
78
-
79
-
80
-
81
-
82
-
83
-
84
-
85
-
86
-
87
-
88
-
89
-
90
-
91
-
92
-
93
-
94
-
95
-
96
-
97
-
98
-
99
-
100
-
101
-
102
-
103
-
104
-
105
-
106
-
107
-
108
-
109
-
110
-
111
-
112
-
113
-
114
-
115
-
116
-
117
-
118
-
119
-
120
-
121
-
122
-
123
-
124
-
125
-
126
-
127
-
128
-
129
-
130
-
131
-
132
-
133
-
134
-
135
-
136
-
137
-
138
-
139
-
140
-
141
-
142
-
143
-
144
-
145
-
146
-
147
-
148
-
149
-
150
-
151
-
152
-
153
-
154
-
155
-
156
-
157
-
158
-
159
-
160
-
161
-
162
-
163
-
164
-
165
-
166
-
167
-
168
-
169
-
170
 |
 |
