Sony TCD-D100 Operating Instructions primary manual - Page 12
Setting, Clock
 |
View all Sony TCD-D100 manuals
Add to My Manuals
Save this manual to your list of manuals |
Page 12 highlights
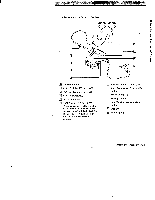
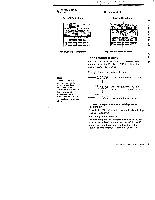
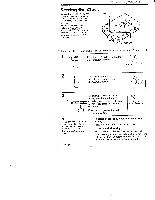
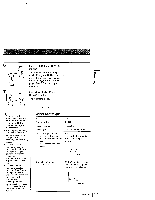
Setting the Clock Set the clock before starting any recording operations to stamp the date and time. Otherwise, you cannot get the correct date and time. The clock will return to its default setting (TU/97Y4M1D/ AMI2H00M00S) if the batteries are removed from the unit for a long time. In this case, set the clock again. HOLD CLOCK/SET Make sure that the tape-corder is in the stop mode and that the HOLD function is off. 1 CLOCK/SET Press the CLOCK/SET button for more than four seconds. N1 4 - CLOCK Li- I NMI Press + or - button to set the current year, then press the CLOCK/SET button. -; CLOCK I I y ly y I 3 CLOCK/SET Repeat step 2 to set the current month, date, hour, minute. For IO seconds, pressing + or - will set it to "00". Then press the CLOCK/ SET button. The display stops flashing and the clock operates. PP CLOCK I I. '42.9 Is Tip To set the clock accurately, set the second to 00 with the + or - button, and then press the CLOCK/SET button at the time of the tone. 12" Setting the Clock To select either the 12-hour or 24-hour clock display Press the + button for 2 seconds or more. To quit the clock setting Press the ■ STOP button. The clock display will return to the previous clock setting. However, if the date is set , the year, month and date will be set and will not be applicable for further cancellation.
-
 1
1 -
2
-
3
-
4
-
5
-
6
-
 7
7 -
 8
8 -
 9
9 -
 10
10 -
 11
11 -
 12
12 -
 13
13 -
 14
14 -
 15
15 -
 16
16 -
 17
17 -
18
-
19
-
20
-
21
-
22
-
23
-
24
-
25
-
26
-
27
-
28
-
29
-
30
-
31
-
32
-
33
-
34
-
35
-
36
-
37
-
38
-
39
-
40
-
41
-
42
-
43
-
44
-
45
-
46
-
47
 |
 |
