Sony VPL-FHZ120L Operating Instructions - Page 18
Correcting for Trapezoidal Distortion of the Projected Image (Keystone Adjustment)
 |
View all Sony VPL-FHZ120L manuals
Add to My Manuals
Save this manual to your list of manuals |
Page 18 highlights
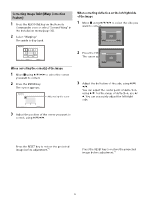
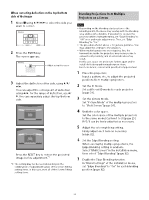
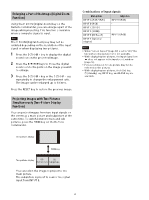
Correcting for Trapezoidal Distortion of the Projected Image (Keystone Adjustment) If the screen is tilted, or you are projecting from an oblique angle, perform keystone adjustment. If the projected image is trapezoidally-distorted in the vertical plane 1 Press the KEYSTONE key on the Remote Commander once or select "Screen Fitting" in the Installation menu (page 32). 2 Select "V Keystone." 3 Adjust the value using /. The higher the setting, the narrower the top of the projected image. The lower the setting, the narrower the bottom of the projected image. If the projected image is trapezoidally-distorted in the lateral plane 1 Press the KEYSTONE key on the Remote Commander once or select "Screen Fitting" in the Installation menu (page 32). 2 Select "H Keystone." 3 Adjust the value using /. The higher the setting, the narrower the right side of the projected image. The lower the setting, the narrower the left side of the projected image. Increase the setting Increase setting Decrease setting Press the RESET key to restore the projected image before adjustment.*1 Decrease setting Press the RESET key to restore the projected image before adjustment.*1 *1: The setting may not be reset depending on the combination of adjustment values of the Screen Fitting setting items. In this case, reset all of the Screen Fitting setting items. Notes Keystone adjustment is an electronic correction. Consequently the image quality may deteriorate. Depending on the position adjusted with the lens shift feature, performing keystone adjustment may change the aspect ratio of the original image, or the projected image may be distorted. 18
-
 1
1 -
2
-
3
-
4
-
5
-
6
-
7
-
8
-
9
-
10
-
11
-
12
-
 13
13 -
 14
14 -
 15
15 -
 16
16 -
 17
17 -
 18
18 -
 19
19 -
 20
20 -
 21
21 -
 22
22 -
 23
23 -
24
-
25
-
26
-
27
-
28
-
29
-
30
-
31
-
32
-
33
-
34
-
35
-
36
-
37
-
38
-
39
-
40
-
41
-
42
-
43
-
44
-
45
-
46
-
47
-
48
-
49
-
50
-
51
-
52
-
53
-
54
-
55
-
56
-
57
-
58
-
59
-
60
-
61
-
62
-
63
 |
 |
