Sony VPL-FHZ120L Operating Instructions - Page 25
DICOM GSDF Sim., High/Middle/Low
 |
View all Sony VPL-FHZ120L manuals
Add to My Manuals
Save this manual to your list of manuals |
Page 25 highlights
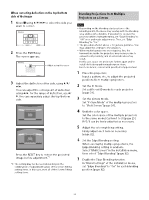
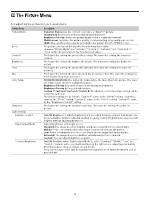
Setting items Expert Setting Reality Creation Contrast Enhancer Gamma Mode Color Space Color Correction Film Mode Description Adjusts the detail and noise processing of images. (Super-resolution function) On: Adjusts the settings of "Reality Creation." Resolution: When you increase the setting value, the texture and detail of the image become sharper. Noise Filtering: When you increase the setting value, the noise (picture roughness) becomes less prominent. Test: On/Off: Switches "On" and "Off" at a certain frequency to check the effect of "Reality Creation." The display position of the status during the test works together with the "Menu Position" setting (page 29). Off: The "Reality Creation" function is not applied. Note Depending on the input signals, image noise may become more prominent. In that case, adjust the settings of "Reality Creation" before use. Corrects the level of bright and dark parts automatically to optimize contrast according to a scene. Increases image sharpness and makes image dynamic. High/Middle/Low: You can adjust the contrast enhancer. Off: The "Contrast Enhancer" function is not applied. 2.2: Equivalent to a 2.2 gamma curve. 2.4: Equivalent to a 2.4 gamma curve. Gamma 3: Applies a gamma curve that prioritizes the brightness to suit use in a relatively bright environment. Gamma 4: Enhances black and white contrast to suit use in a relatively dark environment. DICOM GSDF Sim.: Gamma setting is in accordance with the Grayscale Standard Display Function (GSDF) of the Digital Imaging and Communications in Medicine (DICOM) standards. Available when a computer signal is input from the DVI-D input terminal (INPUT C), HDMI input terminal (INPUT D), or HDBaseT input terminal (INPUT E). This projector is not to be used as a device for medical diagnosis. Converts the color space. Custom 1: Produces images with vivid colors. Custom 2: Produces images with muted colors. Custom 3: Reproduces image colors true to the original image source. You can select R/G/ B for the selected color space and adjust the R/G/B chromaticity points in the x and y directions in the CIExy chromaticity diagram respectively. Color Select: Select the color to adjust from "Red," "Green," and "Blue." Cyan - Red (x): Adjusts the chromaticity point of the selected color toward cyan-red (x). Magenta - Green (y): Adjusts the chromaticity point of the selected color toward magenta-green (y). On: Adjusts the hue, saturation, and brightness for the selected color. Repeat steps 1 and 2 described below to specify the target color. 1 Press / to select "Color Select," then press / to select the color you want to adjust among "Red," "Yellow," "Green," "Cyan," "Blue," and "Magenta." 2 Press / to select "Hue," "Saturation" or "Brightness," then adjust them to suit your taste using / while watching the projected picture. Off: The "Color Correction" function is not applied. When a video signal is input, this option is available. When a progressive signal is input, this option is not available. Auto: Precisely reproduces the image from a film source to suit the original film source. Normally, select this option. Off: Select this option if the images are rough around the edges when "Auto" is selected. 25
-
 1
1 -
2
-
3
-
4
-
5
-
6
-
7
-
8
-
9
-
10
-
11
-
12
-
13
-
14
-
15
-
16
-
17
-
18
-
19
-
 20
20 -
 21
21 -
 22
22 -
 23
23 -
 24
24 -
 25
25 -
 26
26 -
 27
27 -
 28
28 -
 29
29 -
 30
30 -
31
-
32
-
33
-
34
-
35
-
36
-
37
-
38
-
39
-
40
-
41
-
42
-
43
-
44
-
45
-
46
-
47
-
48
-
49
-
50
-
51
-
52
-
53
-
54
-
55
-
56
-
57
-
58
-
59
-
60
-
61
-
62
-
63
 |
 |
