Sony VPL-FHZ120L Operating Instructions - Page 33
HV/H/V/Off/Auto, Off/Left-side Area/Right-side Area
 |
View all Sony VPL-FHZ120L manuals
Add to My Manuals
Save this manual to your list of manuals |
Page 33 highlights
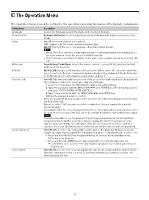
Setting items Zone Black Level *2 *3 *4 Image Split Image Flip High Altitude Mode Filter Cleaning Description Adjusts so that the overlapped part is not noticeably bright when a dark image is displayed. Select the correction zone "Adjust Zone 1" through "Adjust Zone 9," and set the adjustment values. Zone Fitting: Adjusts the area of each correction zone. Adjust: Specifies the position of the marginal line of each correction zone. Select the adjusting position using Press the ENTER key to determine the position and use to move the image pixels vertically/horizontally so that the area of each correction zone is adjusted. Reset: Resets all of the Zone Fitting values. Black Level Adj.: Adjusts the brightness of each correction zone. Reset: Resets all of the Black Level values. Reset: Resets all of the Zone Black Level values. Off/Left-side Area/Right-side Area: Divides the input signal from the computer in half, and displays an enlarged image of the left-side or right-side area on the screen. If the Screen Aspect is set to 16:10 and input signal is 16:10 or 16:9, the image will be projected at the correct aspect. This function is not available when displaying two pictures. HV/H/V/Off/Auto: Flips the projected image horizontally and/or vertically according to the installation method. On/Auto: Set to "On" when using the projector at an altitude of 1,500 m or higher. Continuing to use the wrong setting may affect component reliability. Turns off the projector and cleans the air filter in standby mode. Normally, filter cleaning is performed periodically and automatically when turning off the power. However, it is not performed when "Direct Power On" is set to "On" (page 31). Periodically performing "Filter Cleaning" in the above menu is recommended. Filter cleaning is not performed if the AC power cord is unplugged or the projector is placed at an angle as shown below. Screen Aspect Blanking Panel Alignment 16:10/16:9/4:3: For switching the display area to suit to the screen. This feature allows you to adjust the displayable region within the four directions of the projection surface. When the projected image is displayed smaller than the entire projection surface using the Aspect or Screen Aspect setting, blanking may not be applied. Select the edge to adjust from "Left," "Right," "Top," and "Bottom" using the / keys. Adjust the amount of blanking using the / keys. This feature allows you to adjust the gaps in the color of characters or the picture. When set to "On," "Adjust Color" and "Pattern Color" can be assigned and adjusted. Depending on the adjustment value of "Panel Alignment," the color and resolution may be changed. Adjust Item: Selects how to make adjustments from below. Shift: Shifts the whole picture and makes adjustments. Zone: Selects the desired range and makes adjustments. Adjust Color: Assigns the desired color to adjust the gaps in color. Select "R" (Red) or "B" (Blue) to make adjustments based on "G" (Green). Pattern Color: Select "R/G" (Red and Green) or "R/G/B" (White, all colors) when "Adjust Color" is "R" (Red). Select "B/G" (Blue and Green) or "R/G/B" (White, all colors) when the "Adjust Color" is "B" (Blue). Adjust: The shift adjustment and zone adjustment of the color selected in "Adjust Color" can be made with keys. Reset: The panel alignment settings are initialized to their factory preset values. 33
-
 1
1 -
2
-
3
-
4
-
5
-
6
-
7
-
8
-
9
-
10
-
11
-
12
-
13
-
14
-
15
-
16
-
17
-
18
-
19
-
20
-
21
-
22
-
23
-
24
-
25
-
26
-
27
-
 28
28 -
 29
29 -
 30
30 -
 31
31 -
 32
32 -
 33
33 -
 34
34 -
 35
35 -
 36
36 -
 37
37 -
 38
38 -
39
-
40
-
41
-
42
-
43
-
44
-
45
-
46
-
47
-
48
-
49
-
50
-
51
-
52
-
53
-
54
-
55
-
56
-
57
-
58
-
59
-
60
-
61
-
62
-
63
 |
 |
