Sony VPL-FHZ120L Operating Instructions - Page 22
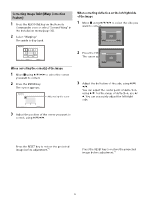
Enlarging a Part of the Image (Digital Zoom Function)
 |
View all Sony VPL-FHZ120L manuals
Add to My Manuals
Save this manual to your list of manuals |
Page 22 highlights
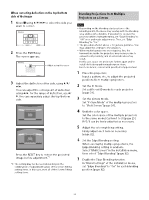
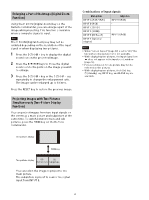
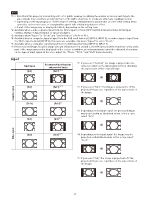
Enlarging a Part of the Image (Digital Zoom Function) Using the D ZOOM (Digital Zoom) key on the Remote Commander, you can enlarge a part of the image while projecting. This function is available when a computer signal is input. Note The D ZOOM (Digital Zoom) key may not be enabled depending on the resolution of the input signal or when displaying two pictures. 1 Press the D ZOOM + key to display the digital zoom icon on the projected image. 2 Press the keys to move the digital zoom icon to the point on the image you wish to enlarge. 3 Press the D ZOOM + key or the D ZOOM - key repeatedly to change the enlargement ratio. The image can be enlarged up to 4 times. Press the RESET key to restore the previous image. Projecting Images with Two Pictures Simultaneously (Two-Picture Display Function) You can project images from two input signals on the screen as a main picture and subpicture at the same time. To switch between main and sub pictures, press the TWIN key on the Remote Commander. Combinations of input signals Main picture INPUT A (RGB/YPBPR) INPUT B (RGB) INPUT C (DVI-D) INPUT D (HDMI) INPUT E (HDBaseT) INPUT F (Optional adaptor) Subpicture INPUT B (RGB) - INPUT B (RGB) Notes When "Screen Aspect" (page 33) is set to "4:3," the two-picture display function is not available. While displaying two pictures, the input signal icon does not appear in the input select window (page 16). Picture settings set for one picture may not be reflected as two pictures. While displaying two pictures, the (On) key, (standby) key, INPUT key, and BLANK key are available. One-picture display TWIN key Two-picture display (A) (B) Main picture Subpicture You can select the image to project to the main picture. The subpicture is preset to source the signal input from INPUT B. 22
-
 1
1 -
2
-
3
-
4
-
5
-
6
-
7
-
8
-
9
-
10
-
11
-
12
-
13
-
14
-
15
-
16
-
 17
17 -
 18
18 -
 19
19 -
 20
20 -
 21
21 -
 22
22 -
 23
23 -
 24
24 -
 25
25 -
 26
26 -
 27
27 -
28
-
29
-
30
-
31
-
32
-
33
-
34
-
35
-
36
-
37
-
38
-
39
-
40
-
41
-
42
-
43
-
44
-
45
-
46
-
47
-
48
-
49
-
50
-
51
-
52
-
53
-
54
-
55
-
56
-
57
-
58
-
59
-
60
-
61
-
62
-
63
 |
 |
