Sony VPL-FHZ120L Operating Instructions - Page 19
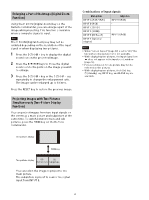
Correcting Image Twist (Warp Correction Feature), When correcting the corners of the image
 |
View all Sony VPL-FHZ120L manuals
Add to My Manuals
Save this manual to your list of manuals |
Page 19 highlights
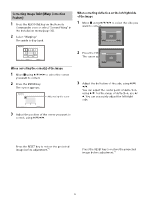
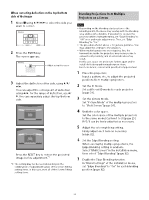
Correcting Image Twist (Warp Correction Feature) 1 Press the KEYSTONE key on the Remote Commander once or select "Screen Fitting" in the Installation menu (page 32). 2 Select "Warping." The guide is displayed. When correcting deflection on the left/right side of the image 1 Move using to select the side you want to correct. 2 Press the ENTER key. The cursor appears. When correcting the corner(s) of the image 1 Move using to select the corner you want to correct. 2 Press the ENTER key. The cursor appears. Adjust using this cursor Adjust using this cursor 3 Adjust the deflection of the side, using You can adjust the center point of deflection using /. For the range of deflection, use / . You can separately adjust the left/right side. 3 Adjust the position of the corner you want to correct, using Press the RESET key to restore the projected image before adjustment.*1 Press the RESET key to restore the projected image before adjustment.*1 19
-
 1
1 -
2
-
3
-
4
-
5
-
6
-
7
-
8
-
9
-
10
-
11
-
12
-
13
-
 14
14 -
 15
15 -
 16
16 -
 17
17 -
 18
18 -
 19
19 -
 20
20 -
 21
21 -
 22
22 -
 23
23 -
 24
24 -
25
-
26
-
27
-
28
-
29
-
30
-
31
-
32
-
33
-
34
-
35
-
36
-
37
-
38
-
39
-
40
-
41
-
42
-
43
-
44
-
45
-
46
-
47
-
48
-
49
-
50
-
51
-
52
-
53
-
54
-
55
-
56
-
57
-
58
-
59
-
60
-
61
-
62
-
63
 |
 |
