Stihl FS 560 C-EM Product Instruction Manual - Page 43
Installing the Rope Rotor, Tensioning the Rewind Spring, could break
 |
View all Stihl FS 560 C-EM manuals
Add to My Manuals
Save this manual to your list of manuals |
Page 43 highlights
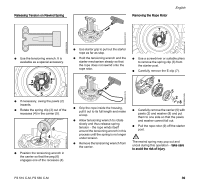
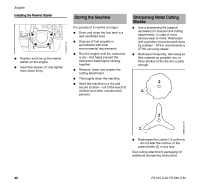
Installing the Rope Rotor Tensioning the Rewind Spring English 9926BA048 KN 9926BA046 KN 9926BA050 KN 9926BA049 KN N Coat the whole starter post uniformly - including the grooves (arrow) - with STIHL gear lubricant (special accessory). N Slip the rotor over the starter post - turn it back and forth to engage the anchor loop of the rewind spring. N Slip the carrier with pawls and washer over the starter post - turn it back and forth to engage the anchor loop of the rewind spring in the carrier. 7 3 2 2 N Fit the E-clip (7) in the groove in the starter post. N Push the spring clip (3) into position - it must point counterclockwise as shown and engage the pawl's peg. 9926BA045 KN N Pull the starter rope out of the housing as far as stop and make a loop. N Fit the tensioning wrench on the carrier. N Use the tensioning wrench to rotate the rotor six full turns counterclockwise - the rope winds itself around the tensioning wrench in this process. N Hold the tensioning wrench steady and unwind the rope. 9926BA047 KN N Pull out and straighten the twisted rope at the starter grip. N Hold the rope steady with the starter grip. N Release the tensioning wrench and rope slowly so that it winds onto the rotor. N Remove the tensioning wrench. The starter grip must locate firmly in the guide bushing. If the grip droops to one side: Add one more turn on the rope rotor to increase spring tension. When the starter rope is fully extended it must still be possible to rotate the rotor at least one more turn. If this is not the case, the spring is overtensioned and could break. N Take one turn of the rope off the rotor. FS 510 C-M, FS 560 C-M 41
-
 1
1 -
2
-
3
-
4
-
5
-
6
-
7
-
8
-
9
-
10
-
11
-
12
-
13
-
14
-
15
-
16
-
17
-
18
-
19
-
20
-
21
-
22
-
23
-
24
-
25
-
26
-
27
-
28
-
29
-
30
-
31
-
32
-
33
-
34
-
35
-
36
-
37
-
 38
38 -
 39
39 -
 40
40 -
 41
41 -
 42
42 -
 43
43 -
 44
44 -
 45
45 -
 46
46 -
 47
47 -
 48
48 -
49
-
50
-
51
-
52
-
53
-
54
-
55
-
56
-
57
-
58
-
59
-
60
-
61
-
62
-
63
-
64
-
65
-
66
-
67
-
68
-
69
-
70
-
71
-
72
-
73
-
74
-
75
-
76
-
77
-
78
-
79
-
80
-
81
-
82
-
83
-
84
-
85
-
86
-
87
-
88
-
89
-
90
-
91
-
92
-
93
-
94
-
95
-
96
-
97
-
98
-
99
-
100
-
101
-
102
-
103
-
104
-
105
-
106
-
107
-
108
-
109
-
110
-
111
-
112
-
113
-
114
-
115
-
116
-
117
-
118
-
119
-
120
 |
 |
