Sub-Zero 427R Wine Storage Installation Instructions - Page 28
Drawer Panel Installation, Models 427G and 427RG Installation
 |
View all Sub-Zero 427R manuals
Add to My Manuals
Save this manual to your list of manuals |
Page 28 highlights
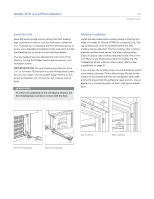
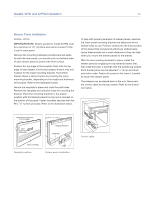
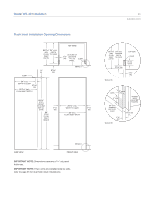
Models 427G and 427RG Installation 28 Drawer Panel Installation MODEL 427RG IMPORTANT NOTE: Drawer panels for model 427RG must be a minimum of 5/8" (16) thick and cannot exceed 12 lbs (5 kg) for each panel. Remove the mounting hardware provided and set aside. As with the door panel, you should work on the back side of each drawer panel to protect the front surface. Position the top edge of the template flush with the top edge of each drawer. For the top drawer, there is only one location for the lower mounting bracket. The bottom drawer allows a second option by inverting the lower mounting bracket, depending on the height and thickness of the panel. Refer to the illustration below. Secure the template in place and mark the pilot holes. Remove the template and drill pilot holes for mounting the bracket. Place the mounting brackets in the proper location with the tabbed bracket on top and L-bracket on the bottom of the panel. Fasten brackets securely with the #8 x 1/2" screws provided. Refer to the illustration below. To help with proper placement of drawer panels, examine the lower panel mounting bracket and determine which slotted holes to use. Position screws into the lower portion of the drawer that correspond with these slotted holes. Leave these screws out a small distance so they can help when you mount the drawer panels to the drawer. With the two mounting brackets in place, install the drawer panel by engaging the top tabbed bracket first, then slide the lower L-bracket onto the positioning screws. Each drawer panel can be adjusted 1/4" (6) up and down and side to side. Fasten all screws to the lower L-bracket to secure the drawer panel. The drawers can be placed back in the unit. Reconnect the control cable for the top drawer. Refer to the illustration below. TEMPLATE FLUSH WITH TOP OF PANEL SIDE EDGE GAP WILL VARY TABBED BRACKET L BRACKET BACK OF PANEL Template position. Drawer panel installation. Control cable.
-
 1
1 -
2
-
3
-
4
-
5
-
6
-
7
-
8
-
9
-
10
-
11
-
12
-
13
-
14
-
15
-
16
-
17
-
18
-
19
-
20
-
21
-
22
-
 23
23 -
 24
24 -
 25
25 -
 26
26 -
 27
27 -
 28
28 -
 29
29 -
 30
30 -
 31
31 -
 32
32 -
 33
33 -
34
-
35
-
36
-
37
-
38
-
39
-
40
-
41
-
42
-
43
-
44
-
45
-
46
-
47
-
48
-
49
-
50
-
51
-
52
-
53
-
54
-
55
-
56
 |
 |
