Sub-Zero 427R Wine Storage Installation Instructions - Page 40
Level the Unit, Model WS-30 Installation, Position the Unit
 |
View all Sub-Zero 427R manuals
Add to My Manuals
Save this manual to your list of manuals |
Page 40 highlights
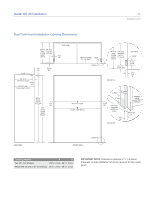
Model WS-30 Installation 40 Position the Unit Before moving model WS-30 into position, secure the door closed and protect any finished flooring. Use an appliance dolly to move the unit near the rough opening. Model WS-30 is equipped with rollers, so it can be moved into position more easily. If possible, keep the door closed until the unit is properly anchored. IMPORTANT NOTE: If for any reason the unit has been laid on its back or side, you must allow the unit to stand upright for a minimum of 24 hours before connecting power. IMPORTANT NOTE: If used, side panels will need to be installed before the unit is placed in its final position. Refer to page 53. The rear levelers must be in their lowest position in order to roll the unit back into the rough opening. Leveling cannot be completed until the unit is in position. Shut off power to the electrical outlet. Plug the power cord into the grounded outlet and roll the unit into position. Make sure the anti-tip brackets are properly engaged. Level the Unit Once the unit is in position, extend the front leveling legs down by turning the legs clockwise to adjust the height. The rear height adjustment can be made from the front of the base. Use a 3/8" socket to adjust the rear rollers. Turn the 3/8" hex bolt clockwise to raise the unit or counterclockwise to lower it. Refer to the illustration below for location of the rear roller base adjustment. When the unit is properly leveled, door adjustments are less likely to be necessary. IMPORTANT NOTE: Be sure to reference leveling of the unit to the floor and not surrounding cabinetry. This could affect the operation of the unit, such as door closing. To reduce the possibility of the unit tipping forward, the front leveling legs must be in contact with the floor. FRONT LEVELING LEG REAR ADJUSTMENT Rear roller base adjustment.
-
 1
1 -
2
-
3
-
4
-
5
-
6
-
7
-
8
-
9
-
10
-
11
-
12
-
13
-
14
-
15
-
16
-
17
-
18
-
19
-
20
-
21
-
22
-
23
-
24
-
25
-
26
-
27
-
28
-
29
-
30
-
31
-
32
-
33
-
34
-
 35
35 -
 36
36 -
 37
37 -
 38
38 -
 39
39 -
 40
40 -
 41
41 -
 42
42 -
 43
43 -
 44
44 -
 45
45 -
46
-
47
-
48
-
49
-
50
-
51
-
52
-
53
-
54
-
55
-
56
 |
 |
