TP-Link Archer C2300 Archer C2300EU V1 User Guide - Page 20
Set Up an IPv6 Internet Connection, types: PPPoE, Dynamic IPSLAAC/DHCPv6, Static IP
 |
View all TP-Link Archer C2300 manuals
Add to My Manuals
Save this manual to your list of manuals |
Page 20 highlights
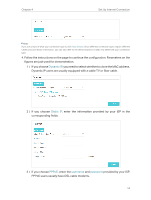
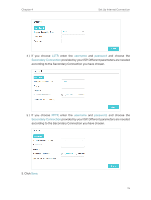
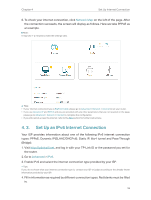
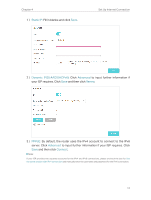
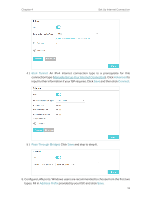
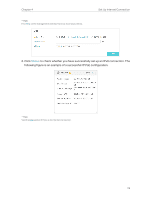
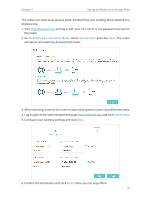
Chapter 4 Set Up Internet Connection 6. To check your internet connection, click Network Map on the left of the page. After the connection succeeds, the screen will display as follows. Here we take PPPoE as an example. Note: It may take 1-2 minutes to make the settings valid. Tips: • If your internet connection type is BigPond Cable, please go to Advanced > Network > Internet to set your router. • If you use Dynamic IP and PPPoE and you are provided with any other parameters that are not required on the page, please go to Advanced > Network > Internet to complete the configuration. • If you still cannot access the internet, refer to the FAQ section for further instructions. 4. 3. Set Up an IPv6 Internet Connection Your ISP provides information about one of the following IPv6 internet connection types: PPPoE, Dynamic IP(SLAAC/DHCPv6), Static IP, 6to4 tunnel and Pass-Through (Bridge). 1. Visit http://tplinkwifi.net, and log in with your TP-Link ID or the password you set for the router. 2. Go to Advanced > IPv6. 3. Enable IPv6 and select the internet connection type provided by your ISP. Tips: If you do not know what your internet connection type is, contact your ISP or judge according to the already known information provided by your ISP. 4. Fill in information as required by different connection types. Red blanks must be filled in. 16
-
 1
1 -
2
-
3
-
4
-
5
-
6
-
7
-
8
-
9
-
10
-
11
-
12
-
13
-
14
-
 15
15 -
 16
16 -
 17
17 -
 18
18 -
 19
19 -
 20
20 -
 21
21 -
 22
22 -
 23
23 -
 24
24 -
 25
25 -
26
-
27
-
28
-
29
-
30
-
31
-
32
-
33
-
34
-
35
-
36
-
37
-
38
-
39
-
40
-
41
-
42
-
43
-
44
-
45
-
46
-
47
-
48
-
49
-
50
-
51
-
52
-
53
-
54
-
55
-
56
-
57
-
58
-
59
-
60
-
61
-
62
-
63
-
64
-
65
-
66
-
67
-
68
-
69
-
70
-
71
-
72
-
73
-
74
-
75
-
76
-
77
-
78
-
79
-
80
-
81
-
82
-
83
-
84
-
85
-
86
-
87
-
88
-
89
-
90
-
91
-
92
-
93
-
94
-
95
-
96
-
97
-
98
-
99
-
100
-
101
-
102
-
103
-
104
-
105
-
106
-
107
-
108
-
109
-
110
-
111
-
112
-
113
-
114
-
115
-
116
-
117
-
118
-
119
-
120
 |
 |