Toshiba Qosmio X300 PQX32A-04S00J Users Manual AU/NZ - Page 169
Battery Packs, Universal AC Adaptor, USB floppy diskette drive, USB connector, Disk-In-Use, Indicator
 |
View all Toshiba Qosmio X300 PQX32A-04S00J manuals
Add to My Manuals
Save this manual to your list of manuals |
Page 169 highlights
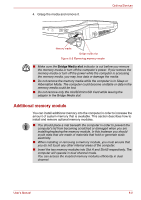
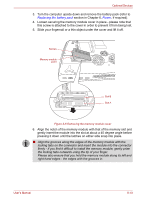
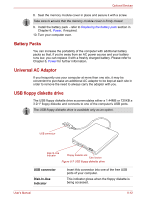
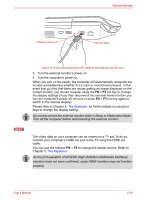
Optional Devices 8. Seat the memory module cover in place and secure it with a screw. Take care to ensure that the memory module cover is firmly closed. 9. Install the battery pack - refer to Replacing the battery pack section in Chapter 6, Power, if required. 10. Turn your computer over. Battery Packs You can increase the portability of the computer with additional battery packs so that, if you're away from an AC power source and your battery runs low, you can replace it with a freshly charged battery. Please refer to Chapter 6, Power for further information. Universal AC Adaptor If you frequently use your computer at more than one site, it may be convenient to purchase an additional AC adaptor to be kept at each site in order to remove the need to always carry the adaptor with you. USB floppy diskette drive The USB floppy diskette drive accommodates either a 1.44MB or 720KB a 3 2/1" floppy diskette and connects to one of the computer's USB ports. The USB floppy diskette drive is available only as an option. USB connector Disk-In-Use Indicator Floppy diskette slot Eject button Figure 8-7 USB floppy diskette drive USB connector Disk-In-Use Indicator Insert this connector into one of the free USB ports of your computer. This indicator glows when the floppy diskette is being accessed. User's Manual 8-12
-
 1
1 -
2
-
3
-
4
-
5
-
6
-
7
-
8
-
9
-
10
-
11
-
12
-
13
-
14
-
15
-
16
-
17
-
18
-
19
-
20
-
21
-
22
-
23
-
24
-
25
-
26
-
27
-
28
-
29
-
30
-
31
-
32
-
33
-
34
-
35
-
36
-
37
-
38
-
39
-
40
-
41
-
42
-
43
-
44
-
45
-
46
-
47
-
48
-
49
-
50
-
51
-
52
-
53
-
54
-
55
-
56
-
57
-
58
-
59
-
60
-
61
-
62
-
63
-
64
-
65
-
66
-
67
-
68
-
69
-
70
-
71
-
72
-
73
-
74
-
75
-
76
-
77
-
78
-
79
-
80
-
81
-
82
-
83
-
84
-
85
-
86
-
87
-
88
-
89
-
90
-
91
-
92
-
93
-
94
-
95
-
96
-
97
-
98
-
99
-
100
-
101
-
102
-
103
-
104
-
105
-
106
-
107
-
108
-
109
-
110
-
111
-
112
-
113
-
114
-
115
-
116
-
117
-
118
-
119
-
120
-
121
-
122
-
123
-
124
-
125
-
126
-
127
-
128
-
129
-
130
-
131
-
132
-
133
-
134
-
135
-
136
-
137
-
138
-
139
-
140
-
141
-
142
-
143
-
144
-
145
-
146
-
147
-
148
-
149
-
150
-
151
-
152
-
153
-
154
-
155
-
156
-
157
-
158
-
159
-
160
-
161
-
162
-
163
-
 164
164 -
 165
165 -
 166
166 -
 167
167 -
 168
168 -
 169
169 -
 170
170 -
 171
171 -
 172
172 -
 173
173 -
 174
174 -
175
-
176
-
177
-
178
-
179
-
180
-
181
-
182
-
183
-
184
-
185
-
186
-
187
-
188
-
189
-
190
-
191
-
192
-
193
-
194
-
195
-
196
-
197
-
198
-
199
-
200
-
201
-
202
-
203
-
204
-
205
-
206
-
207
-
208
-
209
-
210
-
211
-
212
-
213
-
214
-
215
-
216
-
217
-
218
-
219
-
220
-
221
-
222
-
223
-
224
-
225
-
226
-
227
-
228
-
229
-
230
-
231
-
232
-
233
-
234
-
235
-
236
-
237
-
238
-
239
-
240
-
241
-
242
-
243
-
244
-
245
 |
 |