Toshiba Satellite A45-S250 Toshiba Online Users Guide for Satellite A40/A45 - Page 70
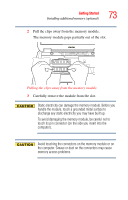
Lift but don't detach the plastic sheet to expose the, memory slots.
 |
View all Toshiba Satellite A45-S250 manuals
Add to My Manuals
Save this manual to your list of manuals |
Page 70 highlights
70 Getting Started Installing additional memory (optional) 5 Lift (but don't detach) the plastic sheet to expose the memory slots. Lifting the plastic covering the memory slots 6 Remove the new memory module from its antistatic packaging. Static electricity can damage the memory module. Before you handle the module, touch a grounded metal surface to discharge any static electricity you may have built up. To avoid damaging the memory module, be careful not to touch its pin connector (on the side you insert into the computer). Avoid touching the connectors on the memory module or on the computer. Grease or dust on the connectors may cause memory access problems.
-
 1
1 -
2
-
3
-
4
-
5
-
6
-
7
-
8
-
9
-
10
-
11
-
12
-
13
-
14
-
15
-
16
-
17
-
18
-
19
-
20
-
21
-
22
-
23
-
24
-
25
-
26
-
27
-
28
-
29
-
30
-
31
-
32
-
33
-
34
-
35
-
36
-
37
-
38
-
39
-
40
-
41
-
42
-
43
-
44
-
45
-
46
-
47
-
48
-
49
-
50
-
51
-
52
-
53
-
54
-
55
-
56
-
57
-
58
-
59
-
60
-
61
-
62
-
63
-
64
-
 65
65 -
 66
66 -
 67
67 -
 68
68 -
 69
69 -
 70
70 -
 71
71 -
 72
72 -
 73
73 -
 74
74 -
 75
75 -
76
-
77
-
78
-
79
-
80
-
81
-
82
-
83
-
84
-
85
-
86
-
87
-
88
-
89
-
90
-
91
-
92
-
93
-
94
-
95
-
96
-
97
-
98
-
99
-
100
-
101
-
102
-
103
-
104
-
105
-
106
-
107
-
108
-
109
-
110
-
111
-
112
-
113
-
114
-
115
-
116
-
117
-
118
-
119
-
120
-
121
-
122
-
123
-
124
-
125
-
126
-
127
-
128
-
129
-
130
-
131
-
132
-
133
-
134
-
135
-
136
-
137
-
138
-
139
-
140
-
141
-
142
-
143
-
144
-
145
-
146
-
147
-
148
-
149
-
150
-
151
-
152
-
153
-
154
-
155
-
156
-
157
-
158
-
159
-
160
-
161
-
162
-
163
-
164
-
165
-
166
-
167
-
168
-
169
-
170
-
171
-
172
-
173
-
174
-
175
-
176
-
177
-
178
-
179
-
180
-
181
-
182
-
183
-
184
-
185
-
186
-
187
-
188
-
189
-
190
-
191
-
192
-
193
-
194
-
195
-
196
-
197
-
198
-
199
-
200
-
201
-
202
-
203
-
204
-
205
-
206
-
207
-
208
-
209
-
210
-
211
-
212
-
213
-
214
-
215
-
216
-
217
-
218
-
219
-
220
-
221
-
222
-
223
-
224
-
225
-
226
-
227
-
228
-
229
-
230
-
231
-
232
-
233
-
234
-
235
-
236
-
237
-
238
-
239
-
240
-
241
-
242
-
243
-
244
-
245
-
246
-
247
-
248
-
249
-
250
-
251
-
252
-
253
-
254
-
255
-
256
-
257
-
258
-
259
-
260
-
261
-
262
-
263
-
264
-
265
-
266
-
267
-
268
-
269
-
270
-
271
-
272
-
273
-
274
-
275
-
276
-
277
 |
 |
70
Getting Started
Installing additional memory (optional)
5
Lift (but don’t detach) the plastic sheet to expose the
memory slots.
Lifting the plastic covering the memory slots
6
Remove the new memory module from its antistatic
packaging.
Static electricity can damage the memory module. Before you
handle the module, touch a grounded metal surface to
discharge any static electricity you may have built up.
To avoid damaging the memory module, be careful not to
touch its pin connector (on the side you insert into the
computer).
Avoid touching the connectors on the memory module or on
the computer. Grease or dust on the connectors may cause
memory access problems.