Toshiba Tecra C50-CMZC002 Mobile Zero Client User Operation Guide - Page 21
Using Setup Utility for BIOS settings
 |
View all Toshiba Tecra C50-CMZC002 manuals
Add to My Manuals
Save this manual to your list of manuals |
Page 21 highlights
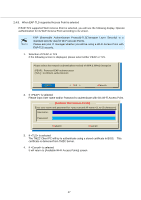
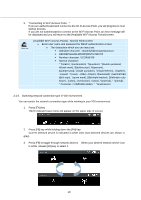
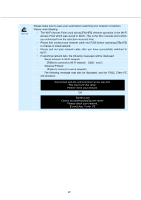
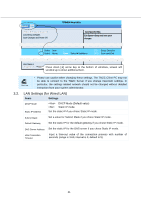
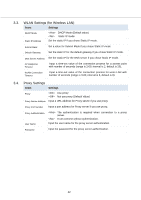
3. Using Setup Utility for BIOS settings This chapter describes how to change system settings. Please note that your administrator may restricted your access to BIOS settings. 3.1. How to Open the Setup Utility 1. Turn off the TMZC Client PC 2. Press and hold [F2] key and press power button 3. Release [F2] key 4. Type in your password if a password (user and/or supervisor password) for boot certification is required 5. Following screens will be displayed Please note that screen appearance may differ based on the model you purchased and/or by different BIOS version You can choose an item in the setup menu by using [] and [] arrow keys. Once you are finished with changes, choose [Exit] item by using [] and [] arrow keys, and choose one of the action from [exit] selections. System Exit TOSHIBA Setup Utility [LAN Settings] DHCP Mode Static IP Address-> - Subnet Mask-> - Default Gateway-> - DNS Server Address-> - LAN Connection Timeout [9] Item Specific Help Select DHCP or static to get IP address. : DHCP is ON. : DHCP is OFF. If no, configure the static IP address settings. [WLAN Settings] DHCP Mode Static IP Address-> Subnet Mask-> Default Gateway-> DNS Server Address-> LAN Connection Timeout [20] [9] [Proxy Settings] Proxy Proxy Server Address-> Proxy Port Number-> Proxy Authentication User Name-> Password - Select Item Select Menu Enter SelectSubMenu F9 Setup Defaults F10 Save and Exit 20
-
 1
1 -
2
-
3
-
4
-
5
-
6
-
7
-
8
-
9
-
10
-
11
-
12
-
13
-
14
-
15
-
 16
16 -
 17
17 -
 18
18 -
 19
19 -
 20
20 -
 21
21 -
 22
22 -
 23
23 -
 24
24 -
 25
25 -
 26
26 -
27
-
28
-
29
-
30
-
31
-
32
 |
 |