Tripp Lite SV20KM1P1B Owners Manual for SmartOnline 208V SV-Series 3-Phase Mod - Page 16
Removing a Power Module, 2.3 Installing a Battery Module, 2.4 Removing a Battery Module
 |
View all Tripp Lite SV20KM1P1B manuals
Add to My Manuals
Save this manual to your list of manuals |
Page 16 highlights
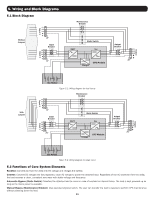
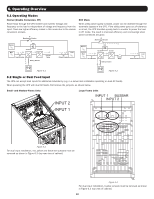
7. Installation 4. Secure the module to the frame via the fixing bracket using the four screws. Ensure both sides of the Power Module are secured to the frame. 5. Place the ready switch into the locked position by rotating the knob clockwise. Note: For initial startup and powering on the UPS, refer to Section 9.1 Control Panel - Introduction After the UPS has been successfully powered ON, refer to Section 9.3.6.2 System to adjust total power and redundancy settings of the UPS based on power modules installed. If additional power modules are being installed after initial startup, you may skip Section 9.1 and go to Section 9.3.6.2 to adjust total power and redundancy settings. The Power Module's LED indicator displays its operational status as follows No. Behavior 1 Indicates the system is abnormal 2 Indicates the parallel system is abnormal 3 Normal operation of the Primary UPS 4 Normal operation of the Subordinate UPS LED Display FAULT - constant red LED FAULT - flashing red LED POWER - flashing green LED POWER - constant green LED 7.2.2 Removing a Power Module WARNING Before removing any Power Module, ensure the remaining Power Modules can support the attached load and the UPS is in Line- or Bypass-mode. 1. Place the ready switch on the Power Module's front panel to the unlocked position by rotating the knob counterclockwise. 2. The red FAULT LED will illuminate to indicate the Power Module output is off and disconnected from the UPS. 3. Wait five minutes after unlocking the Power Module before servicing. 4. Remove the four screws used to attach to the fixing bracket. 5. Completely remove the Power Module from the frame. Notes: • When a power module is removed from the frame, the Redundancy Set Fail alarm will sound. Refer to Section 9.3.6.2 System to adjust the Total Power and Redundancy settings based on power modules removed. • The Power Module is heavy and will require two or more people to move it. • To replace a Power Module, refer to Section 11.1 Power Module Replacement. 7.2.3 Installing a Battery Module Each Battery Module is comprised of four battery trays. Trays are shipped separately in individual boxes (four boxes per module), fully assembled. Refer to Section 9.3.6.3 Battery for configuring the Amh hour rating when adding Battery Modules. The default value is 18Ah. For medium and small frames, each additional installed Battery Module (4 x trays) is 18Ah. 1. Insert battery tray into open slot in the frame position and slide into cabinet, ensuring the +/- connectors make full contact. 2. Secure each battery tray with two screws (provided in accessory bag). Figure 7.3 7.2.4 Removing a Battery Module Remove two bottom screws on front panel of the battery tray and pull out the Battery Module using the handle provided. 16
-
 1
1 -
2
-
3
-
4
-
5
-
6
-
7
-
8
-
9
-
10
-
 11
11 -
 12
12 -
 13
13 -
 14
14 -
 15
15 -
 16
16 -
 17
17 -
 18
18 -
 19
19 -
 20
20 -
 21
21 -
22
-
23
-
24
-
25
-
26
-
27
-
28
-
29
-
30
-
31
-
32
-
33
-
34
-
35
-
36
-
37
-
38
-
39
-
40
-
41
-
42
-
43
-
44
-
45
-
46
-
47
-
48
-
49
-
50
-
51
-
52
-
53
-
54
-
55
-
56
-
57
-
58
-
59
-
60
-
61
-
62
-
63
-
64
-
65
-
66
-
67
-
68
-
69
-
70
-
71
-
72
-
73
-
74
-
75
-
76
-
77
-
78
-
79
-
80
-
81
-
82
-
83
-
84
-
85
-
86
-
87
-
88
-
89
-
90
-
91
-
92
-
93
-
94
-
95
-
96
-
97
-
98
-
99
-
100
-
101
-
102
-
103
-
104
-
105
-
106
-
107
-
108
-
109
-
110
-
111
-
112
 |
 |
