VMware 454885-B21 Installation Guide - Page 41
Adding and Synchronizing Lab Manager Server with NFS Media Storage
 |
UPC - 883585381647
View all VMware 454885-B21 manuals
Add to My Manuals
Save this manual to your list of manuals |
Page 41 highlights
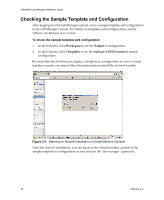
Chapter 3 Installing Lab Manager Adding and Synchronizing Lab Manager Server with NFS Media Storage If you added NFS media storage and created the /ISO folder, as described in "Configuring Additional Media Storage (NFS) Prior to Installing the Managed Server" on page 28, add the media server to the Lab Manager Web console. To ensure Lab Manager recognizes and syncs up with the contents of the NFS media server, store media files in the /ISO folder. Review these requirements for the CD and floppy files: „ CD files must end with .iso. „ Floppy files must end with .img, .vfd, and .flp. To add a media server 1 In the left pane, click Storage. 2 Click the Add Server button. 3 Enter the required information, select NFS Storage, and enter the NFS export path (for example, /export). 4 Create a ISO subdirectory on the NFS server. If your NFS server is /export, the ISO directory is /export/ISO. To synchronize Lab Manager Server with NFS media storage 1 In the left pane, click Storage. 2 In the left pane, click Media. 3 Click Synchronize to make Lab Manager recognize the contents of the NFS server. 4 Confirm to synchronize the contents. NOTE Lab Manager does not provide a way to populate the contents of the NFS server contents as it does for SMB shares. Use your own method of populating the NFS server. If you add new items, use the Synchronize button to ensure Lab Manager recognizes the additional items. VMware, Inc. 41
-
 1
1 -
2
-
3
-
4
-
5
-
6
-
7
-
8
-
9
-
10
-
11
-
12
-
13
-
14
-
15
-
16
-
17
-
18
-
19
-
20
-
21
-
22
-
23
-
24
-
25
-
26
-
27
-
28
-
29
-
30
-
31
-
32
-
33
-
34
-
35
-
 36
36 -
 37
37 -
 38
38 -
 39
39 -
 40
40 -
 41
41 -
 42
42 -
 43
43 -
 44
44 -
 45
45 -
 46
46 -
47
-
48
-
49
-
50
 |
 |