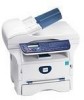
Xerox 3100MFPX User Guide - Phaser 3100 MFP/S - Page 23
Starting your device, Loading paper in the manual feed tray - s printers
 |
UPC - 095205741964
View all Xerox 3100MFPX manuals
Add to My Manuals
Save this manual to your list of manuals |
Page 23 highlights
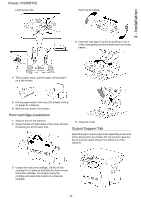
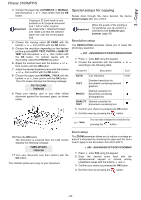
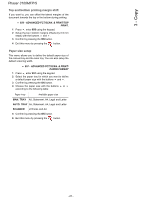
2 - Installation Phaser 3100MFP/S Starting your device Device connection Before plugging the power cord, it WARNING is imperative to refer to the Security directives, page 7. 1 Make sure that the On/Off switch is on Off (O position). 2 Connect the power cord to the device. Plug the power cord into the wall outlet. 1 To modify the display language, press the OK button. 2 Select the desired language using the or buttons and confirm with OK. The setup is now complete and the functions list is automatically printed out. The LCD screen displays the message PAPER EMPTY if no paper has been loaded in the paper tray (see Loading paper in the main paper tray, page 13). Once paper has been loaded, printing will resume. Loading paper in the manual feed tray Before loading paper, refer to the Important paragraph Paper recommendations, page 13. The manual feed tray allows you to use a greater variety of weights and sizes than those used in the main paper tray (refer to Specifications, page 50). Only one sheet or envelope can be fed at a time. Important You can use paper weighing between 52 and 160 g/m². WARNING The power cord is used as a power unit cut off. As a precaution, the outlet shall be located close to the device and be of easy access in case of danger. 3 Press the On/Off button to turn on the device (I position). Device initial setup After a few seconds, when the machine has warmed up, the Easy Install function is launched and the LCD screen displays the following message: SET LANGUAGE YES=OK - NO=C The Easy Install function will help you configure your machine by guiding you through the basic settings. If you wish to modify the setting displayed, press the OK button. If you do not want to modify the displayed setting, press the C button: the Easy Install function then displays the next basic setting. 1 Spread the manual feed guides to the maximum. 2 Insert a sheet or an envelope in the manual feed tray. 3 Adjust the paper guides against the right and left edges of the sheet or the envelope. 4 Print making sure that the chosen paper size corresponds to the selected format on the printer (refer to Copy, page 21). Note If you do not want to carry out the initial setup, press the button. A confirmation message appears. Press the button again to confirm. To manually modify and customise the machine settings, refer to Parameters/Setup, page 25. - 19 -
-
 1
1 -
2
-
3
-
4
-
5
-
6
-
7
-
8
-
9
-
10
-
11
-
12
-
13
-
14
-
15
-
16
-
17
-
 18
18 -
 19
19 -
 20
20 -
 21
21 -
 22
22 -
 23
23 -
 24
24 -
 25
25 -
 26
26 -
 27
27 -
 28
28 -
29
-
30
-
31
-
32
-
33
-
34
-
35
-
36
-
37
-
38
-
39
-
40
-
41
-
42
-
43
-
44
-
45
-
46
-
47
-
48
-
49
-
50
-
51
-
52
-
53
-
54
-
55
-
56
 |
 |
