Xerox 3100MFPX User Guide - Phaser 3100 MFP/S - Page 33
Connect your WLAN adaptor, Con your network - phaser x driver
 |
UPC - 095205741964
View all Xerox 3100MFPX manuals
Add to My Manuals
Save this manual to your list of manuals |
Page 33 highlights
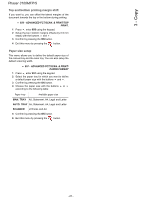
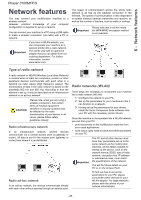
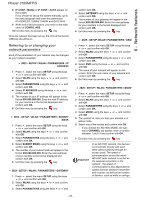
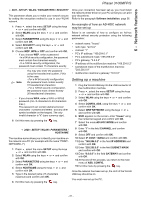
6 - Network features Phaser 3100MFP/S Note You can be sure of perfect communication if you use an approved adaptor in conjunction with your PC. All of the latest printer drivers for the approved adaptor may be found on our website together with further information: www.xerox.com. Connect your WLAN adaptor Your machine belongs to a new generation of terminals that you can incorporate into a WLAN network using a WLAN USB key. Important Your machine's network radio adaptor transmits data using the radio protocol IEEE 802.11g; it can also be incorporated into an existing IEEE 802.11b network. When connecting to your machine, only use the approved adaptor. Other transmitting or receiving adaptors may damage your device. Irrespective of whether you use your machine in an infrastructure or adhoc network, you must set up certain network and security parameters (for example, the Service-Set-ID (SSID) and the encryption key). These must match the network's specifications. 1 Plug your WLAN USB key into the USB port of your machine. Configure your network Note We recommend that the settings of your WLAN network should only be changed by a person with a good knowledge of the configuration of your computer. Creating or rejoining a network Before attempting to use a WLAN adaptor on your machine, you must enter the parameters that will allow a WLAN network to recognise your machine. On your machine you will find simple instructions that guide you step by step through the set-up of your network. Just follow them! 281 - SETUP / WLAN / CONFIG. ASS. 1 Press , select the menu SETUP using the keys or and confirm with OK. 2 Select WLAN using the keys or and confirm with OK. 3 Select CONFIG. ASS. using the keys or and confirm with OK. The machine searches for existing networks. 4 Select your existing network, or select NEW NETWORK to create it, using the keys or and confirm with OK. Note If you choose an existing network, steps 5 and 6 (and possibly 7) are carried out automatically. 5 SSID appears on the screen, enter the name of your network using the numerical keypad, pressing the keys one after the other until you obtain the name you want (32 characters maximum) and confirm with OK. 6 AD-HOC MODE or INFRA. MODE appear on the screen. Go back to the beginning of the chapter and make your choice. Select one of these modes and confirm with OK. - If you choose AD-HOC mode, the sub-menu CHANNEL appears, enter a figure between 1 and 13 and confirm with OK. 7 Select your encryption method, OFF, WEP or WPA, and confirm with OK: Please note that in ad-hoc mode, Important the WPA/WPA2 encryption method is not available. - If you choose WEP, enter the WEP key that you are using on your network. Note The WEP key number may be configured in the menu: 29 SETUP / TECHNICALS / WEP KEYS NBR. - If you choose WPA, enter the WPA or WPA2 key that you are using on your network. - 29 -
-
 1
1 -
2
-
3
-
4
-
5
-
6
-
7
-
8
-
9
-
10
-
11
-
12
-
13
-
14
-
15
-
16
-
17
-
18
-
19
-
20
-
21
-
22
-
23
-
24
-
25
-
26
-
27
-
 28
28 -
 29
29 -
 30
30 -
 31
31 -
 32
32 -
 33
33 -
 34
34 -
 35
35 -
 36
36 -
 37
37 -
 38
38 -
39
-
40
-
41
-
42
-
43
-
44
-
45
-
46
-
47
-
48
-
49
-
50
-
51
-
52
-
53
-
54
-
55
-
56
 |
 |