Xerox 3100MFPX User Guide - Phaser 3100 MFP/S - Page 28
Top and bottom printing margin shift, Paper size setup
 |
UPC - 095205741964
View all Xerox 3100MFPX manuals
Add to My Manuals
Save this manual to your list of manuals |
Page 28 highlights
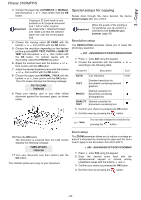
3 - Copy Phaser 3100MFP/S Top and bottom printing margin shift If you want to, you can offset the lateral margins of the document towards the top or the bottom during printing. 856 - ADVANCED FCT/SCAN. & PRINT/TOP PRINT. 1 Press , enter 856 using the keypad. 2 Setup the top / bottom margins offsets (by 0.5 mm steps) with the buttons and . 3 Confirm by pressing the OK button. 4 Exit this menu by pressing the button. Paper size setup This menu allows you to define the default paper size of the manual tray and the main tray. You can also setup the default scanning width. 857 - ADVANCED FCT/SCAN. & PRINT/ PAPER FORMAT 1 Press , enter 857 using the keypad. 2 Select the paper tray for which you want to define a default paper size with the buttons and . 3 Confirm by pressing the OK button. 4 Choose the paper size with the buttons or according to the following table: Paper tray Available paper size MAN. TRAY A5, Statement, A4, Legal and Letter AUTO. TRAY A5, Statement, A4, Legal and Letter SCANNER LTR/LGL and A4 5 Confirm by pressing the OK button. 6 Exit this menu by pressing the button. - 24 -
-
 1
1 -
2
-
3
-
4
-
5
-
6
-
7
-
8
-
9
-
10
-
11
-
12
-
13
-
14
-
15
-
16
-
17
-
18
-
19
-
20
-
21
-
22
-
 23
23 -
 24
24 -
 25
25 -
 26
26 -
 27
27 -
 28
28 -
 29
29 -
 30
30 -
 31
31 -
 32
32 -
 33
33 -
34
-
35
-
36
-
37
-
38
-
39
-
40
-
41
-
42
-
43
-
44
-
45
-
46
-
47
-
48
-
49
-
50
-
51
-
52
-
53
-
54
-
55
-
56
 |
 |