Yamaha 9000Pro Owner's Manual - Page 144
Mixing Console, Part Settings
 |
View all Yamaha 9000Pro manuals
Add to My Manuals
Save this manual to your list of manuals |
Page 144 highlights
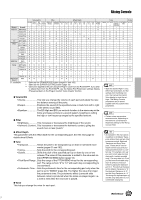
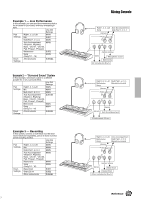
Mixing Console A full-screen mixing console which provides access to a wide range of controls for each main and accompaniment part can be selected by pressing the [MIXING CONSOLE] button. A simpler mixing console is available via the [MAIN MIXER] and the [PART ON/OFF] buttons described in "Quick Guide" on pages 24 and 31. MAIN MIXER See below. PART ON/OFF PART Refer to the Quick Guide on pages 24 and 31. Basic Procedure 1 Press the [MIXING CONSOLE] button several times until the desired parts are displayed. Pressing the [MIXING CONSOLE] button alternates among the displays as listed below. All parts (see below) Accompaniment parts Song tracks 1~8 2 Adjust the desired parameter. Volume/EQ (see "Part Settings," page 145.) Song tracks 9~16 Filter (see "Part Settings," page 145.) Effect Depth (see "Part Settings," page 145.) Effect Type (see "Effect Type Settings," page 146.) Tune (see "Part Settings," page 145.) Master EQ (see "Master Equalizer Settings," page 147.) Voice (see "Part Settings," page 145.) Line Out (see "Line Out Settings," page 148.) Select the desired menu. Select the desired menu. Select the desired parameter. Select the desired parameter. Adjust the parameter for each part. You can use the data dial to adjust the parameter. First, select the desired part by pressing the any of the [1]~[8] buttons and then rotate the data dial to adjust the parameter. The operations for each parameter corresponding to step #2 are covered in the following explanations. • You can also select the desired menu by pressing the [NEXT] or [BACK] button. • You can change the value of all parts simultaneously. To do this, press any of the LCD [1]~[8] buttons or rotate the data dial while holding the corresponding LCD button ([A]~[J]). Part Settings In addition to the keyboard-played voices, the 9000Pro features many different instrumental "parts," including those contained in the auto accompaniment, song playback, and vocal harmony. See the next page for details. 144 Reference 142
-
 1
1 -
2
-
3
-
4
-
5
-
6
-
7
-
8
-
9
-
10
-
11
-
12
-
13
-
14
-
15
-
16
-
17
-
18
-
19
-
20
-
21
-
22
-
23
-
24
-
25
-
26
-
27
-
28
-
29
-
30
-
31
-
32
-
33
-
34
-
35
-
36
-
37
-
38
-
39
-
40
-
41
-
42
-
43
-
44
-
45
-
46
-
47
-
48
-
49
-
50
-
51
-
52
-
53
-
54
-
55
-
56
-
57
-
58
-
59
-
60
-
61
-
62
-
63
-
64
-
65
-
66
-
67
-
68
-
69
-
70
-
71
-
72
-
73
-
74
-
75
-
76
-
77
-
78
-
79
-
80
-
81
-
82
-
83
-
84
-
85
-
86
-
87
-
88
-
89
-
90
-
91
-
92
-
93
-
94
-
95
-
96
-
97
-
98
-
99
-
100
-
101
-
102
-
103
-
104
-
105
-
106
-
107
-
108
-
109
-
110
-
111
-
112
-
113
-
114
-
115
-
116
-
117
-
118
-
119
-
120
-
121
-
122
-
123
-
124
-
125
-
126
-
127
-
128
-
129
-
130
-
131
-
132
-
133
-
134
-
135
-
136
-
137
-
138
-
 139
139 -
 140
140 -
 141
141 -
 142
142 -
 143
143 -
 144
144 -
 145
145 -
 146
146 -
 147
147 -
 148
148 -
 149
149 -
150
-
151
-
152
-
153
-
154
-
155
-
156
-
157
-
158
-
159
-
160
-
161
-
162
-
163
-
164
-
165
-
166
-
167
-
168
-
169
-
170
-
171
-
172
-
173
-
174
-
175
-
176
-
177
-
178
-
179
-
180
-
181
-
182
-
183
-
184
-
185
-
186
-
187
-
188
-
189
-
190
-
191
-
192
-
193
-
194
-
195
-
196
-
197
-
198
-
199
-
200
-
201
-
202
-
203
-
204
-
205
-
206
-
207
-
208
-
209
-
210
-
211
-
212
-
213
-
214
-
215
-
216
-
217
-
218
-
219
-
220
-
221
-
222
-
223
-
224
-
225
-
226
-
227
-
228
-
229
-
230
-
231
-
232
-
233
-
234
-
235
-
236
-
237
-
238
-
239
-
240
-
241
-
242
-
243
-
244
-
245
-
246
-
247
-
248
-
249
-
250
 |
 |
