Yamaha 9000Pro Owner's Manual - Page 151
Basic Operation, Directory/File Selection, Selecting, Selecting Directories/Files
 |
View all Yamaha 9000Pro manuals
Add to My Manuals
Save this manual to your list of manuals |
Page 151 highlights
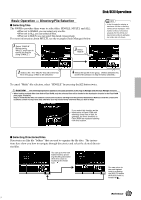
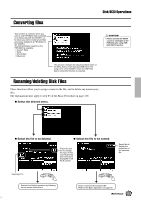
Basic Operation - Directory/File Selection I Selecting files The 9000Pro provides three ways to select files: SINGLE, MULTI, and ALL. • When set to SINGLE, you can select only one file. • When set to ALL, you can select all files. • When set to MULTI, you can select files listed consecutively. For more information about MULTI, see the example (Style Manager) below. 1 Select "SINGLE." (Before using "MULTI," you'll have to specify the first file using "SINGLE.") 3 Select "MULTI." Disk/SCSI Operations • In the file selection display, a maximum 250 file or directory names can be displayed. If the number of files or directories exceeds 250, the 251st and beyond (according to alphabetical order) are not shown. 2 Select a file. (For "MULTI," this will be the first file in the group of files to be selected.)" 4 Select the last file in the group. (All files between this and the file selected in step #2 will be selected.) To cancel "Multi" file selection, select "SINGLE" by pressing the [C] button twice. CAUTION The following explanation applies to the Load operation of the Plug-in Manager and the Style Manager function. • When loading multiple files from disk to Flash ROM, only the selected files will be loaded to the destination location in the Flash ROM (see pages 78 and 87). Keep in mind that the files are loaded to consecutive locations starting from the specified destination. Make sure that the consecutive locations contain no important data, otherwise you may inadvertently overwrite files you wish to keep. If you select this location as the destination in Flash ROM with selecting three files in disk, for example, the three locations in Flash ROM are replaced starting from this location. I Selecting Directories/Files Directories are like file "folders" that are used to organize the file data. The instructions here show you how to navigate through directories and select the desired directories/files. You can go to the next lowest level by pressing the [IN] LCD button while the cursor is located at the folder icon . You can return to the next highest level by pressing the [IN] LCD button while the cursor is located at . Reference 151 149
-
 1
1 -
2
-
3
-
4
-
5
-
6
-
7
-
8
-
9
-
10
-
11
-
12
-
13
-
14
-
15
-
16
-
17
-
18
-
19
-
20
-
21
-
22
-
23
-
24
-
25
-
26
-
27
-
28
-
29
-
30
-
31
-
32
-
33
-
34
-
35
-
36
-
37
-
38
-
39
-
40
-
41
-
42
-
43
-
44
-
45
-
46
-
47
-
48
-
49
-
50
-
51
-
52
-
53
-
54
-
55
-
56
-
57
-
58
-
59
-
60
-
61
-
62
-
63
-
64
-
65
-
66
-
67
-
68
-
69
-
70
-
71
-
72
-
73
-
74
-
75
-
76
-
77
-
78
-
79
-
80
-
81
-
82
-
83
-
84
-
85
-
86
-
87
-
88
-
89
-
90
-
91
-
92
-
93
-
94
-
95
-
96
-
97
-
98
-
99
-
100
-
101
-
102
-
103
-
104
-
105
-
106
-
107
-
108
-
109
-
110
-
111
-
112
-
113
-
114
-
115
-
116
-
117
-
118
-
119
-
120
-
121
-
122
-
123
-
124
-
125
-
126
-
127
-
128
-
129
-
130
-
131
-
132
-
133
-
134
-
135
-
136
-
137
-
138
-
139
-
140
-
141
-
142
-
143
-
144
-
145
-
 146
146 -
 147
147 -
 148
148 -
 149
149 -
 150
150 -
 151
151 -
 152
152 -
 153
153 -
 154
154 -
 155
155 -
 156
156 -
157
-
158
-
159
-
160
-
161
-
162
-
163
-
164
-
165
-
166
-
167
-
168
-
169
-
170
-
171
-
172
-
173
-
174
-
175
-
176
-
177
-
178
-
179
-
180
-
181
-
182
-
183
-
184
-
185
-
186
-
187
-
188
-
189
-
190
-
191
-
192
-
193
-
194
-
195
-
196
-
197
-
198
-
199
-
200
-
201
-
202
-
203
-
204
-
205
-
206
-
207
-
208
-
209
-
210
-
211
-
212
-
213
-
214
-
215
-
216
-
217
-
218
-
219
-
220
-
221
-
222
-
223
-
224
-
225
-
226
-
227
-
228
-
229
-
230
-
231
-
232
-
233
-
234
-
235
-
236
-
237
-
238
-
239
-
240
-
241
-
242
-
243
-
244
-
245
-
246
-
247
-
248
-
249
-
250
 |
 |
