Yamaha 9000Pro Owner's Manual - Page 159
Split Point/Chord Fingering, Controller Assignment
 |
View all Yamaha 9000Pro manuals
Add to My Manuals
Save this manual to your list of manuals |
Page 159 highlights
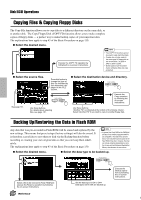
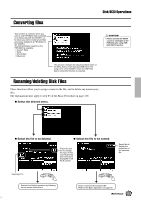
The 9000Pro "Functions" Split Point/Chord Fingering The explanations here apply to step #3 of the Basic Procedure on page 158. You can set the Split Point by pressing the desired key while holding this button. The way in which chords are played or indicated with your left hand (in the auto accompaniment section of the keyboard) is referred to as "fingering." For details, refer to page 70. The point on the keyboard that separates the auto accompaniment section/the left-hand section (voice L) and the right-hand section (voice R1/ R2/R3) of the keyboard is called the "split point." For details, refer to page 57. Split Point Auto Accompaniment section or Voice L Controller Assignment The explanations here apply to step #3 of the Basic Procedure on page 158. I Foot Controller Various functions can be assigned to the foot volume/switch connected to the FOOT PEDAL jacks. G Foot Volume Controller Determines whether an optional YAMAHA FC7 Foot Controller plugged into the rear-panel FOOT PEDAL VOLUME jack will control master volume, or only the volume of specified parts and voices. Select "MASTER" for master volume control or "INDIVIDUAL" for individual part/voice volume control. When "INDIVIDUAL" is selected, you can set the individual part/voice to on or off. Reference 159 157
-
 1
1 -
2
-
3
-
4
-
5
-
6
-
7
-
8
-
9
-
10
-
11
-
12
-
13
-
14
-
15
-
16
-
17
-
18
-
19
-
20
-
21
-
22
-
23
-
24
-
25
-
26
-
27
-
28
-
29
-
30
-
31
-
32
-
33
-
34
-
35
-
36
-
37
-
38
-
39
-
40
-
41
-
42
-
43
-
44
-
45
-
46
-
47
-
48
-
49
-
50
-
51
-
52
-
53
-
54
-
55
-
56
-
57
-
58
-
59
-
60
-
61
-
62
-
63
-
64
-
65
-
66
-
67
-
68
-
69
-
70
-
71
-
72
-
73
-
74
-
75
-
76
-
77
-
78
-
79
-
80
-
81
-
82
-
83
-
84
-
85
-
86
-
87
-
88
-
89
-
90
-
91
-
92
-
93
-
94
-
95
-
96
-
97
-
98
-
99
-
100
-
101
-
102
-
103
-
104
-
105
-
106
-
107
-
108
-
109
-
110
-
111
-
112
-
113
-
114
-
115
-
116
-
117
-
118
-
119
-
120
-
121
-
122
-
123
-
124
-
125
-
126
-
127
-
128
-
129
-
130
-
131
-
132
-
133
-
134
-
135
-
136
-
137
-
138
-
139
-
140
-
141
-
142
-
143
-
144
-
145
-
146
-
147
-
148
-
149
-
150
-
151
-
152
-
153
-
 154
154 -
 155
155 -
 156
156 -
 157
157 -
 158
158 -
 159
159 -
 160
160 -
 161
161 -
 162
162 -
 163
163 -
 164
164 -
165
-
166
-
167
-
168
-
169
-
170
-
171
-
172
-
173
-
174
-
175
-
176
-
177
-
178
-
179
-
180
-
181
-
182
-
183
-
184
-
185
-
186
-
187
-
188
-
189
-
190
-
191
-
192
-
193
-
194
-
195
-
196
-
197
-
198
-
199
-
200
-
201
-
202
-
203
-
204
-
205
-
206
-
207
-
208
-
209
-
210
-
211
-
212
-
213
-
214
-
215
-
216
-
217
-
218
-
219
-
220
-
221
-
222
-
223
-
224
-
225
-
226
-
227
-
228
-
229
-
230
-
231
-
232
-
233
-
234
-
235
-
236
-
237
-
238
-
239
-
240
-
241
-
242
-
243
-
244
-
245
-
246
-
247
-
248
-
249
-
250
 |
 |
