Yamaha 9000Pro Owner's Manual - Page 51
Button/Controller, LCD title, Function, s, Editing various parameters e.g., Initial Touch Curve
 |
View all Yamaha 9000Pro manuals
Add to My Manuals
Save this manual to your list of manuals |
Page 51 highlights
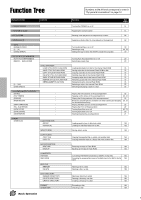
49 Button/Controller 8 MENU [FUNCTION] [MIDI] 9 TRANSPOSE 10 DIGITAL STUDIO [SOUND CREATOR] Function Tree LCD title Function See pages MASTER TUNE/SCALE TUNE MASTER TUNE Setting the overall pitch of the 9000Pro 158 SCALE TUNE Tuning each individual note of the octave 158 SPLIT POINT/FINGERING SPLIT POINT FINGERING Setting the point on the keyboard that separates the left-hand and 159 right-hand section Selecting the way in which chords are played with your left hand 159 CONTROLLER FOOT CONTROLLER PANEL CONTROLLER Selecting the foot controller (page 13) function 159 Selecting the panel controller (e.g. Pitch Bend Wheel ) function 161 REGISTRATION/FREEZE/VOICE SET REGISTRATION Naming each Registration setup/bank 163 FREEZE Specifying which settings are affected by the Freeze function (page 163 28) VOICE SET Determining whether the preset settings will or will not be recalled 163 when a new voice is selected HARMONY/ECHO VIDEO OUT TALK SETTING Harmony/Echo settings 164 Setting the display characteristics that are output to a television or 165 video monitor connected to the [VIDEO OUT] jack Setting various parameters which affect the microphone sound 165 when the [TALK] button is on UTILITY CONFIGURATION Setting various parameters 166 TIME Setting parameters related to time 167 LANGUAGE Selecting the language of the display messages 45 Selecting a MIDI template 174 MFC10 EASY SETUP FULL SETUP Selecting a template of the MFC10 settings 178 Creating and storing a template of the MFC10 settings 179 SETUP SYSTEM MIDI system-related parameter settings 175 TRANSMIT MIDI transmit channel settings 175 RECEIVE MIDI receive channel settings 176 ROOT MIDI chord root settings 177 CHORD DETECT MIDI chord detect settings 177 STORE Storing MIDI settings as a template 177 Transposing up or down the pitch 61 SAMPLING RECORDING • TRIGGER LEVEL • PRE EFFECT • STORE FILE IMPORT • STORE EDIT WAVE CLEAR CUSTOM VOICE EASY EDIT • EDIT • STORE/CLEAR FULL EDIT • VOICE • E1:WAVEFORM • E2:EG • E3:FILTER • E4:LFO • VOICE SET • STORE/CLEAR Sampling sounds via a microphone or line source Recording a new sample Setting the Trigger level for starting sampling Setting up a maximum of three DSP effects to be applied to the source sound Storing the sampled data as Custom voice Importing Wave files from disk Storing the sampled data as Custom voice Editing a recorded/imported sample Clearing Wave data 40, 84 40, 86 84 87 41 87 41 88 87 Editing various parameters related to tone generation (e.g., Filter, EG) 93 Naming/Storing/Clearing Custom voice data 92 Editing various parameters (e.g., Initial Touch Curve, Scale Curve) 94 Editing various parameters related to Waveform 95 Editing various parameters related to EG (Envelope Generator) 96 Editing various parameters related to Filter 97 Editing various parameters related to LFO 98 Editing various parameters related to Voice Set 99 Naming/Storing/Clearing Custom voice data 92 Basic Operation 51
-
 1
1 -
2
-
3
-
4
-
5
-
6
-
7
-
8
-
9
-
10
-
11
-
12
-
13
-
14
-
15
-
16
-
17
-
18
-
19
-
20
-
21
-
22
-
23
-
24
-
25
-
26
-
27
-
28
-
29
-
30
-
31
-
32
-
33
-
34
-
35
-
36
-
37
-
38
-
39
-
40
-
41
-
42
-
43
-
44
-
45
-
 46
46 -
 47
47 -
 48
48 -
 49
49 -
 50
50 -
 51
51 -
 52
52 -
 53
53 -
 54
54 -
 55
55 -
 56
56 -
57
-
58
-
59
-
60
-
61
-
62
-
63
-
64
-
65
-
66
-
67
-
68
-
69
-
70
-
71
-
72
-
73
-
74
-
75
-
76
-
77
-
78
-
79
-
80
-
81
-
82
-
83
-
84
-
85
-
86
-
87
-
88
-
89
-
90
-
91
-
92
-
93
-
94
-
95
-
96
-
97
-
98
-
99
-
100
-
101
-
102
-
103
-
104
-
105
-
106
-
107
-
108
-
109
-
110
-
111
-
112
-
113
-
114
-
115
-
116
-
117
-
118
-
119
-
120
-
121
-
122
-
123
-
124
-
125
-
126
-
127
-
128
-
129
-
130
-
131
-
132
-
133
-
134
-
135
-
136
-
137
-
138
-
139
-
140
-
141
-
142
-
143
-
144
-
145
-
146
-
147
-
148
-
149
-
150
-
151
-
152
-
153
-
154
-
155
-
156
-
157
-
158
-
159
-
160
-
161
-
162
-
163
-
164
-
165
-
166
-
167
-
168
-
169
-
170
-
171
-
172
-
173
-
174
-
175
-
176
-
177
-
178
-
179
-
180
-
181
-
182
-
183
-
184
-
185
-
186
-
187
-
188
-
189
-
190
-
191
-
192
-
193
-
194
-
195
-
196
-
197
-
198
-
199
-
200
-
201
-
202
-
203
-
204
-
205
-
206
-
207
-
208
-
209
-
210
-
211
-
212
-
213
-
214
-
215
-
216
-
217
-
218
-
219
-
220
-
221
-
222
-
223
-
224
-
225
-
226
-
227
-
228
-
229
-
230
-
231
-
232
-
233
-
234
-
235
-
236
-
237
-
238
-
239
-
240
-
241
-
242
-
243
-
244
-
245
-
246
-
247
-
248
-
249
-
250
 |
 |
