Yamaha 9000Pro Owner's Manual - Page 52
Stopping the Multi Pad playback, Storing Plug-in Custom voice data
 |
View all Yamaha 9000Pro manuals
Add to My Manuals
Save this manual to your list of manuals |
Page 52 highlights
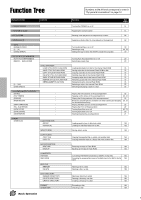
Function Tree Button/Controller LCD title Function See pages 10 DIGITAL STUDIO [SOUND CREATOR] PLUG-IN VOICE VOICE EDIT • BOARD VOICE Selecting a Board Voice on which the Plug-in Custom Voice editing is based 102 • E1: EG/VIB Editing various parameters related to tone generation (e.g., Filter, EG) 103 • E2: CTRL Editing various parameters related to tone generation (e.g., Initial 103 Touch Sensitivity, etc) • E3: NATIVE PRM. Editing various parameters which are native to the installed Plug-in Board. 104 • VOICE SET Editing various part parameters related to Voice Set 104 • STORE Storing Plug-in Custom voice data 101 NATIVE SYSTEM PARAMETER EDIT Editing various system parameters which are native to the installed 105 Plug-in Board. VOICE EDIT ON COMPUTER Editing various parameters on a computer connected to the 106 9000Pro. Voice editing is done with special Plug-in software from the XGworks (or XGworks lite) program. BOARD CUSTOM VOICE BACKUP Backing up the edited Board Custom Voice data from the installed 108 Board to Flash ROM. [DIGITAL RECORDING] SONG CREATOR QUICK RECORD • CHORD STEP MULTI TRACK RECORD • TRACK • RECORD • EDIT • SETUP • SAVE/DELETE • STEP REC Recording a song quickly without having to make detailed settings 36 Recording accompaniment data with the Step Recording method 122 (similar to writing out the chords in a chord chart) Recording sixteen song tracks independently 38 Setting the Record method 38 Starting/stopping recording 39 Editing a recorded song (e.g., Quantize, Note Shift) 114 Editing Setup data (e.g., Mixing Console parameters) 115 Saving the recorded song to a disk/Deleting a song in a disk 39 Recording a song with the Step Recording method (similar to writing 116 out the notes in music notation) STYLE CREATOR EASY EDIT • STYLE ASSEMBLY • REVOICE • GROOVE & DYNAMICS FULL EDIT • BASIC • SET UP • EDIT • STORE/CLEAR • PARA.EDIT • STEP REC NEW STYLE ASSEMBLY Re-creating a style 129 Re-creating a specific track of an already-created style. 129 Changing various parameters 130 Altering the timing for each section, velocity of notes for each track 131 Creating a style by recording notes 132 Selecting the section and track to be recorded, setting the tempo 132 and the beat, and so on Editing Setup data (voice, etc.) 134 Editing various parameters (Quantize, etc.) 134 Storing the created style data to Flash ROM or clearing the created style data 128 Editing various parameters related to the Style File Format 135 Recording a style with the Step Recording method (similar to writing 140 out the notes in music notation) Creating a new style 129 [MIXING CONSOLE] MULTI PAD CREATOR RECORDING • STEP REC CLEAR COPY REPEAT CHORD MATCH VOL/EQ FILT EFF DEPTH EFF TYPE TUNE M.EQ VOICE LINE OUT Multi Pad Recording 142 Multi Pad Step Recording 143 Clearing the recorded Multi Pad data 142 Copying the recorded Multi Pad data 142 Turning Repeat on or off 142 Turning Chord Match on or off 142 Adjusting the Volume, Pan and EQ high/low for each part 145 Adjusting the Harmonic content and Brightness for each part 145 Adjusting the Effect (Reverb, Chorus and DSP) depth for each part 145 Setting the Effect type/parameter for each block 146 Adjusting the pitch related parameters (e.g., Pitch Bend range, Por- 145 tamento time) for each part Adjusting the overall tone of the 9000Pro, in five frequency bands 147 Changing the voice for each part 145 Changing the Line out setting to send the output of each part to the 148 LINE OUT jacks. 11 MULTI PAD [M.PAD BANK 1~60] [BANK VIEW] [STOP] [1] ... [4] REPEAT CHORD MATCH Selecting a Multi Pad Bank Turning Repeat on or off Turning Chord Match on or off Stopping the Multi Pad playback Playing the Multi Pads 34, 77 77 77 34 34 12 Data dial 52 Basic Operation Changing the tempo of accompaniment/song playback 44, 72 50
-
 1
1 -
2
-
3
-
4
-
5
-
6
-
7
-
8
-
9
-
10
-
11
-
12
-
13
-
14
-
15
-
16
-
17
-
18
-
19
-
20
-
21
-
22
-
23
-
24
-
25
-
26
-
27
-
28
-
29
-
30
-
31
-
32
-
33
-
34
-
35
-
36
-
37
-
38
-
39
-
40
-
41
-
42
-
43
-
44
-
45
-
46
-
 47
47 -
 48
48 -
 49
49 -
 50
50 -
 51
51 -
 52
52 -
 53
53 -
 54
54 -
 55
55 -
 56
56 -
 57
57 -
58
-
59
-
60
-
61
-
62
-
63
-
64
-
65
-
66
-
67
-
68
-
69
-
70
-
71
-
72
-
73
-
74
-
75
-
76
-
77
-
78
-
79
-
80
-
81
-
82
-
83
-
84
-
85
-
86
-
87
-
88
-
89
-
90
-
91
-
92
-
93
-
94
-
95
-
96
-
97
-
98
-
99
-
100
-
101
-
102
-
103
-
104
-
105
-
106
-
107
-
108
-
109
-
110
-
111
-
112
-
113
-
114
-
115
-
116
-
117
-
118
-
119
-
120
-
121
-
122
-
123
-
124
-
125
-
126
-
127
-
128
-
129
-
130
-
131
-
132
-
133
-
134
-
135
-
136
-
137
-
138
-
139
-
140
-
141
-
142
-
143
-
144
-
145
-
146
-
147
-
148
-
149
-
150
-
151
-
152
-
153
-
154
-
155
-
156
-
157
-
158
-
159
-
160
-
161
-
162
-
163
-
164
-
165
-
166
-
167
-
168
-
169
-
170
-
171
-
172
-
173
-
174
-
175
-
176
-
177
-
178
-
179
-
180
-
181
-
182
-
183
-
184
-
185
-
186
-
187
-
188
-
189
-
190
-
191
-
192
-
193
-
194
-
195
-
196
-
197
-
198
-
199
-
200
-
201
-
202
-
203
-
204
-
205
-
206
-
207
-
208
-
209
-
210
-
211
-
212
-
213
-
214
-
215
-
216
-
217
-
218
-
219
-
220
-
221
-
222
-
223
-
224
-
225
-
226
-
227
-
228
-
229
-
230
-
231
-
232
-
233
-
234
-
235
-
236
-
237
-
238
-
239
-
240
-
241
-
242
-
243
-
244
-
245
-
246
-
247
-
248
-
249
-
250
 |
 |
