Yamaha CVP-79A Owner's Manual - Page 105
Song Copy
 |
View all Yamaha CVP-79A manuals
Add to My Manuals
Save this manual to your list of manuals |
Page 105 highlights
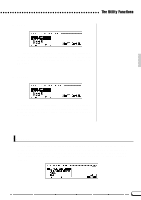
The Utility Functions XSelect the Song Number to be Converted Use the SONG LCD button - or data dial or [+]/[-] buttons - to select the song number to be converted. CStart the Conversion Press the TRANSFORM LCD button to begin the conversion process. When the conversion process is finished, the "Completed! SONG No. XX" message will appear to inform you as to the SONG No. into which the data was saved. Song Copy Song data can be "backed up" by copying to a new song number or a different disk, as follows: (Make sure that the song record mode is not engaged before proceeding.) ZInsert a Disk, Select the Song Copy Function, & Select the Type of Copy Operation Insert the disk containing the song you want to copy, select the Song Copy function, and use either of the first two LCD buttons to select "DISK1 - 1" to copy to a different song within the same disk, or "DISK1 - 2" to copy to a different disk. XSelect the Source Song Number Use the SONG-> LCD button to select the song you want to copy. The data dial and [+]/[-] buttons can also be used once the SONG-> parameter has been selected. The selected song name will appear in the upper right corner of the display. CSelect the Destination Song (DISK 1 - 1 type copy) .. This step is for the DISK 1 - 1 type copy only. If you have selected the DISK 1 - 2 type copy, pass this step and proceed to the next V step. Use the SONG button to select the song number you wish to copy to (i.e. the destination song number). The data dial and [+]/[-] buttons can also be used once the SONG parameter has been selected. If you select a song number that already contains data, that data will be overwritten by the new song data. If the destination song already contains data, the name of the song file will appear in the middle right corner of the display. • The song copy function cannot be used when the song record mode is engaged-the "Button not valid!" alert display will appear. • If the Clavinova's internal memory contains song data, the "CVP-DISK" copy mode will be automatically selected to copy the internal memory data to disk (see the "Copying Data Recorded Without a Disk" below) and the "DISK 1 - 1" or "DISK 1 - 2" copy mode cannot be selected. In this case, copy the internal memory data to disk first, if you want to keep the data, and delete the internal memory data by using the Song Delete function (page 104). Then try the "DISK 1 - 1" or DISK 1 - 2" copy operation again. • Only song data recorded on the CVP79A/69/69A/59S and Disk Orchestra Collection orchestra and rhythm data can be copied using this function. • Data cannot be copied to Disk Orchestra Collection disks, Disklavier disks, or any write-protected disk. 102
-
 1
1 -
2
-
3
-
4
-
5
-
6
-
7
-
8
-
9
-
10
-
11
-
12
-
13
-
14
-
15
-
16
-
17
-
18
-
19
-
20
-
21
-
22
-
23
-
24
-
25
-
26
-
27
-
28
-
29
-
30
-
31
-
32
-
33
-
34
-
35
-
36
-
37
-
38
-
39
-
40
-
41
-
42
-
43
-
44
-
45
-
46
-
47
-
48
-
49
-
50
-
51
-
52
-
53
-
54
-
55
-
56
-
57
-
58
-
59
-
60
-
61
-
62
-
63
-
64
-
65
-
66
-
67
-
68
-
69
-
70
-
71
-
72
-
73
-
74
-
75
-
76
-
77
-
78
-
79
-
80
-
81
-
82
-
83
-
84
-
85
-
86
-
87
-
88
-
89
-
90
-
91
-
92
-
93
-
94
-
95
-
96
-
97
-
98
-
99
-
 100
100 -
 101
101 -
 102
102 -
 103
103 -
 104
104 -
 105
105 -
 106
106 -
 107
107 -
 108
108 -
 109
109 -
 110
110 -
111
-
112
-
113
-
114
-
115
-
116
-
117
-
118
-
119
-
120
-
121
-
122
-
123
-
124
-
125
-
126
-
127
-
128
-
129
-
130
-
131
-
132
-
133
-
134
-
135
-
136
-
137
-
138
-
139
-
140
-
141
-
142
-
143
-
144
-
145
-
146
-
147
-
148
-
149
-
150
-
151
-
152
-
153
-
154
-
155
-
156
-
157
-
158
-
159
-
160
-
161
-
162
-
163
 |
 |
