Yamaha CVP-79A Owner's Manual - Page 34
Synchronized Start, Tap start, The Beat Display
 |
View all Yamaha CVP-79A manuals
Add to My Manuals
Save this manual to your list of manuals |
Page 34 highlights
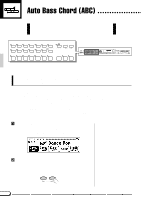
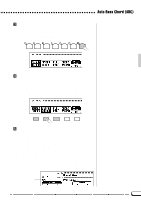
Accompaniment s Synchronized Start Any of the start types described above can be synchronized to the first note or chord played on the keyboard by first pressing the [SYNCHRO] button so that its indicator lights. When the keyboard is split or Auto Bass Chord Single Finger or Fingered mode is used, the first note played on the left-hand section of the keyboard will start the accompaniment (i.e. keys to the left of and including the split-point key - normally F#2). Use the [MAIN A], [MAIN B] and/or [INTRO A/FILL TO A] or [INTRO B/FILL TO B] buttons to select the type of start you want. START/STOP TAP SYNCHRO START/STOP The first (red) dot of the BEAT display will flash at the current tempo when a synchronized start mode has been selected. The synchronized start mode can be canceled by pressing the [SYNCHRO] button a second time so that its indicator goes out. The synchronized start mode is automatically canceled once playback has started. • If the [SYNCHRO] button is pressed during playback, playback is stopped and the synchronized start mode is automatically engaged. s Tap start ...This function lets you set the tempo and start the rhythm in one operation. Simply tap the [TAP] button at the required tempo - 3 times for a 3/4 style, 4 times for 2/4, 4/4, and 6-beat styles, and 5 times for 5-beat styles. The rhythm will start from the beginning of the next measure at the specified tempo. START/STOP TAP SYNCHRO START/STOP • The [TAP] button can also be used to change the tempo during rhythm playback (tap twice). In this case the "tap" click will not sound. • If you tap the [TAP] button less than the required number of times (i.e. 3, 4, or 5), the tap tempo function will be canceled after a few seconds. s The Beat Display The four LED dots of the BEAT display provide a visual indication of the selected tempo during accompaniment playback. The leftmost (red) dot flashes on the first beat of each measure, the second dot flashes on the second beat, and so on (all dots except the leftmost dot are green). The current measure number appears on the LCD during playback. Measure number BEAT 31
-
 1
1 -
2
-
3
-
4
-
5
-
6
-
7
-
8
-
9
-
10
-
11
-
12
-
13
-
14
-
15
-
16
-
17
-
18
-
19
-
20
-
21
-
22
-
23
-
24
-
25
-
26
-
27
-
28
-
 29
29 -
 30
30 -
 31
31 -
 32
32 -
 33
33 -
 34
34 -
 35
35 -
 36
36 -
 37
37 -
 38
38 -
 39
39 -
40
-
41
-
42
-
43
-
44
-
45
-
46
-
47
-
48
-
49
-
50
-
51
-
52
-
53
-
54
-
55
-
56
-
57
-
58
-
59
-
60
-
61
-
62
-
63
-
64
-
65
-
66
-
67
-
68
-
69
-
70
-
71
-
72
-
73
-
74
-
75
-
76
-
77
-
78
-
79
-
80
-
81
-
82
-
83
-
84
-
85
-
86
-
87
-
88
-
89
-
90
-
91
-
92
-
93
-
94
-
95
-
96
-
97
-
98
-
99
-
100
-
101
-
102
-
103
-
104
-
105
-
106
-
107
-
108
-
109
-
110
-
111
-
112
-
113
-
114
-
115
-
116
-
117
-
118
-
119
-
120
-
121
-
122
-
123
-
124
-
125
-
126
-
127
-
128
-
129
-
130
-
131
-
132
-
133
-
134
-
135
-
136
-
137
-
138
-
139
-
140
-
141
-
142
-
143
-
144
-
145
-
146
-
147
-
148
-
149
-
150
-
151
-
152
-
153
-
154
-
155
-
156
-
157
-
158
-
159
-
160
-
161
-
162
-
163
 |
 |
