Yamaha CVP-79A Owner's Manual - Page 52
Repeat Until the Custom Style is Complete, Name the Custom Style
 |
View all Yamaha CVP-79A manuals
Add to My Manuals
Save this manual to your list of manuals |
Page 52 highlights
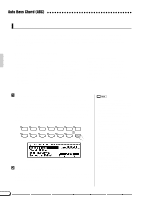
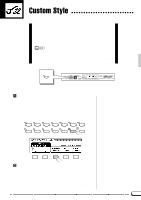
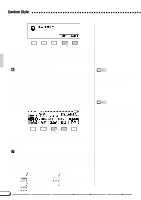
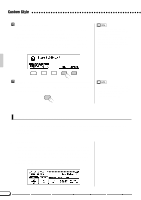
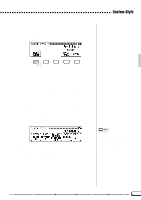
Custom Style • Quantization can only be applied to the current recording part. Quantization cannot be executed if no part is set to the record mode. Once the required quantize size has been selected press the START LCD button to actually quantize the current part. Playback will stop for an instant while the data is being quantized, then the START LCD button will change to UNDO, allowing you to undo the quantize operation and return to the pre-quantized data if the results are not as you expected. You will not be able to UNDO once another button has been pressed. Name the Custom Style When your custom style is complete, use the PAGE buttons to select CUSTOM STYLE page 3, and press the STYLE NAME LCD button to go to the style naming page. The current style name appears in the upper right corner of the display. Use the > LCD button to position the underline cursor at the character you want to change (style names can be up to 12 characters in length). Use the data dial and/or the [+]/[-] buttons to select the character you want to enter from the list in the center of the display, then press the c.set LCD button to enter the character at the current cursor position. Repeat this procedure until your name is complete. The c.del LCD button can be used to back up one space and delete a character. When the name is complete press the OK LCD button to register the name for the current custom style, or CANCEL to abort. 49
-
 1
1 -
2
-
3
-
4
-
5
-
6
-
7
-
8
-
9
-
10
-
11
-
12
-
13
-
14
-
15
-
16
-
17
-
18
-
19
-
20
-
21
-
22
-
23
-
24
-
25
-
26
-
27
-
28
-
29
-
30
-
31
-
32
-
33
-
34
-
35
-
36
-
37
-
38
-
39
-
40
-
41
-
42
-
43
-
44
-
45
-
46
-
 47
47 -
 48
48 -
 49
49 -
 50
50 -
 51
51 -
 52
52 -
 53
53 -
 54
54 -
 55
55 -
 56
56 -
 57
57 -
58
-
59
-
60
-
61
-
62
-
63
-
64
-
65
-
66
-
67
-
68
-
69
-
70
-
71
-
72
-
73
-
74
-
75
-
76
-
77
-
78
-
79
-
80
-
81
-
82
-
83
-
84
-
85
-
86
-
87
-
88
-
89
-
90
-
91
-
92
-
93
-
94
-
95
-
96
-
97
-
98
-
99
-
100
-
101
-
102
-
103
-
104
-
105
-
106
-
107
-
108
-
109
-
110
-
111
-
112
-
113
-
114
-
115
-
116
-
117
-
118
-
119
-
120
-
121
-
122
-
123
-
124
-
125
-
126
-
127
-
128
-
129
-
130
-
131
-
132
-
133
-
134
-
135
-
136
-
137
-
138
-
139
-
140
-
141
-
142
-
143
-
144
-
145
-
146
-
147
-
148
-
149
-
150
-
151
-
152
-
153
-
154
-
155
-
156
-
157
-
158
-
159
-
160
-
161
-
162
-
163
 |
 |
