Yamaha CVP-79A Owner's Manual - Page 155
Watch Your, Fingers When Doing This, Sicht! Klemmen Sie Sich Dabei Nicht, Die Finger Ein
 |
View all Yamaha CVP-79A manuals
Add to My Manuals
Save this manual to your list of manuals |
Page 155 highlights
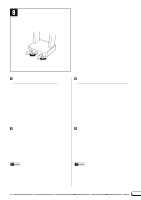
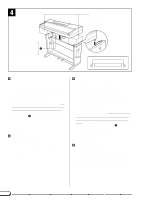
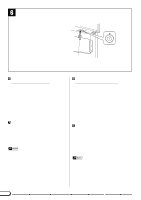
4 A 6 x 18 mm flat-head screws Senkschrauben (6 x 18 mm) Vis à tête plate de 6 x 18 mm 3 Tornillos de cabeza plana de 6 x 18 mm Danger Zone Gefahrenzone Zones dangereuses Zona peligrosa A D D A VInstall the main unit (A). Gently place the main unit (A) on the side panels (D) with the screws on its bottom panel (toward the rear of the main unit) just in front of the grooves in the brackets located at the top of the side panels. Then slide the main unit to the rear until it stops. WATCH YOUR FINGERS WHEN DOING THIS!! Align the holes on the bottom panel of the main unit with the holes in the brackets on the side panels (also center the main unit to produce an equal clearance on the left and right sides, as shown in the illustration), then screw in and securely tighten the six 6 x 18mm flat-head screws 3 (three screws for each side of the main unit). * Keep your fingers away from the area marked "Danger Zone" in the illustrations when lowering the main keyboard unit onto the stand assembly. BConnect the pedal cord. Pass the pedal cord through the two cord holders on the side panel. Insert the connector on the free end of the cord into the corresponding socket on the underside of the main unit. Make sure that the protruding clip on the connector is facing the rear of the main unit. Close the clips of the two cord holders to keep the cord firmly in place. VDie Haupteinheit (A) montieren. Setzen Sie die Haupteinheit (A) vorsichtig so auf die Seitenwände (D), daß die Schrauben an ihrer Unterseite (hinten) vor den oberen Halterungen an den Seitenwänden zu liegen kommen. Schieben Sie die Haupteinheit dann nach hinten, bis die Schrauben bis zum Anschlag in den Halterungsschlitzen sitzen. VORSICHT! KLEMMEN SIE SICH DABEI NICHT DIE FINGER EIN! Bringen Sie nun die Bohrungen in den beiden seitlichen Halterungen mit den Bohrungen an der Unterseite der Haupteinheit zur Deckung (achten Sie auch darauf, daß die Haupteinheit mittig positioniert ist, d.h. links und rechts gleichviel übersteht, wie in der Abbildung gezeigt), und schrauben Sie die Haupteinheit dann mit den sechs Senkschrauben (6 x 18 mm) 3 fest (jeweils drei Schrauben links und rechts). * Halten Sie beim Aufsetzen der Haupteinheit auf die Ständerbaugruppe von dem in der Abbildung mit "Gefahrenzone" gekennzeichneten Bereich fern. BDas Pedalkabel anschließen. Führen Sie das Pedalkabel durch die beiden Kabelhalter an der Seitenwand. Schließen Sie das Kabel danach an die Buchse auf der Unterseite der Haupteinheit an. Der Stecker muß mit der Führungsnase in Richtung Rückseite (der Haupteinheit) in die Buchse gesteckt werden. Drücken Sie nun noch die Klemmen der Kabelhalter fest an, damit das Kabel sicher gehalten wird. 152
-
 1
1 -
2
-
3
-
4
-
5
-
6
-
7
-
8
-
9
-
10
-
11
-
12
-
13
-
14
-
15
-
16
-
17
-
18
-
19
-
20
-
21
-
22
-
23
-
24
-
25
-
26
-
27
-
28
-
29
-
30
-
31
-
32
-
33
-
34
-
35
-
36
-
37
-
38
-
39
-
40
-
41
-
42
-
43
-
44
-
45
-
46
-
47
-
48
-
49
-
50
-
51
-
52
-
53
-
54
-
55
-
56
-
57
-
58
-
59
-
60
-
61
-
62
-
63
-
64
-
65
-
66
-
67
-
68
-
69
-
70
-
71
-
72
-
73
-
74
-
75
-
76
-
77
-
78
-
79
-
80
-
81
-
82
-
83
-
84
-
85
-
86
-
87
-
88
-
89
-
90
-
91
-
92
-
93
-
94
-
95
-
96
-
97
-
98
-
99
-
100
-
101
-
102
-
103
-
104
-
105
-
106
-
107
-
108
-
109
-
110
-
111
-
112
-
113
-
114
-
115
-
116
-
117
-
118
-
119
-
120
-
121
-
122
-
123
-
124
-
125
-
126
-
127
-
128
-
129
-
130
-
131
-
132
-
133
-
134
-
135
-
136
-
137
-
138
-
139
-
140
-
141
-
142
-
143
-
144
-
145
-
146
-
147
-
148
-
149
-
 150
150 -
 151
151 -
 152
152 -
 153
153 -
 154
154 -
 155
155 -
 156
156 -
 157
157 -
 158
158 -
 159
159 -
 160
160 -
161
-
162
-
163
 |
 |
