Yamaha DVX-S100 Owner's Manual - Page 23
Connecting to an external amplifier, Connecting the AC power cord, Turning on the power - remote codes
 |
View all Yamaha DVX-S100 manuals
Add to My Manuals
Save this manual to your list of manuals |
Page 23 highlights
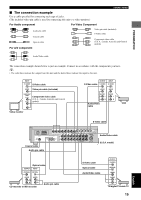
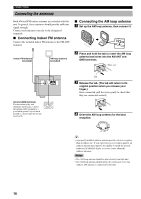
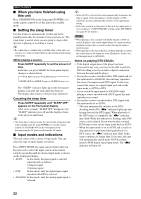
PREPARATION Connecting to an external amplifier If you want to increase the power output to the speakers, or want to use another amplifier, connect an external amplifier to the 6CH PREOUT jacks as follows. Note • When you have connected this unit to an external amplifier, select PRE in "9 SP/PRE OUT" on the SET MENU. (See page 63.) 1 FRONT jacks Front channel line output jacks. 2 REAR jacks Rear channel line output jacks. 3 CENTER jack Center channel line output jack. 4 SUBWOOFER jack Low bass signals distributed from the front, center and/or rear channels are directed to this jack if they are assigned to this jack. (The cut-off frequency of this jack is 90 Hz.) The LFE (low-frequency effect) signals generated when Dolby Digital or DTS is decoded are also directed if they are assigned to this jack. 1 2 FRONT REAR CENTER 3 CONNECTIONS Connecting the AC power cord Plug in this unit to the wall outlet. I Memory back-up The memory back-up circuit prevents the stored data from being lost when the power cord is disconnected from the AC outlet, or the power supply is temporarily cut due to power failure. However, if the unit is turned off for more than one week, the stored setting will be cleared. If so, set the setting again. • Volume level • Input source • Speaker output level (center, rear L/R and subwoofer) • Sleep timer • Parameter • Delay time • Set menu • Disc direct • Preset station Turning on the power When all connections are complete, turn on the power of this unit. STANDBY/ON STANDBY/ON 6CH PREOUT SUBWOOFER 4 y • The adjustments made in the following settings have an effect on the signals output from the 6CH PREOUT jacks. - BASS BOOST settings - Speaker settings - DSP programs POWER TV AV SLEEP POWER TV MODE INPUT CH VOL MUTE SUBTITLE AUDIO REC TUNER MD CD-R VCR VIDEO 2 CODE SET SHIFT HALL 1 JAZZ 2 VIDEO 1 CD DVD AMP ROCK 3 ENTERTAINMENT 4 POWER ( ) 1 Press STANDBY/ON (POWER ( ) on the remote control) to turn on the power of this unit. 2 Turn on the video monitor connected to this unit. Note • When you use only some of the included 6 speakers or when using commercially available speakers, adjust speaker mode settings soon after turning the power on. See "1 SPEAKER SET (speaker mode settings)" on page 60 for details. English 19
-
 1
1 -
2
-
3
-
4
-
5
-
6
-
7
-
8
-
9
-
10
-
11
-
12
-
13
-
14
-
15
-
16
-
17
-
 18
18 -
 19
19 -
 20
20 -
 21
21 -
 22
22 -
 23
23 -
 24
24 -
 25
25 -
 26
26 -
 27
27 -
 28
28 -
29
-
30
-
31
-
32
-
33
-
34
-
35
-
36
-
37
-
38
-
39
-
40
-
41
-
42
-
43
-
44
-
45
-
46
-
47
-
48
-
49
-
50
-
51
-
52
-
53
-
54
-
55
-
56
-
57
-
58
-
59
-
60
-
61
-
62
-
63
-
64
-
65
-
66
-
67
-
68
-
69
-
70
-
71
-
72
-
73
-
74
-
75
-
76
-
77
-
78
-
79
-
80
-
81
-
82
 |
 |