Yamaha PSR-SX600 PSR-SX600 Reference Manual - Page 26
Use the [7, nature buttons to select the key si
 |
View all Yamaha PSR-SX600 manuals
Add to My Manuals
Save this manual to your list of manuals |
Page 26 highlights
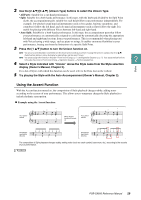
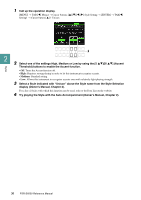
Styles 1 Select the desired Style and make sure that the STYLE CONTROL [ACMP] button is on (the lamp is lit). For the example score above, press the [COUNTRY & BALLROOM] button, and then select Country 8Beat. 2 Call up the operation display. [MENU] → TAB [E] Menu1 → Cursor buttons [][][E][F] Split Point/Chord Fingering → [ENTER] → TAB [F] Chord Fingering 3 Use the [2 ]-[4 ] (Fingering Type) buttons to select Smart Chord. 4 Use the [5 ]/[6 ] Key Signature buttons to select the key signature. Make sure to select the key signature which is same as that on your music score, or your desired key for playing. For the example score, select F Major (b*1). After selecting, press the [EXIT] button to close the window. 2 Indicates the selected key signature. Set this to the same as your music score. 5 Use the [7 ]/[8 ] (Type) buttons to select the music genre. The Smart Chord type selected here determines the specific chord assignment for each scale note in the Chord section. Although selecting a Style in step 1 will automatically set the optimum type, you can select a different type here for more appropriate results, if necessary. For the example score, select Standard. NOTE Each music type assumes only typical or conventional chord progression for the Style. NOTE The root of a chord shown at the bottom left of the display during Song recording may be different when the recorded Song is played back. NOTE The actual chord assignments are provided in the Smart Chord Chart on page 27. 6 Press the STYLE CONTROL [SYNC START] button to enable synchronized start. 7 According to the music score or the chord progression of your performance, play only the root key with the left hand. Pressing a key will start playback of the Style. Chord section Split Point (F#2 as default) 26 PSR-SX600 Reference Manual
-
 1
1 -
2
-
3
-
4
-
5
-
6
-
7
-
8
-
9
-
10
-
11
-
12
-
13
-
14
-
15
-
16
-
17
-
18
-
19
-
20
-
 21
21 -
 22
22 -
 23
23 -
 24
24 -
 25
25 -
 26
26 -
 27
27 -
 28
28 -
 29
29 -
 30
30 -
 31
31 -
32
-
33
-
34
-
35
-
36
-
37
-
38
-
39
-
40
-
41
-
42
-
43
-
44
-
45
-
46
-
47
-
48
-
49
-
50
-
51
-
52
-
53
-
54
-
55
-
56
-
57
-
58
-
59
-
60
-
61
-
62
-
63
-
64
-
65
-
66
-
67
-
68
-
69
-
70
-
71
-
72
-
73
-
74
-
75
-
76
-
77
-
78
-
79
-
80
-
81
-
82
-
83
-
84
-
85
-
86
-
87
-
88
-
89
-
90
-
91
-
92
-
93
-
94
-
95
-
96
-
97
-
98
-
99
-
100
-
101
-
102
-
103
-
104
-
105
-
106
-
107
-
108
-
109
-
110
-
111
-
112
-
113
-
114
-
115
 |
 |
