Yamaha PSR-SX600 PSR-SX600 Reference Manual - Page 36
Realtime Recordin, Recordin, Rhythm Channels 1-2
 |
View all Yamaha PSR-SX600 manuals
Add to My Manuals
Save this manual to your list of manuals |
Page 36 highlights
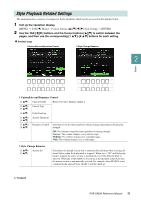
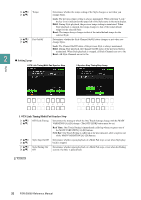
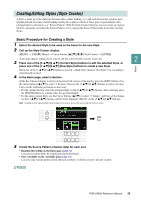
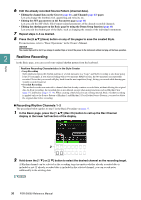
6 Edit the already recorded Source Pattern (channel data). • Editing the channel data on the Groove (page 41), and Channel (page 43) pages Lets you change the rhythmic feel, quantizing and velocity, etc. • Editing the SFF parameters on the Parameter page (page 44) Lets you edit the SFF (Style File Format) related parameters of the already recorded channels. • Editing the rhythm part on the Basic page by using the Drum Setup function (page 48) Lets you edit the rhythm part of the Style, such as changing the sounds of the individual instruments. 7 Repeat steps 4-6 as desired. 8 Press the [8 ] (Save) button on any of the pages to save the created Style. For instructions, refer to "Basic Operations" in the Owner's Manual. NOTICE The created Style will be lost if you change to another Style or turn off the power to the instrument without carrying out the Save operation. 2 Realtime Recording In the Basic page, you can record your original rhythm pattern from the keyboard. Styles Realtime Recording Characteristics in the Style Creator • Loop Recording Style playback repeats the rhythm patterns of several measures in a "loop," and Style recording is also done using loops. For example, if you start recording with a two-measure MAIN section, the two measures are repeatedly recorded. Notes that you record will play back from the next repetition (loop), letting you record while hearing previously recorded material. • Overdub Recording This method records new material to channel data that already contains recorded data, without deleting the original data. In Style recording, the recorded data is not deleted, except when using functions such as Rhythm Clear (page 37) and Delete (pages 37, 39). When creating a Style based on an existing internal Style, overdub recording is applied only to the Source Pattern of Rhythm 1 and Rhythm 2. For all other Source Patterns, you need to delete the original data before recording. Recording Rhythm Channels 1-2 The procedure below applies to step 5 in the Basic Procedure on page 35. 1 In the Basic page, press the [1 ] (Rec Ch) button to call up the Rec Channel display in the lower half section of the display. 2 2 Hold down the [1 ] or [2 ] button to select the desired channel as the recording target. A Rhythm channel can be selected as the recording target no matter whether already recorded data is included or not. If already recorded data is included in the selected channel, you can record notes additionally to the existing data. NEXT PAGE 36 PSR-SX600 Reference Manual
-
 1
1 -
2
-
3
-
4
-
5
-
6
-
7
-
8
-
9
-
10
-
11
-
12
-
13
-
14
-
15
-
16
-
17
-
18
-
19
-
20
-
21
-
22
-
23
-
24
-
25
-
26
-
27
-
28
-
29
-
30
-
 31
31 -
 32
32 -
 33
33 -
 34
34 -
 35
35 -
 36
36 -
 37
37 -
 38
38 -
 39
39 -
 40
40 -
 41
41 -
42
-
43
-
44
-
45
-
46
-
47
-
48
-
49
-
50
-
51
-
52
-
53
-
54
-
55
-
56
-
57
-
58
-
59
-
60
-
61
-
62
-
63
-
64
-
65
-
66
-
67
-
68
-
69
-
70
-
71
-
72
-
73
-
74
-
75
-
76
-
77
-
78
-
79
-
80
-
81
-
82
-
83
-
84
-
85
-
86
-
87
-
88
-
89
-
90
-
91
-
92
-
93
-
94
-
95
-
96
-
97
-
98
-
99
-
100
-
101
-
102
-
103
-
104
-
105
-
106
-
107
-
108
-
109
-
110
-
111
-
112
-
113
-
114
-
115
 |
 |
