Yamaha PSR-SX600 PSR-SX600 Reference Manual - Page 39
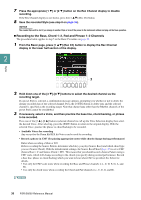
the bass line, chord backin, Press the [1
 |
View all Yamaha PSR-SX600 manuals
Add to My Manuals
Save this manual to your list of manuals |
Page 39 highlights
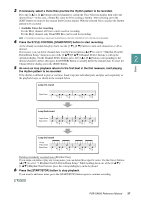
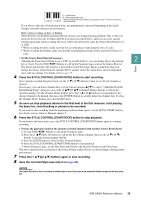
CRC CRC C = Chord note R = Recommended note * When recording the Source Pattern, you should use the "C" and "R" notes and avoid the others. If you observe this rule, Style playback notes are appropriately converted depending on the chord changes you make during your performance. Rules when recording an Intro or Ending These Sections are designed assuming that the chord is not changed during playback. This is why you need not observe the rule for Main and Fill-in Sections described above, and you can create special chord progressions when recording. However, follow the rules below since the Source Root/Chord is set to CM7. • When recording the Intro, make sure that the recorded phrase leads properly into a C scale. • When recording the Ending, make sure that the recorded phrase begins with or properly follows a C scale. • Set the Source Root/Chord if necessary Although the Source Root/Chord is set to CM7 as described above, you can change this to any desired 2 key or chord. Use the TAB [E][F] buttons to call up the Parameter page, and set the Source Root (or Styles Play Root) and Chord to the favorite or desired Root and Chord type. Keep in mind that when you change the Source Chord from the default CM7 to another chord, the chord notes and recommended notes will also change. For details, refer to page 45. 4 Press the STYLE CONTROL [START/STOP] button to start recording. Since already recorded data plays back, use the [1 ]-[8 ] buttons to turn on or off each channel as desired. If necessary, you can delete channel data. Use the Cursor buttons [][] to select "3 Rhythm Clear/Ch Delete/Drum Setup," then press one of the [4 ]/[5 ] (Channel Delete) buttons to call up the operation display. On the Channel Delete display, press the [1 ]-[8 ] buttons corresponding to the desired channel to be deleted, then press the [ENTER] button to actually delete the channel data. To close the Channel Delete display, press the [EXIT] button. 5 As soon as loop playback returns to the first beat in the first measure, start playing the bass line, chord backing or phrase to be recorded. If you want to start recording from the beginning (with no blank space), use the [SYNC START] button. For details, refer to Owner's Manual, chapter 2. 6 Press the STYLE CONTROL [START/STOP] button to stop playback. If you want to add more notes, press the STYLE CONTROL [START/STOP] button again to continue recording. • To hear the playback sound of the already recorded channels with another Source Root/Chord: 1) Use the TAB [E][F] buttons to call up the Parameter page. 2) Press the [1 ] (Rec Ch) button to call up the Rec Channel display, then use the [1 ]-[8 ] buttons to turn the desired channel On/Off. 3) Press the [EXIT] button to close the Rec Channel display. 4) Press the STYLE CONTROL [START/STOP] button to start playback. 5) On the Parameter page, set the Play Root and Chord to the desired Chord root and Chord type. The above operation lets you hear how the Source Pattern is played back via chord changes during normal performance. 7 Press the [1 ]/[2 ] buttons again to stop recording. 8 Save the recorded Style (see step 8 on page 36). NOTICE The created Style will be lost if you change to another Style or turn off the power to the instrument without carrying out the Save operation. PSR-SX600 Reference Manual 39
-
 1
1 -
2
-
3
-
4
-
5
-
6
-
7
-
8
-
9
-
10
-
11
-
12
-
13
-
14
-
15
-
16
-
17
-
18
-
19
-
20
-
21
-
22
-
23
-
24
-
25
-
26
-
27
-
28
-
29
-
30
-
31
-
32
-
33
-
 34
34 -
 35
35 -
 36
36 -
 37
37 -
 38
38 -
 39
39 -
 40
40 -
 41
41 -
 42
42 -
 43
43 -
 44
44 -
45
-
46
-
47
-
48
-
49
-
50
-
51
-
52
-
53
-
54
-
55
-
56
-
57
-
58
-
59
-
60
-
61
-
62
-
63
-
64
-
65
-
66
-
67
-
68
-
69
-
70
-
71
-
72
-
73
-
74
-
75
-
76
-
77
-
78
-
79
-
80
-
81
-
82
-
83
-
84
-
85
-
86
-
87
-
88
-
89
-
90
-
91
-
92
-
93
-
94
-
95
-
96
-
97
-
98
-
99
-
100
-
101
-
102
-
103
-
104
-
105
-
106
-
107
-
108
-
109
-
110
-
111
-
112
-
113
-
114
-
115
 |
 |
