Yamaha RX-V563 Owner's Manual - Page 16
Before connecting to the SPEAKERS, terminal, Connecting to the FRONT A terminals - setup
 |
UPC - 027108929972
View all Yamaha RX-V563 manuals
Add to My Manuals
Save this manual to your list of manuals |
Page 16 highlights
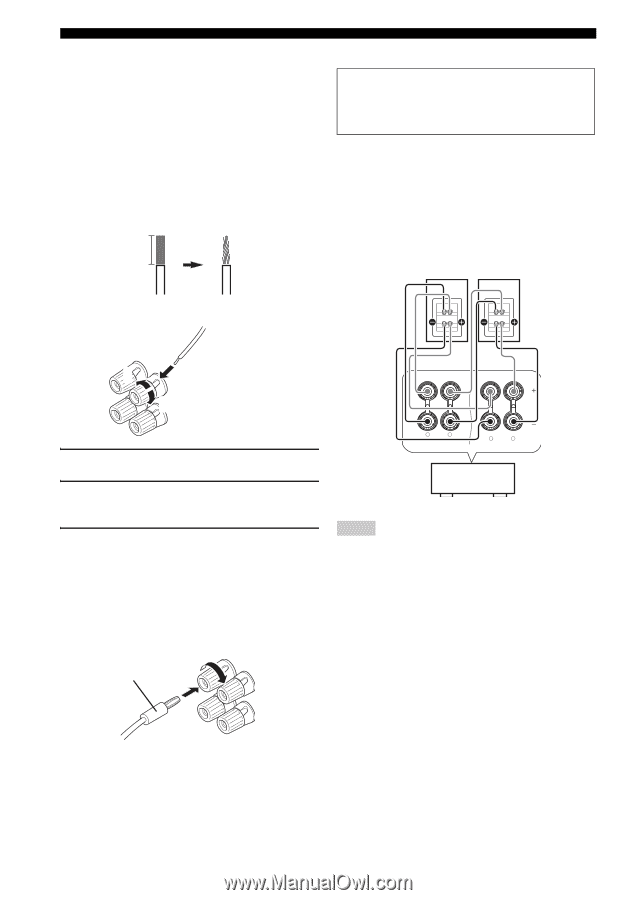
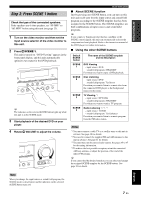
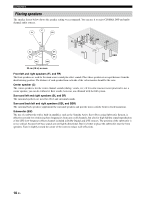
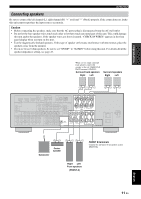
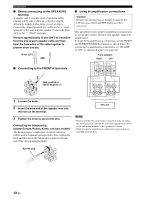
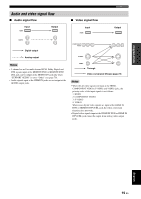
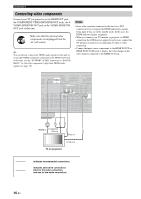
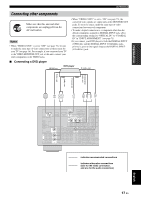
Connections ■ Before connecting to the SPEAKERS terminal A speaker cord is actually a pair of insulated cables running side by side. Cables are colored or shaped differently, perhaps with a stripe, groove or ridges. Connect the striped (grooved, etc.) cable to the "+" (red) terminals of this unit and your speaker. Connect the plain cable to the "-" (black) terminals. Remove approximately 10 mm (3/8") of insulation from the end of each speaker cable and then twist the bare wires of the cable together to prevent short circuits. 10 mm (3/8") ■ Using bi-amplification connections Caution Remove the shorting bars or bridges to separate the LPF (low pass filter) and HPF (high pass filter) crossovers. This unit allows you to make bi-amplification connections to one speaker system. Check if your speakers support biamplification. To make the bi-amplification connections, use the FRONT and SURROUND BACK terminals as shown below. To activate the bi-amplification connections, set "BI-AMP" to "ON" in "Advanced setup" (see page 82). Front speakers Right Left ■ Connecting to the FRONT A terminals 2 1 Red: positive (+) Black: negative (-) 3 1 Loosen the knob. 2 Insert the bare end of the speaker wire into the hole on the terminal. 3 Tighten the knob to secure the wire. Connecting the banana plug (except Europe, Russia, Korea, and Asia models) The banana plug is a single-pole electrical connector widely used to terminate speaker cables. First, tighten the knob and then insert the banana plug connector into the end of the corresponding terminal. R FRONT A L SURROUND BACK/BI-AMP R L SINGLE This unit Notes • When you make the conventional connection, make sure that the shorting bars are put into the terminals appropriately. Refer to the instruction manuals of the speakers for details. • When you use bi-amplification connections, you can not use surround back speakers. Banana plug 12 En
-
 1
1 -
2
-
3
-
4
-
5
-
6
-
7
-
8
-
9
-
10
-
 11
11 -
 12
12 -
 13
13 -
 14
14 -
 15
15 -
 16
16 -
 17
17 -
 18
18 -
 19
19 -
 20
20 -
 21
21 -
22
-
23
-
24
-
25
-
26
-
27
-
28
-
29
-
30
-
31
-
32
-
33
-
34
-
35
-
36
-
37
-
38
-
39
-
40
-
41
-
42
-
43
-
44
-
45
-
46
-
47
-
48
-
49
-
50
-
51
-
52
-
53
-
54
-
55
-
56
-
57
-
58
-
59
-
60
-
61
-
62
-
63
-
64
-
65
-
66
-
67
-
68
-
69
-
70
-
71
-
72
-
73
-
74
-
75
-
76
-
77
-
78
-
79
-
80
-
81
-
82
-
83
-
84
-
85
-
86
-
87
-
88
-
89
-
90
-
91
-
92
-
93
-
94
-
95
-
96
-
97
-
98
-
99
-
100
-
101
-
102
-
103
-
104
-
105
-
106
-
107
-
108
-
109
-
110
-
111
-
112
-
113
-
114
 |
 |