Yamaha YAS-408 MusicCast BAR 400 YAS-408 Owners Manual - Page 72
Information for qualified contractors or dealers, Mounting the center unit on a wall
 |
View all Yamaha YAS-408 manuals
Add to My Manuals
Save this manual to your list of manuals |
Page 72 highlights
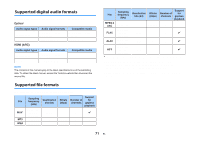
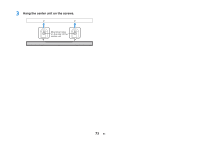
Information for qualified contractors or dealers Mounting the center unit on a wall Mount the center unit on a wall using the screw holes on the rear panel. CAUTION ▪ To prevent the center unit from falling, attach it to a wall constructed of drywall (plasterboard). ▪ Make sure you use screws (sold separately) that can support the weight of the installation. Using clamps other than specified screws, such as short screws, nails, and two-sided tape, may cause the center unit to fall. ▪ Fix the cables in place where they will not become loose. If your foot or hand accidentally gets caught on a loose cable, the center unit may fall. ▪ Do not lean on the unit or apply excessive force to the top of the center unit. Doing so may cause the center unit to fall. ▪ Check that the center unit is fixed securely after the installation. Yamaha will bear no responsibility for any accidents caused by improper installations. 1 Attach the mounting template (supplied) on a wall and mark for the screw holes. Mounting template (supplied) DRILL HERE / PERCER CIC MOUNTING TEMPLATE / GABARIT DE FIXATION DRILL HERE / PERCER CIC Tapes or thumbtacks Screw holes 2 Remove the mounting template from the wall, and then install screws (sold separately) at the points marked on the wall. 457 mm (18") 7 to 9 mm (1/4" to 3/8") 13 to 15 mm (1/2" to 5/8") 4 to 5 mm (#8 to #10) 20 mm (3/4") or more 72 En
-
 1
1 -
2
-
3
-
4
-
5
-
6
-
7
-
8
-
9
-
10
-
11
-
12
-
13
-
14
-
15
-
16
-
17
-
18
-
19
-
20
-
21
-
22
-
23
-
24
-
25
-
26
-
27
-
28
-
29
-
30
-
31
-
32
-
33
-
34
-
35
-
36
-
37
-
38
-
39
-
40
-
41
-
42
-
43
-
44
-
45
-
46
-
47
-
48
-
49
-
50
-
51
-
52
-
53
-
54
-
55
-
56
-
57
-
58
-
59
-
60
-
61
-
62
-
63
-
64
-
65
-
66
-
 67
67 -
 68
68 -
 69
69 -
 70
70 -
 71
71 -
 72
72 -
 73
73 -
 74
74
 |
 |
