1998 Chevrolet Express Van Owner's Manual - Page 148
1998 Chevrolet Express Van Manual

Page 148 highlights
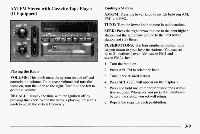
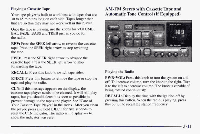
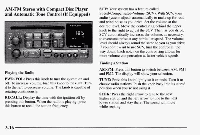
P. SCAN: The preset scan button lets you scan through your favorite stations stored on your pushbuttons. Select either the AM, FMl orFM2 mode and then pressP. SCAN. It will scan through each station stored on your pushbuttons and stop for a few seconds before continuing to scan through all ofthe pushbuttons. Press P. SCAN again or one of the pushbuttons to stop scanning to listen to a specific preset station. P. SCAN will light upon the display while in this mode. If one of the stations stored on a pushbutton is too weak for the location you are in, the radio display will show the channel number (PI-P6) for several seconds before advancing to the next preset station. AUTO TONE: Press this buttonto select among the to six preset equalization settings and tailor the sound the music or voice being heard. Each time you press the of button, the selection will switch to one the preset settings of CLASSIC, NEWS, ROCK, POP, C/W (CountryNestern) or JAZZ. To return to the manual TONE mode, press and release this button until the AUTO display goes blank. This will return the tone adjustment to the BASS and TREB controls. If a BASS or TREB control is rotated, the AUTO TONE display will blank. go Use PUSHBUTTONS to program AUTO TONE. Adjusting theSpeakers BAL: Press lightly on this knob torelease it from its stored position. Turn the control the right to adjust to to sound to the right speakers and to the left adjust sound to the left speakers. The middle position balances the sound between the speakers. FADE: Press lightly on this knob to release it from its stored position. Turn the control to the right to adjust the sound to the front speakers and to the left for the rear speakers. The middle position balances thesound between the speakers. Push these knobs back into their stored positions when you're not using them. Setting the Tone BASS: Press lightly on this knob to release it from its stored position. Turn the knob the right to increase bass to and to the leftto decrease bass. When the BASS control is rotated, the AUTO TONE display willgo blank. TREB: Press lightly onthis knob to release it from its stored position. Turnthe knob to the right toincrease treble and to the left to decrease treble. When the TREB control is rotated, the AUTO TONE display will go to blank. If a station is weakor noisy, you may want decrease the treble. Push these knobs back into their stored positions when you're not using them.
-
 1
1 -
2
-
3
-
4
-
5
-
6
-
7
-
8
-
9
-
10
-
11
-
12
-
13
-
14
-
15
-
16
-
17
-
18
-
19
-
20
-
21
-
22
-
23
-
24
-
25
-
26
-
27
-
28
-
29
-
30
-
31
-
32
-
33
-
34
-
35
-
36
-
37
-
38
-
39
-
40
-
41
-
42
-
43
-
44
-
45
-
46
-
47
-
48
-
49
-
50
-
51
-
52
-
53
-
54
-
55
-
56
-
57
-
58
-
59
-
60
-
61
-
62
-
63
-
64
-
65
-
66
-
67
-
68
-
69
-
70
-
71
-
72
-
73
-
74
-
75
-
76
-
77
-
78
-
79
-
80
-
81
-
82
-
83
-
84
-
85
-
86
-
87
-
88
-
89
-
90
-
91
-
92
-
93
-
94
-
95
-
96
-
97
-
98
-
99
-
100
-
101
-
102
-
103
-
104
-
105
-
106
-
107
-
108
-
109
-
110
-
111
-
112
-
113
-
114
-
115
-
116
-
117
-
118
-
119
-
120
-
121
-
122
-
123
-
124
-
125
-
126
-
127
-
128
-
129
-
130
-
131
-
132
-
133
-
134
-
135
-
136
-
137
-
138
-
139
-
140
-
141
-
142
-
 143
143 -
 144
144 -
 145
145 -
 146
146 -
 147
147 -
 148
148 -
 149
149 -
 150
150 -
 151
151 -
 152
152 -
 153
153 -
154
-
155
-
156
-
157
-
158
-
159
-
160
-
161
-
162
-
163
-
164
-
165
-
166
-
167
-
168
-
169
-
170
-
171
-
172
-
173
-
174
-
175
-
176
-
177
-
178
-
179
-
180
-
181
-
182
-
183
-
184
-
185
-
186
-
187
-
188
-
189
-
190
-
191
-
192
-
193
-
194
-
195
-
196
-
197
-
198
-
199
-
200
-
201
-
202
-
203
-
204
-
205
-
206
-
207
-
208
-
209
-
210
-
211
-
212
-
213
-
214
-
215
-
216
-
217
-
218
-
219
-
220
-
221
-
222
-
223
-
224
-
225
-
226
-
227
-
228
-
229
-
230
-
231
-
232
-
233
-
234
-
235
-
236
-
237
-
238
-
239
-
240
-
241
-
242
-
243
-
244
-
245
-
246
-
247
-
248
-
249
-
250
-
251
-
252
-
253
-
254
-
255
-
256
-
257
-
258
-
259
-
260
-
261
-
262
-
263
-
264
-
265
-
266
-
267
-
268
-
269
-
270
-
271
-
272
-
273
-
274
-
275
-
276
-
277
-
278
-
279
-
280
-
281
-
282
-
283
-
284
-
285
-
286
-
287
-
288
-
289
-
290
-
291
-
292
-
293
-
294
-
295
-
296
-
297
-
298
-
299
-
300
-
301
-
302
-
303
-
304
-
305
-
306
-
307
-
308
-
309
-
310
-
311
-
312
-
313
-
314
-
315
-
316
-
317
-
318
-
319
-
320
-
321
-
322
-
323
-
324
-
325
-
326
-
327
-
328
-
329
-
330
-
331
-
332
-
333
-
334
-
335
-
336
-
337
-
338
-
339
-
340
-
341
-
342
-
343
-
344
-
345
-
346
-
347
-
348
-
349
-
350
-
351
-
352
-
353
-
354
-
355
-
356
-
357
-
358
-
359
-
360
-
361
-
362
-
363
-
364
-
365
-
366
-
367
-
368
-
369
-
370
-
371
-
372
-
373
-
374
-
375
-
376
-
377
-
378
-
379
-
380
-
381
-
382
-
383
-
384
-
385
-
386
 |
 |