ATI X1900 User Guide - Page 19
Advanced Installation: PCIe
 |
UPC - 727419413213
View all ATI X1900 manuals
Add to My Manuals
Save this manual to your list of manuals |
Page 19 highlights
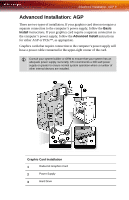
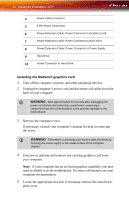
Advanced Installation: PCIe™ 11 6 Align your ATI graphics card with the slot and press it in firmly until the card is fully seated. 7 Remove the power cable from the hard drive power connector. 8 Connect the power extension cable to the 4-pin power connection on the graphics card. 9 Connect the power extension cable to the power supply. 10 Connect the power extension cable to the hard drive. 11 Screw in or fasten the graphics card securely. Make sure the cables are not interfering with anything inside the computer (for example, a cooling fan) and replace the computer cover. 12 Reconnect any cables you have disconnected and plug in the computer's power cord. 13 Turn on the monitor, and then your computer. L Your computer will beep, possibly show a warning message on your display, and the boot process will stop if the graphics card is not correctly connected to the power supply. Advanced Installation: PCIe™ There are two types of installation. If your Radeon® graphics card does not require a separate connection to the computer's power supply, follow the Basic Install instructions. If your graphics card require a separate connection to the computer's power supply, follow the Advanced Install instructions for either AGP or PCIe™, as appropriate. Radeon® graphics cards that require connection to the computer's power supply will have a power cable connected to them. L Consult your system builder or OEM to ensure that your system has an adequate power supply. A PCI Express® compatible system has a specialized 12V graphics card power connector. A 450 watt or greater power supply is recommended. Consult your computer system manual to ensure the power supply is designed to accommodate a high-end graphics card with a peak dissipation above 75 watts.
-
 1
1 -
2
-
3
-
4
-
5
-
6
-
7
-
8
-
9
-
10
-
11
-
12
-
13
-
 14
14 -
 15
15 -
 16
16 -
 17
17 -
 18
18 -
 19
19 -
 20
20 -
 21
21 -
 22
22 -
 23
23 -
 24
24 -
25
-
26
-
27
-
28
-
29
-
30
-
31
-
32
-
33
-
34
-
35
-
36
-
37
-
38
-
39
-
40
-
41
-
42
-
43
-
44
-
45
-
46
-
47
-
48
-
49
-
50
-
51
-
52
-
53
-
54
-
55
-
56
-
57
-
58
-
59
-
60
-
61
-
62
-
63
-
64
-
65
-
66
-
67
-
68
-
69
-
70
-
71
-
72
-
73
-
74
-
75
-
76
-
77
-
78
-
79
-
80
-
81
-
82
-
83
-
84
-
85
-
86
-
87
-
88
-
89
-
90
-
91
-
92
-
93
-
94
-
95
-
96
-
97
-
98
-
99
-
100
-
101
-
102
-
103
-
104
-
105
-
106
-
107
-
108
-
109
-
110
-
111
-
112
-
113
-
114
-
115
-
116
-
117
-
118
-
119
-
120
-
121
-
122
-
123
-
124
-
125
-
126
-
127
-
128
-
129
-
130
-
131
-
132
-
133
-
134
-
135
-
136
-
137
-
138
-
139
-
140
-
141
-
142
-
143
-
144
-
145
-
146
-
147
-
148
-
149
-
150
-
151
-
152
-
153
-
154
-
155
-
156
-
157
-
158
-
159
-
160
 |
 |
