Brother International DCP-8060 Users Manual - English - Page 68
Black Spots at 3.7 in. 94 mm, Hollow print - drum unit
 |
UPC - 012502615064
View all Brother International DCP-8060 manuals
Add to My Manuals
Save this manual to your list of manuals |
Page 68 highlights
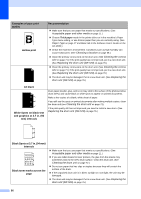
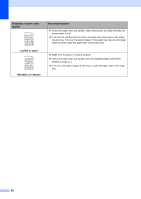
Examples of poor print quality Hollow print Recommendation „ Make sure that you use paper that meets our specifications. (See Acceptable paper and other media on page 11.) „ Choose Thick paper mode in the printer driver or in the machine's Paper Type menu setting, or use thinner paper than you are currently using. (See Paper Type on page 17 and Basic tab in the Software User's Guide on the CD-ROM.) „ Check the machine's environment. Conditions such as high humidity can cause hollow print. (See Choosing a location on page 38.) „ Clean the primary corona wire on the drum unit. (See Cleaning the corona wire on page 71.) If the print quality has not improved, put in a new drum unit. (See Replacing the drum unit (DR-520) on page 76.) „ Clean the primary corona wire on the drum unit. (See Cleaning the corona wire on page 71.) If the print quality has not improved, put in a new drum unit. (See Replacing the drum unit (DR-520) on page 76.) „ The drum unit may be damaged. Put in a new drum unit. (See Replacing the drum unit (DR-520) on page 76.) All black White Spots on black text and graphics at 3.7 in. (94 mm) intervals Dust, paper powder, glue, and so on may stick to the surface of the photosensitive drum (OPC) and cause black or white spots to appear on printed documents. Make a few copies of a blank, white sheet of paper. If you still see the spots on printed documents after making multiple copies, clean the drum unit (see Cleaning the drum unit on page 72). If the print quality still has not improved you need to install a new drum. (See Replacing the drum unit (DR-520) on page 76.) Black Spots at 3.7 in. (94 mm) intervals ABCDEFGH abcdefghijk ABCD abcde 01234 Black toner marks across the page „ Make sure that you use paper that meets our specifications. (See Acceptable paper and other media on page 11.) „ If you use label sheets for laser printers, the glue from the sheets may sometimes stick to the OPC drum surface. Clean the drum unit. (See Cleaning the drum unit on page 72.) „ Do not use paper that has clips or staples because they will scratch the surface of the drum. „ If the unpacked drum unit is in direct sunlight or room light, the unit may be damaged. „ The drum unit may be damaged. Put in a new drum unit. (See Replacing the drum unit (DR-520) on page 76.) 56
-
 1
1 -
2
-
3
-
4
-
5
-
6
-
7
-
8
-
9
-
10
-
11
-
12
-
13
-
14
-
15
-
16
-
17
-
18
-
19
-
20
-
21
-
22
-
23
-
24
-
25
-
26
-
27
-
28
-
29
-
30
-
31
-
32
-
33
-
34
-
35
-
36
-
37
-
38
-
39
-
40
-
41
-
42
-
43
-
44
-
45
-
46
-
47
-
48
-
49
-
50
-
51
-
52
-
53
-
54
-
55
-
56
-
57
-
58
-
59
-
60
-
61
-
62
-
 63
63 -
 64
64 -
 65
65 -
 66
66 -
 67
67 -
 68
68 -
 69
69 -
 70
70 -
 71
71 -
 72
72 -
 73
73 -
74
-
75
-
76
-
77
-
78
-
79
-
80
-
81
-
82
-
83
-
84
-
85
-
86
-
87
-
88
-
89
-
90
-
91
-
92
-
93
-
94
-
95
-
96
-
97
-
98
-
99
-
100
-
101
-
102
-
103
-
104
-
105
-
106
-
107
-
108
-
109
-
110
-
111
-
112
-
113
-
114
-
115
-
116
 |
 |
