Brother International KE-436C Instruction Manual - English - Page 18
INSTALLATION, 14-1. Installing the air unit, 14-2. Adjusting the speed controller
 |
View all Brother International KE-436C manuals
Add to My Manuals
Save this manual to your list of manuals |
Page 18 highlights
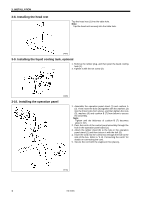
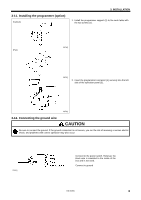
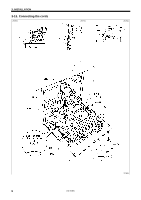
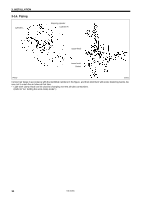
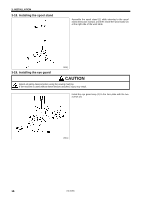
3-14-1. Installing the air unit Make sure that the air unit does not touch the control box or the work table leg. 2680Q 3. INSTALLATION 1093Q Fig. 1 2681Q 2598Q 1. Remove the two screws (1) and the valve setting plate (2). 2. Turn the valve setting plate (2) upside down, and install it to the underside of the work table using the two wood screws (3) and washers (4) which are provided as accessories. * At this time, install the valve setting plate (2) in a position where it will not be in the way when using the machine. (The recommended installation position is shown in Figure 1.) 3. Install the ground cord (5) to the machine head. 4. Install the air unit (6) to the valve setting plate (2) with two screws (1). 5. Connect the air hose (7). 6. Adjust the air pressure. (Refer to "9-14. Adjusting the air pressure".) 1. Make holes in the beam as shown in the illustration above. (Button hole diameter is 5.4 mm. The pitch is 50mm.) 2. Install the air unit (8) to the beam with two accessory screws (9) and two bolts (10). 3. Install the ground cord (11) to the machine head. 4. Connect the air hose (12). 5. Adjust the air pressure. (Refer to "9-14. Adjusting the air pressure".) 3-14-2. Adjusting the speed controller The speeds at which the work clamps are raised and lowered can be adjusted by loosening or tightening the valve control knobs. The speeds should be adjusted to speeds which are suitable for the intended application. • If the upper control knob is tightened, the raising speed becomes slower; if it is loosened, the raising speed becomes faster. • If the lower control knob is tightened, the lowering speed becomes slower; if it is loosened, the lowering speed becomes faster. • When the power is turned off, the work clamps can be operated by pressing the switch. Note: Adjust the control knobs so that the left and right work clamps both operate at the same speed. (Valve 1 and 2) Adjust the control knobs so that the stepping work clamp operates more quickly. (Valve 3) KE-436C 12
-
 1
1 -
2
-
3
-
4
-
5
-
6
-
7
-
8
-
9
-
10
-
11
-
12
-
 13
13 -
 14
14 -
 15
15 -
 16
16 -
 17
17 -
 18
18 -
 19
19 -
 20
20 -
 21
21 -
 22
22 -
 23
23 -
24
-
25
-
26
-
27
-
28
-
29
-
30
-
31
-
32
-
33
-
34
-
35
-
36
-
37
-
38
-
39
-
40
-
41
-
42
-
43
-
44
-
45
-
46
-
47
-
48
-
49
-
50
-
51
-
52
-
53
-
54
-
55
-
56
-
57
-
58
-
59
-
60
-
61
-
62
-
63
-
64
-
65
-
66
-
67
-
68
-
69
-
70
-
71
-
72
-
73
 |
 |
