Brother International KE-436C Instruction Manual - English - Page 20
Installing the needle sub plate, height of the needle sub plate 3 so that it is at the same
 |
View all Brother International KE-436C manuals
Add to My Manuals
Save this manual to your list of manuals |
Page 20 highlights
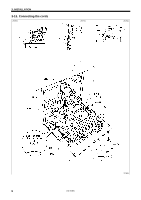
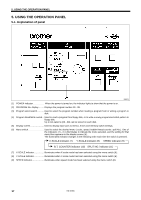
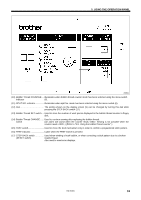
3. INSTALLATION 3-17. Installing the needle sub plate 2599Q 1. Install the four needle sub plate supports (1) with the four screws (2). 2. Insert the needle sub plate (3) from the front of the machine so that it is level. Note: Insert the needle sub plate (3) so that the X feed lever cap (4) sits on top of the needle sub plate (3). 3. Install the needle sub plate (3) with the four screws (5). 4. Loosen the screws (2) and make fine adjustments to the height of the needle sub plate (3) so that it is at the same height as the needle plate (6). 2600Q 5. Provisionally secure the two auxiliary plate supports (7) with the washers (8) and the screws (9) and (10), and then firmly tighten the screws (9) and (10) in that order. 2601Q KE-436C 14
-
 1
1 -
2
-
3
-
4
-
5
-
6
-
7
-
8
-
9
-
10
-
11
-
12
-
13
-
14
-
 15
15 -
 16
16 -
 17
17 -
 18
18 -
 19
19 -
 20
20 -
 21
21 -
 22
22 -
 23
23 -
 24
24 -
 25
25 -
26
-
27
-
28
-
29
-
30
-
31
-
32
-
33
-
34
-
35
-
36
-
37
-
38
-
39
-
40
-
41
-
42
-
43
-
44
-
45
-
46
-
47
-
48
-
49
-
50
-
51
-
52
-
53
-
54
-
55
-
56
-
57
-
58
-
59
-
60
-
61
-
62
-
63
-
64
-
65
-
66
-
67
-
68
-
69
-
70
-
71
-
72
-
73
 |
 |

3. INSTALLATION
14
KE-436C
3-17. Installing the needle sub plate
1.
Install the four needle sub plate supports (1) with the four
screws (2).
2. Insert the needle sub plate (3) from the front of the
machine so that it is level.
Note:
Insert the needle sub plate (3) so that the X feed lever
cap (4) sits on top of the needle sub plate (3).
3.
Install the needle sub plate (3) with the four screws (5).
4.
Loosen the screws (2) and make fine adjustments to the
height of the needle sub plate (3) so that it is at the same
height as the needle plate (6).
5. Provisionally secure the two auxiliary plate supports (7)
with the washers (8) and the screws (9) and (10), and
then firmly tighten the screws (9) and (10) in that order.
2601Q
2599Q
2600Q